usethis::use_git_config(
  user.name = "Your name",
  user.email = "Email associated with your GitHub account"
)Lab 0
Mise en place
Lab
Due: End of lab on Thurs, Aug 27
Find your teammates
… and sit with them!
Mise en place (French pronunciation: [mi zɑ̃ ˈplas]) is a French culinary phrase which means “putting in place” or “gather”. It refers to the setup required before cooking, and is often used in professional kitchens to refer to organizing and arranging the ingredients (e.g., cuts of meat, relishes, sauces, par-cooked items, spices, freshly chopped vegetables, and other components) that a cook will require for the menu items that are expected to be prepared during a shift.1

This lab is all about setting up your computing environment for the course and putting in place all the bits and bobbles you’ll need for the rest of the semester. It’s about getting to know each other and the teaching team.
And just like the mise an place phase for cooking something that is new to you, it might not be entirely clear how everything will come together at the end. Hang in there, and it’ll all start to make sense by the end of the week. And you’ll be a pro at it all just in time for the first assignment!
Hello, World!
Computational toolkit
You may have heard/seen this phrase, Hello, World!, elsewhere before. It’s usually the first thing you learn in programming – to write a computer program to print this sentence to the screen. Things will be different in this course, as it’s not a programming course, but a data science course. In this course, you’ll learn to use a computing language (called R) to work with data.
But today, we need to set you up for success! Let’s first briefly review the components of the computational toolkit for the course:
R: The programming language you’ll learn in this course.
-
Positron: The piece of software (a.k.a. the integrated development environment, IDE) you’ll use to write R code in.
NoteR is the name of the programming language itself and Positron is a convenient interface.
-
Quarto: The tool you’ll use to create reproducible computational documents that contain both your narrative (i.e., words in English) and your code (i.e., code in R). Every assignment you hand in will be created using Quarto.
NoteYou might be familiar with word processors like MS Word or Google Docs. We will not be using these in this class. Instead, the words you would write in a word processor, as well as the code, will go into a Quarto document. When you render the document you will get a document out that has your words, your code, and the output of that code. Everything in one place, beautifully formatted!
Git: A version control system.
-
GitHub: A web hosting service for the Git version control system that also allows for transparent collaboration between team members.
NoteGit is a version control system (like the “Track Changes” feature from Microsoft Word but more powerful) and GitHub is the home for your Git-based work on the internet (like DropBox but much better).
Set up GitHub
Sign in to your GitHub account
Go to github.com and sign in to your GitHub account. Make sure to sign in with the GitHub username that you submitted in your Getting to know you survey.
What if you don’t have a GitHub account?
If you don’t have a GitHub account, you’ll need to create one. To do so, click on Sign up in the upper right corner of the GitHub page and follow the instructions. You do not have to use your Duke email address for your GitHub account, but I recommend doing so.[^3] Similarly, you do not need to use your real name or your Duke NetID for your GitHub username, but I recommend reviewing the advice at https://happygitwithr.com/github-acct#username-advice before choosing a username.
Haven’t filled out the Getting to know you survey?
STOP HERE AND TALK TO A TA! If you haven’t yet filled out your Getting to know you survey yet or haven’t submitted your GitHub username as part of it, let your TA know your GitHub username asap. This is essential for being able to complete the rest of your lab.
Update your GitHub profile
Once you have created your GitHub account, you should update your profile.
To do so, click on your profile icon in the upper right corner of the GitHub page and select Settings. Then, on the left side of the page, click on Public profile and fill out your profile information. You don’t have to add a profile picture, but it is highly recommended. It will help us get to know you (and recognize you in class) and will also help you get to know your classmates.
Once done, click Update profile near the middle of the page.
Set up Positron
You’ll be doing all of your computing in Positron, which is hosted by Duke OIT in a container. A container is a self-contained instance of Positron for you, and you alone. You will do all of your computing in your container and you access it through a web browser.
Step 1. Go to https://cmgr.oit.duke.edu/containers and login with your Duke NetID and Password.
Step 2. Under Reservations available, click on reserve STA199 to reserve a container for yourself.
-
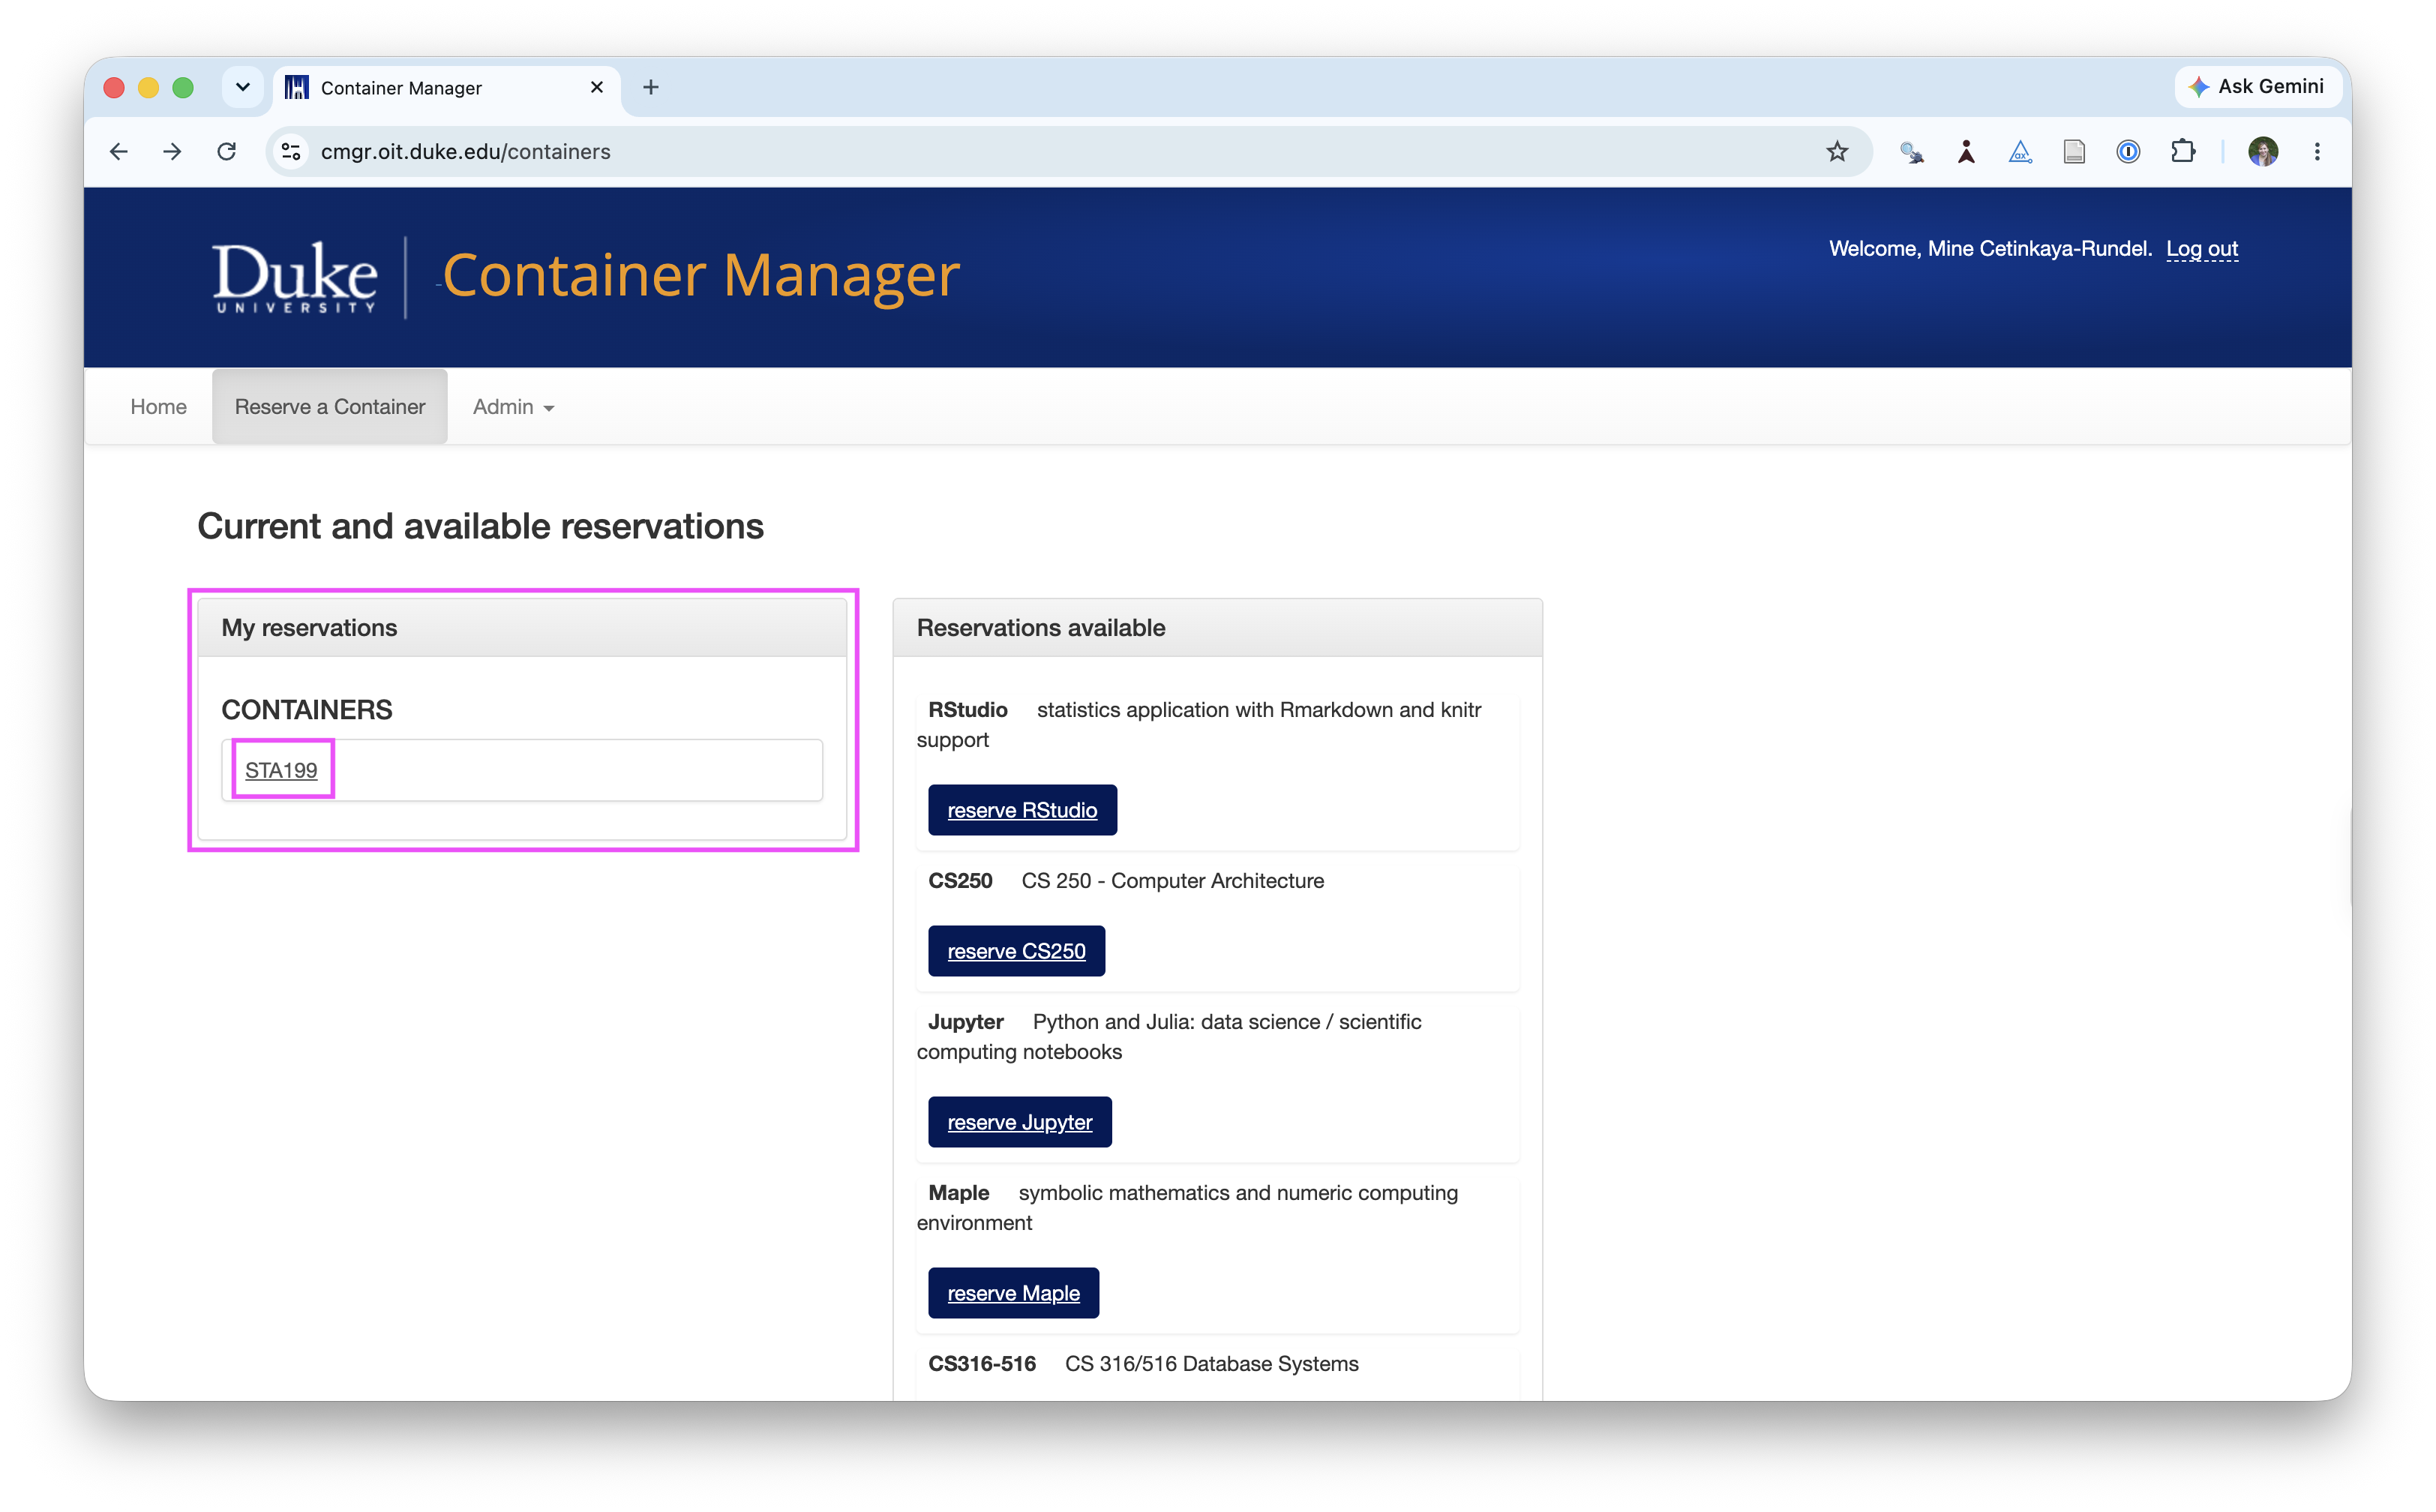
Step 3. Once you’ve reserved the container you’ll see that it will show up under My reservations.
-
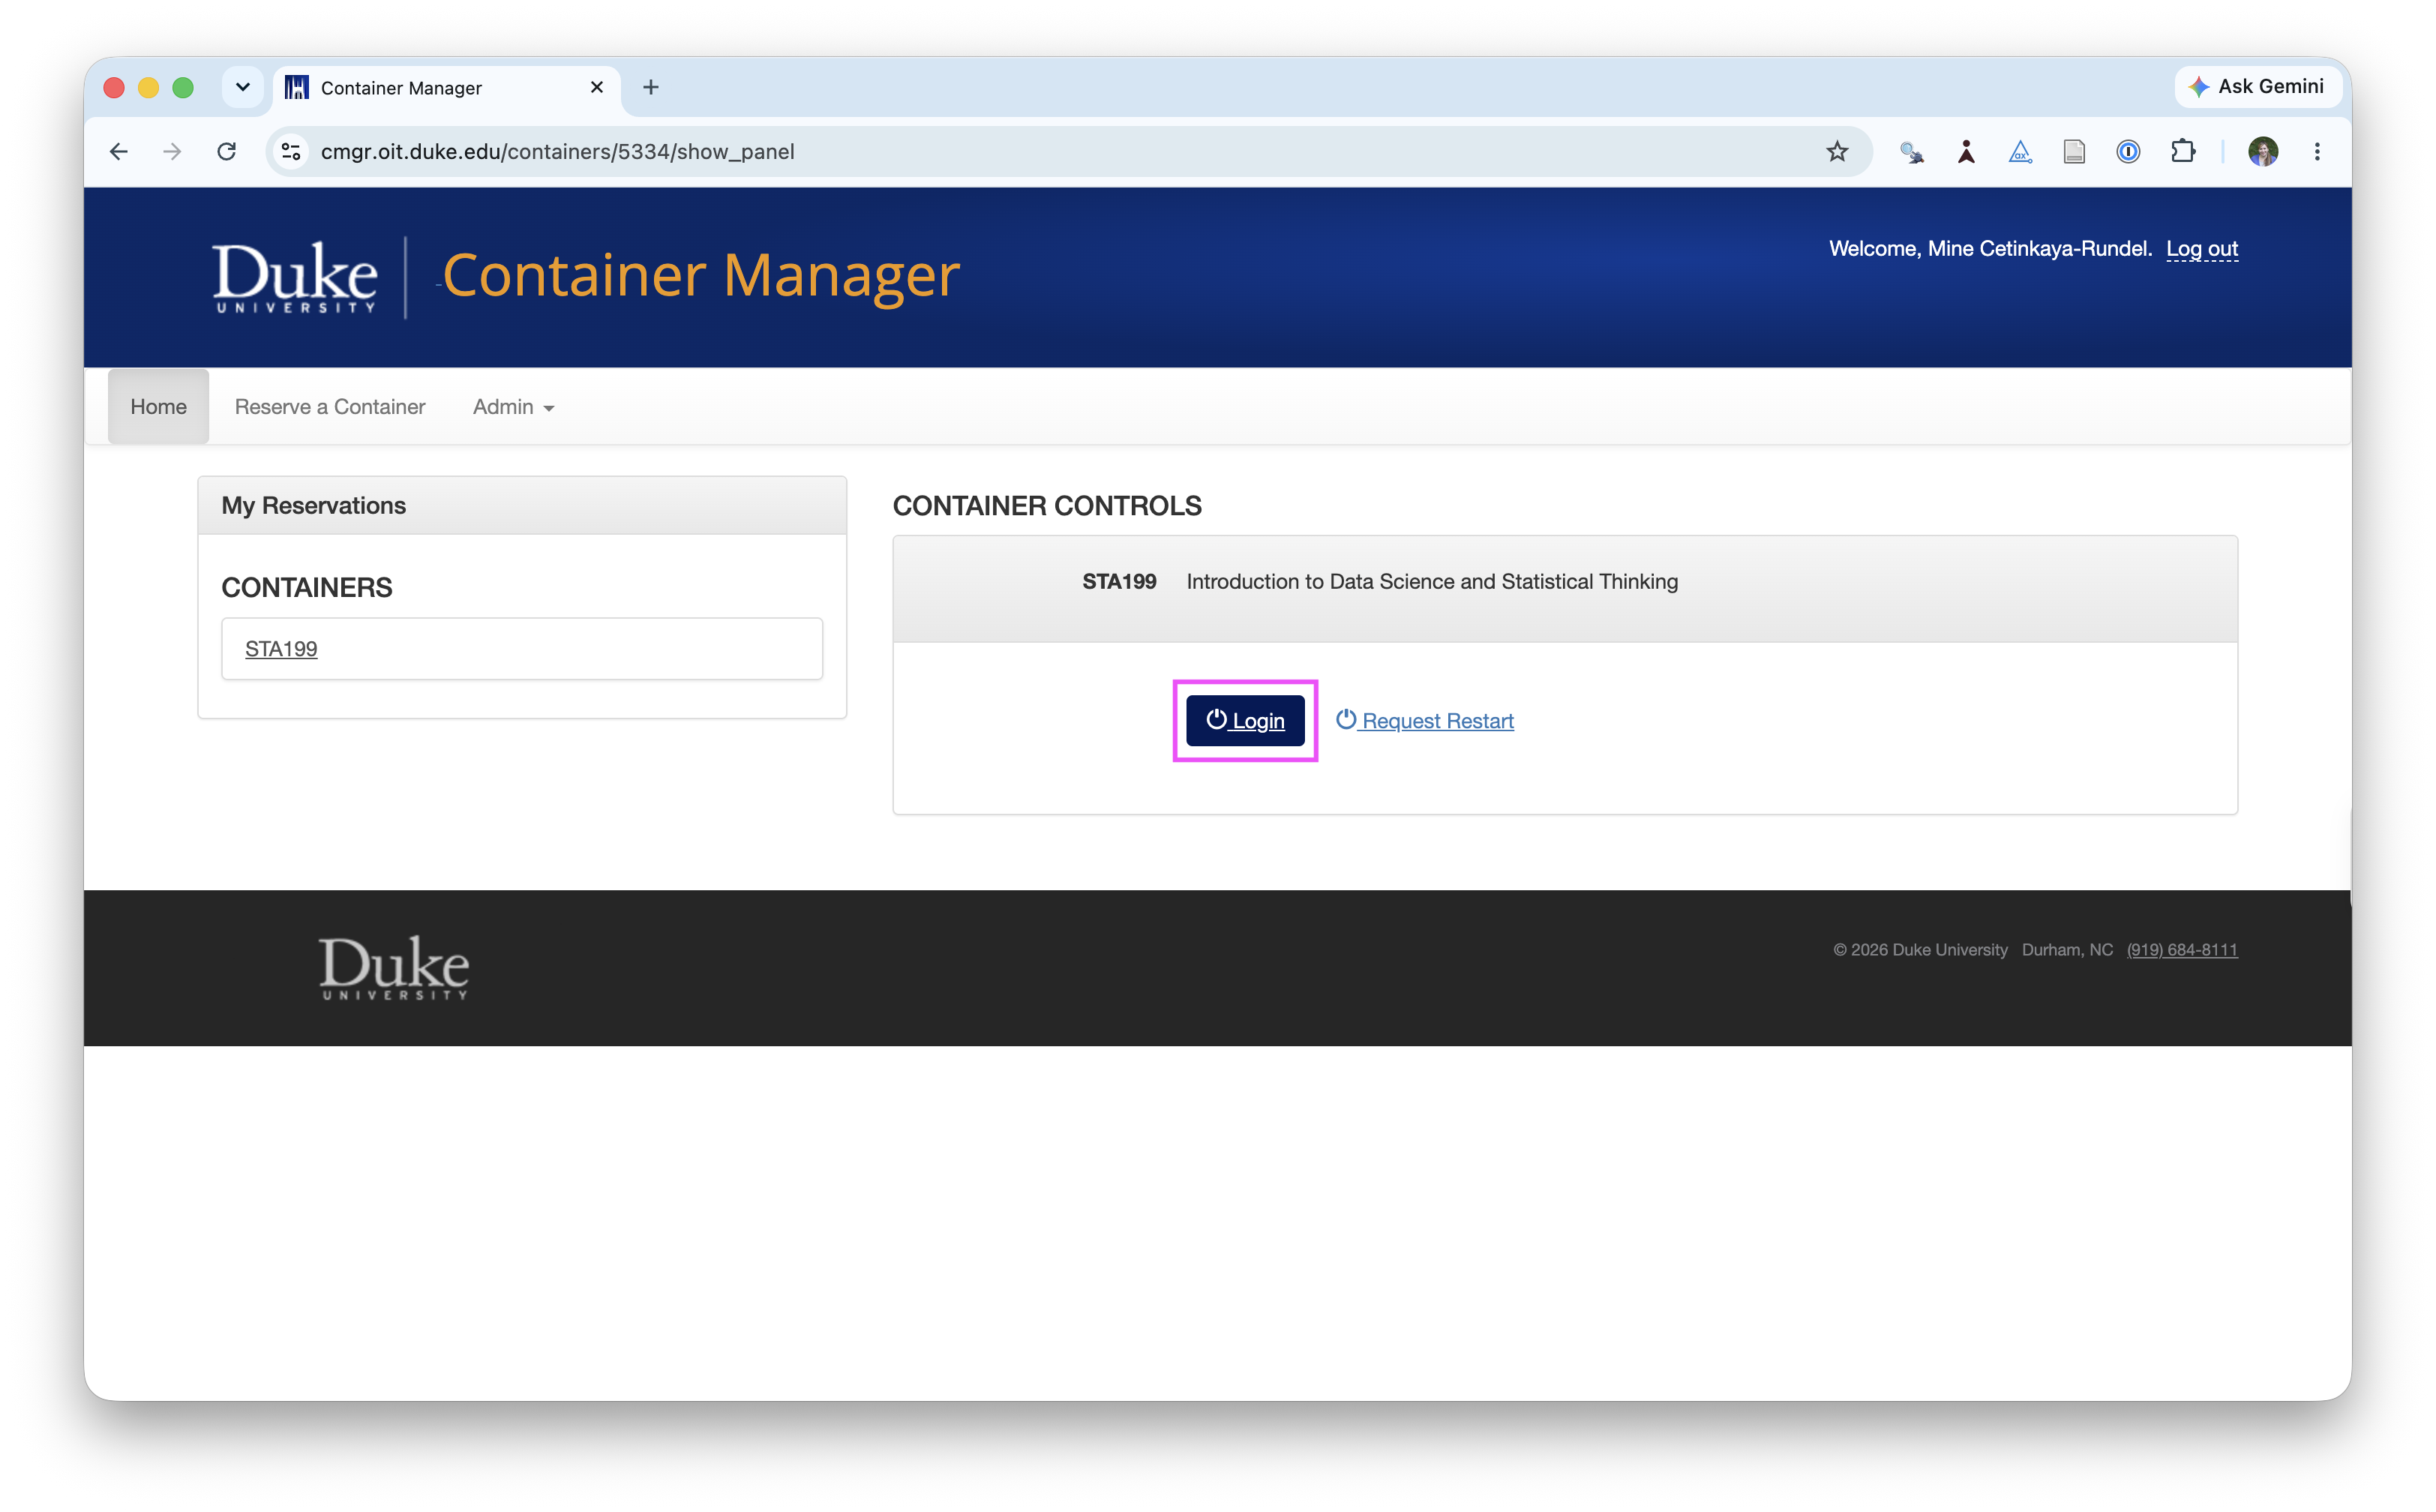
Step 4. To launch your container click on STA199 under My reservations, then click Login.
-
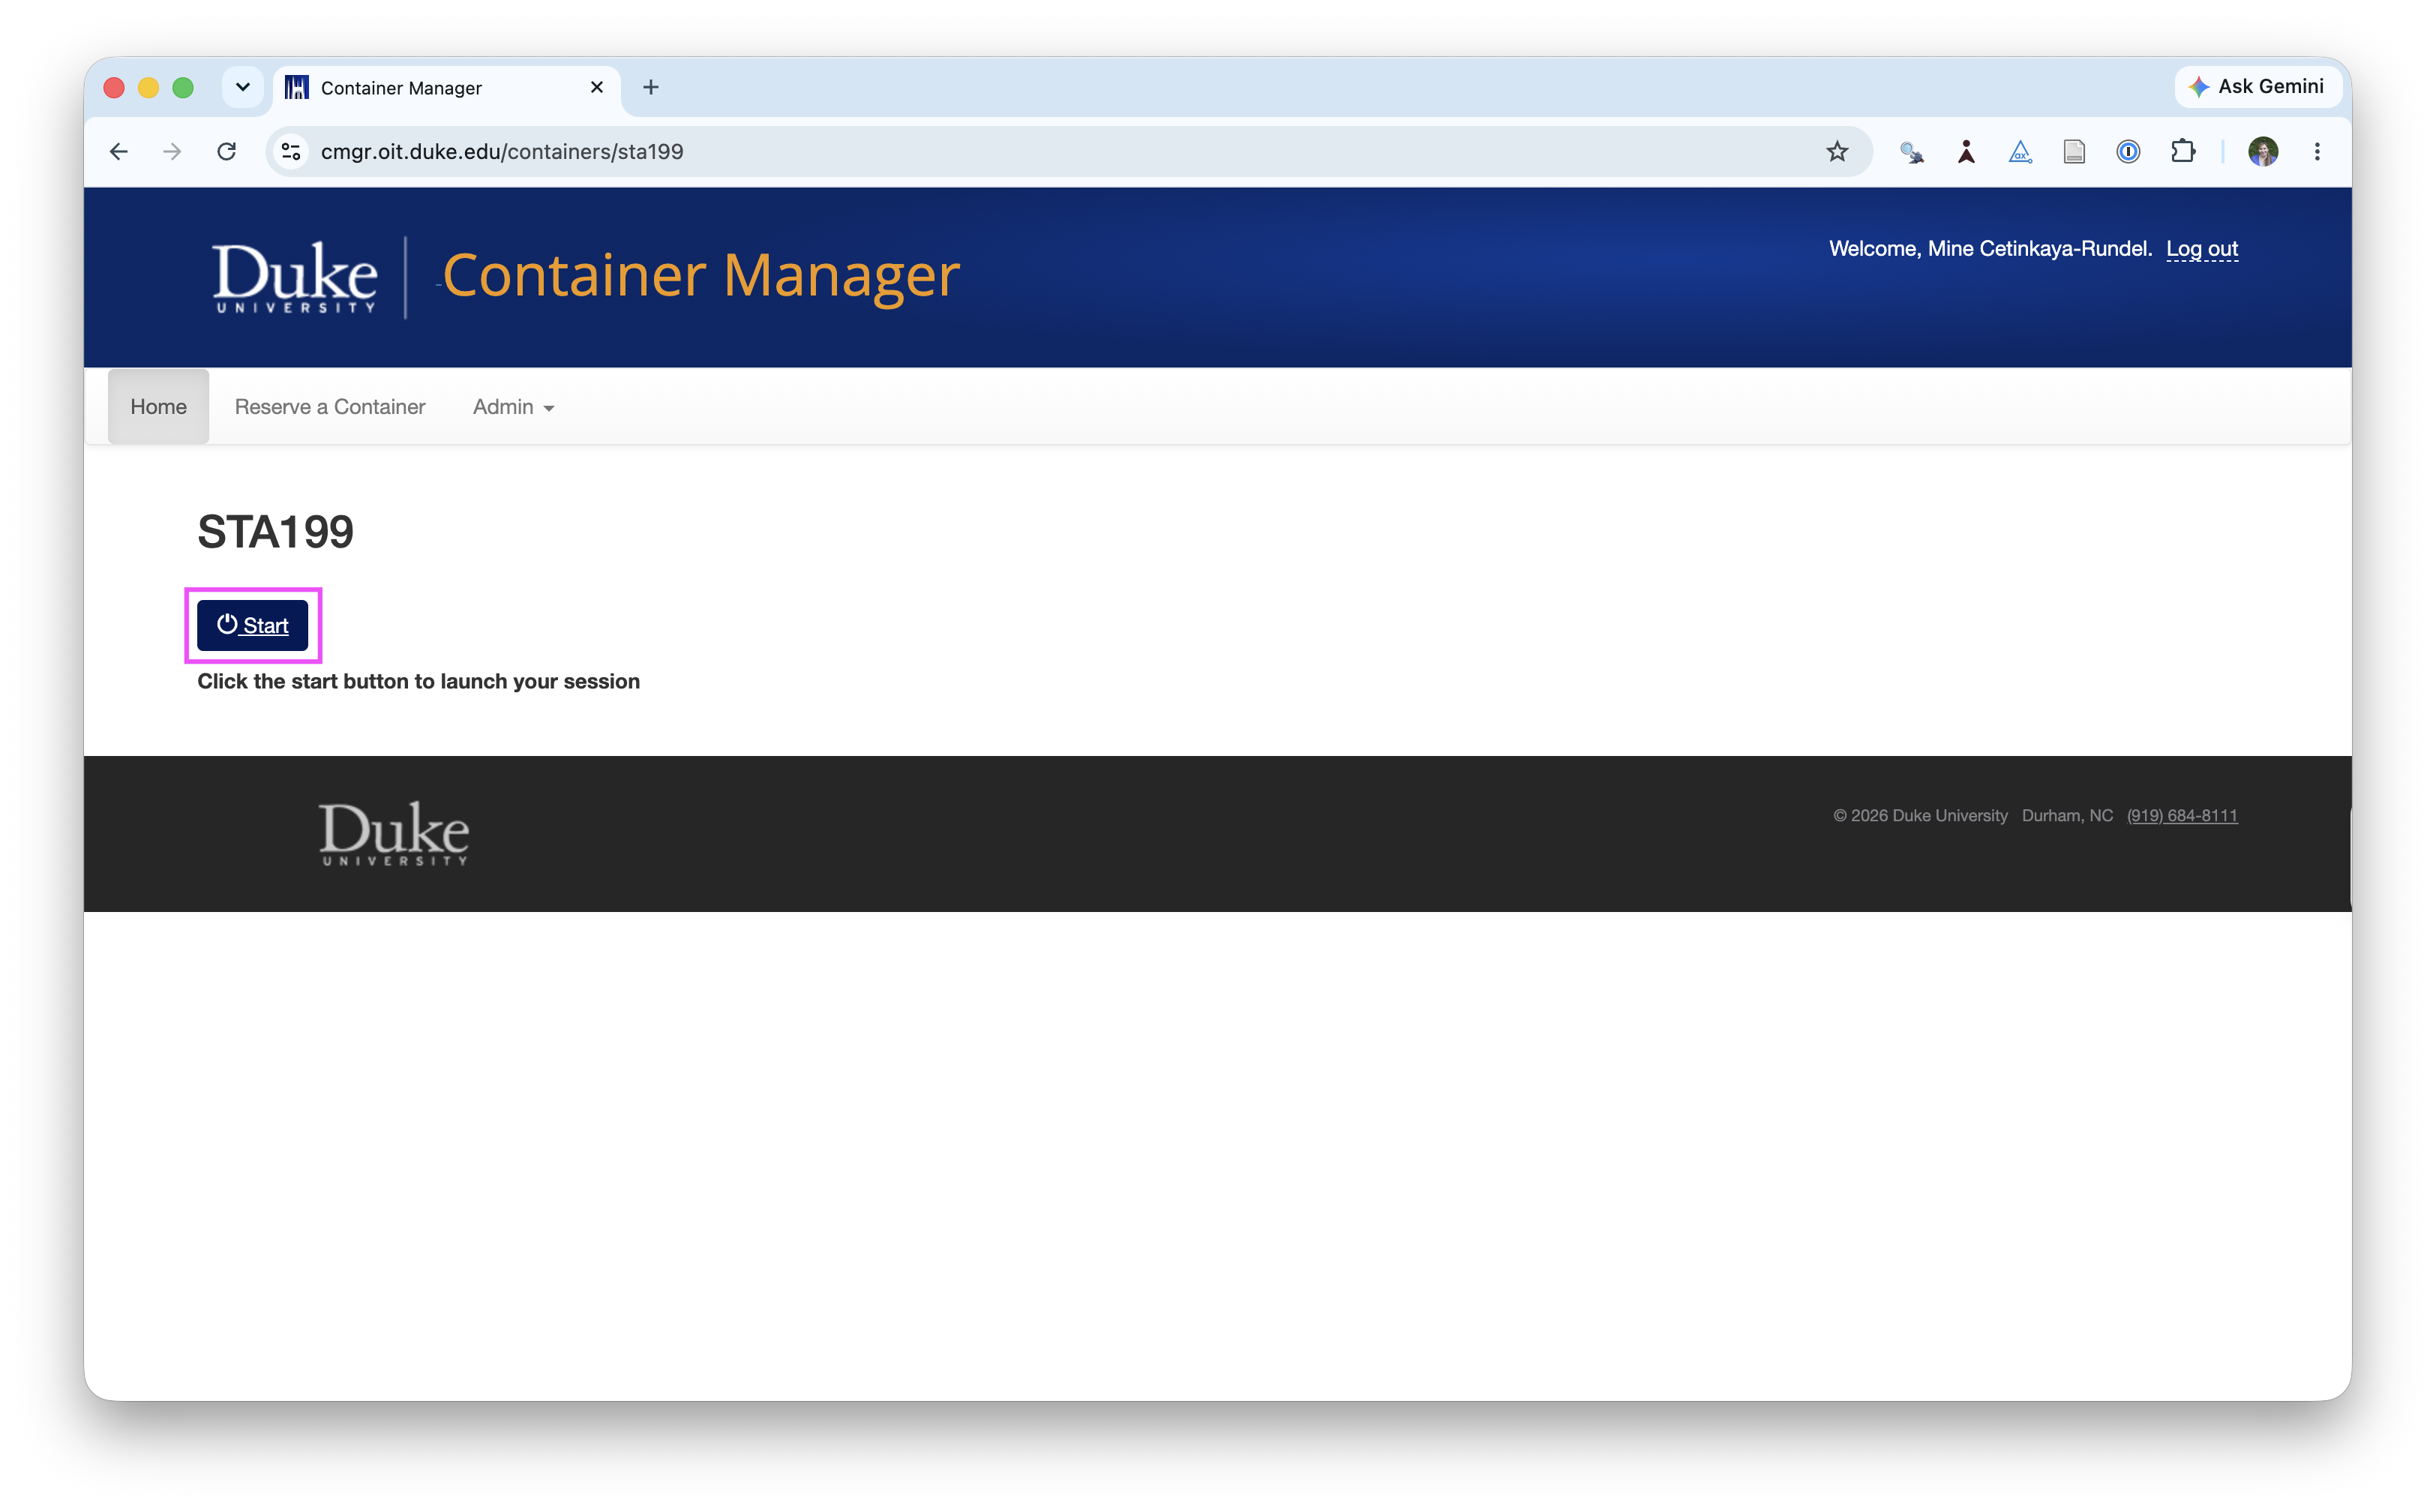
Step 5. Then Start. You should now see the Positron environment.2
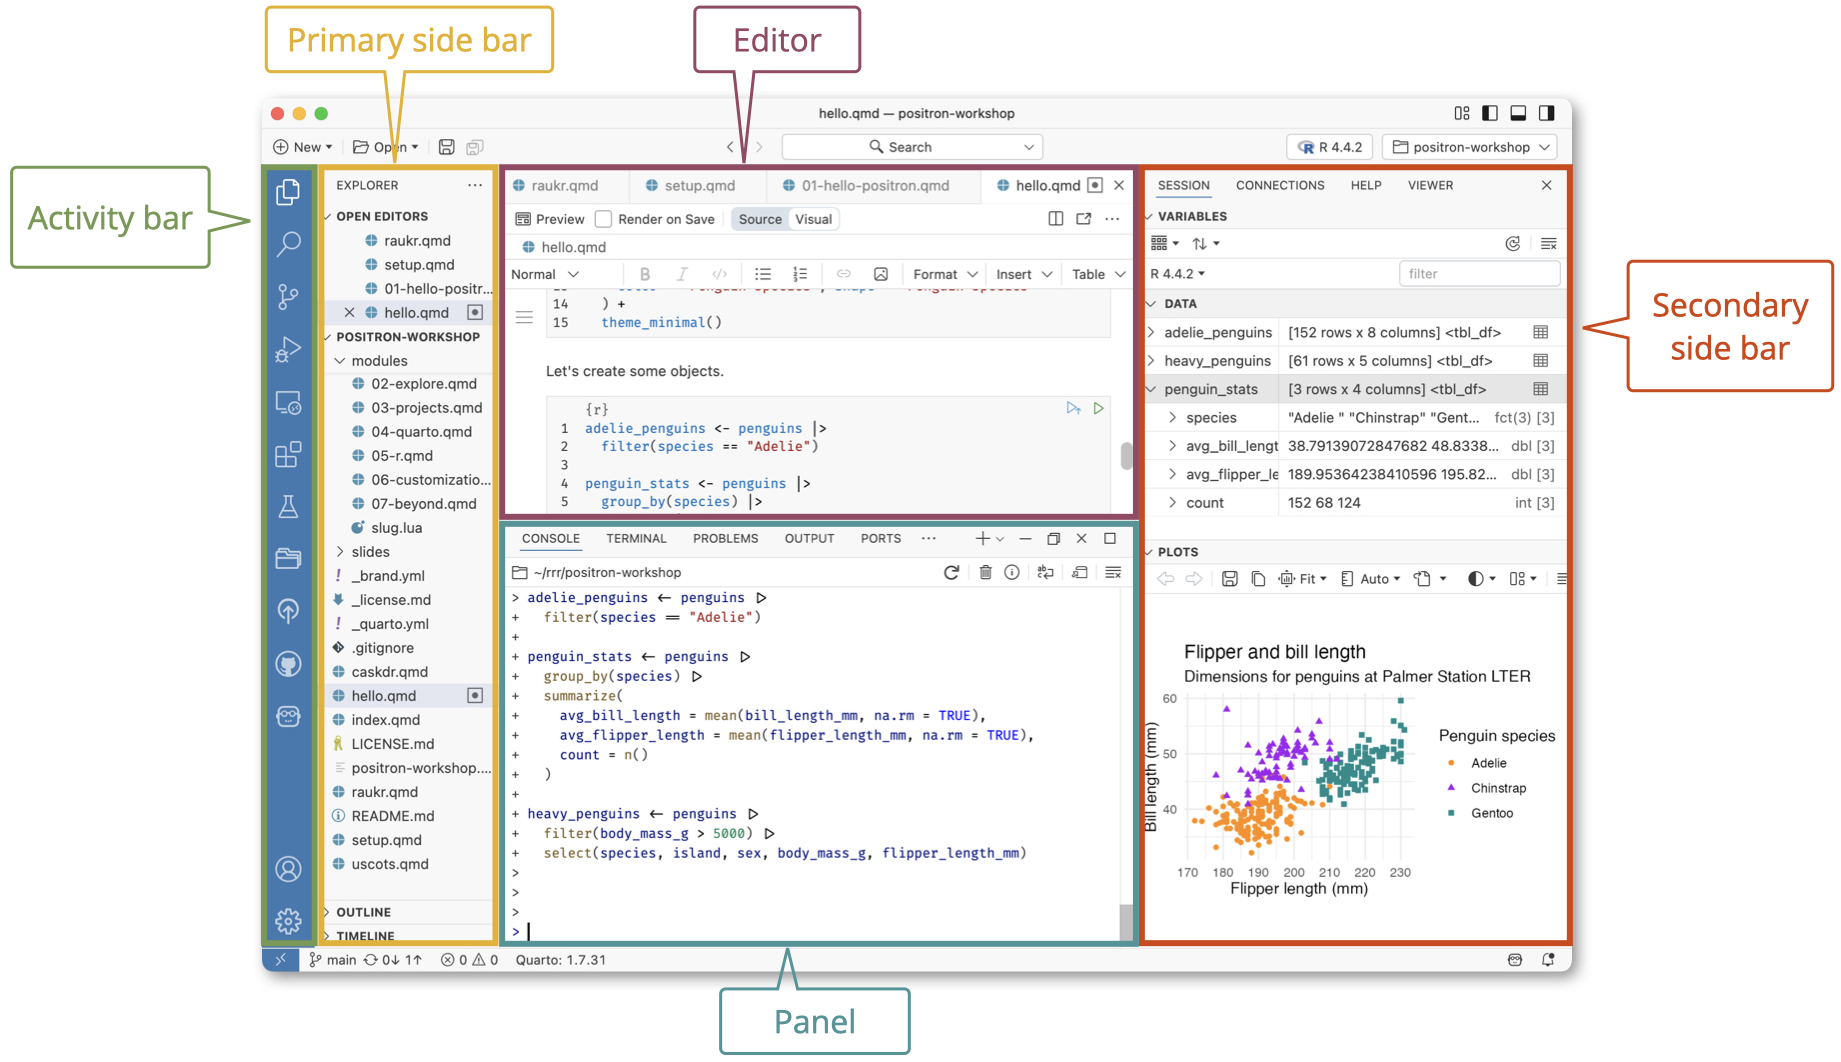
You’ll get acquainted with Positron throughout the semester, but here is the high level overview from yesterday’s lecture to remind you of the terminology and the pieces of the Positron interface.
Connecting the pieces
Sign in to GitHub from Positron
-
Step 1. In Positron, click on the Accounts icon in the lower left of the Activity bar of your Positron window. It should have a red 1 in the lower right of the icon. It may take a minute for everything in your container to finish loading before the red 1 appears.
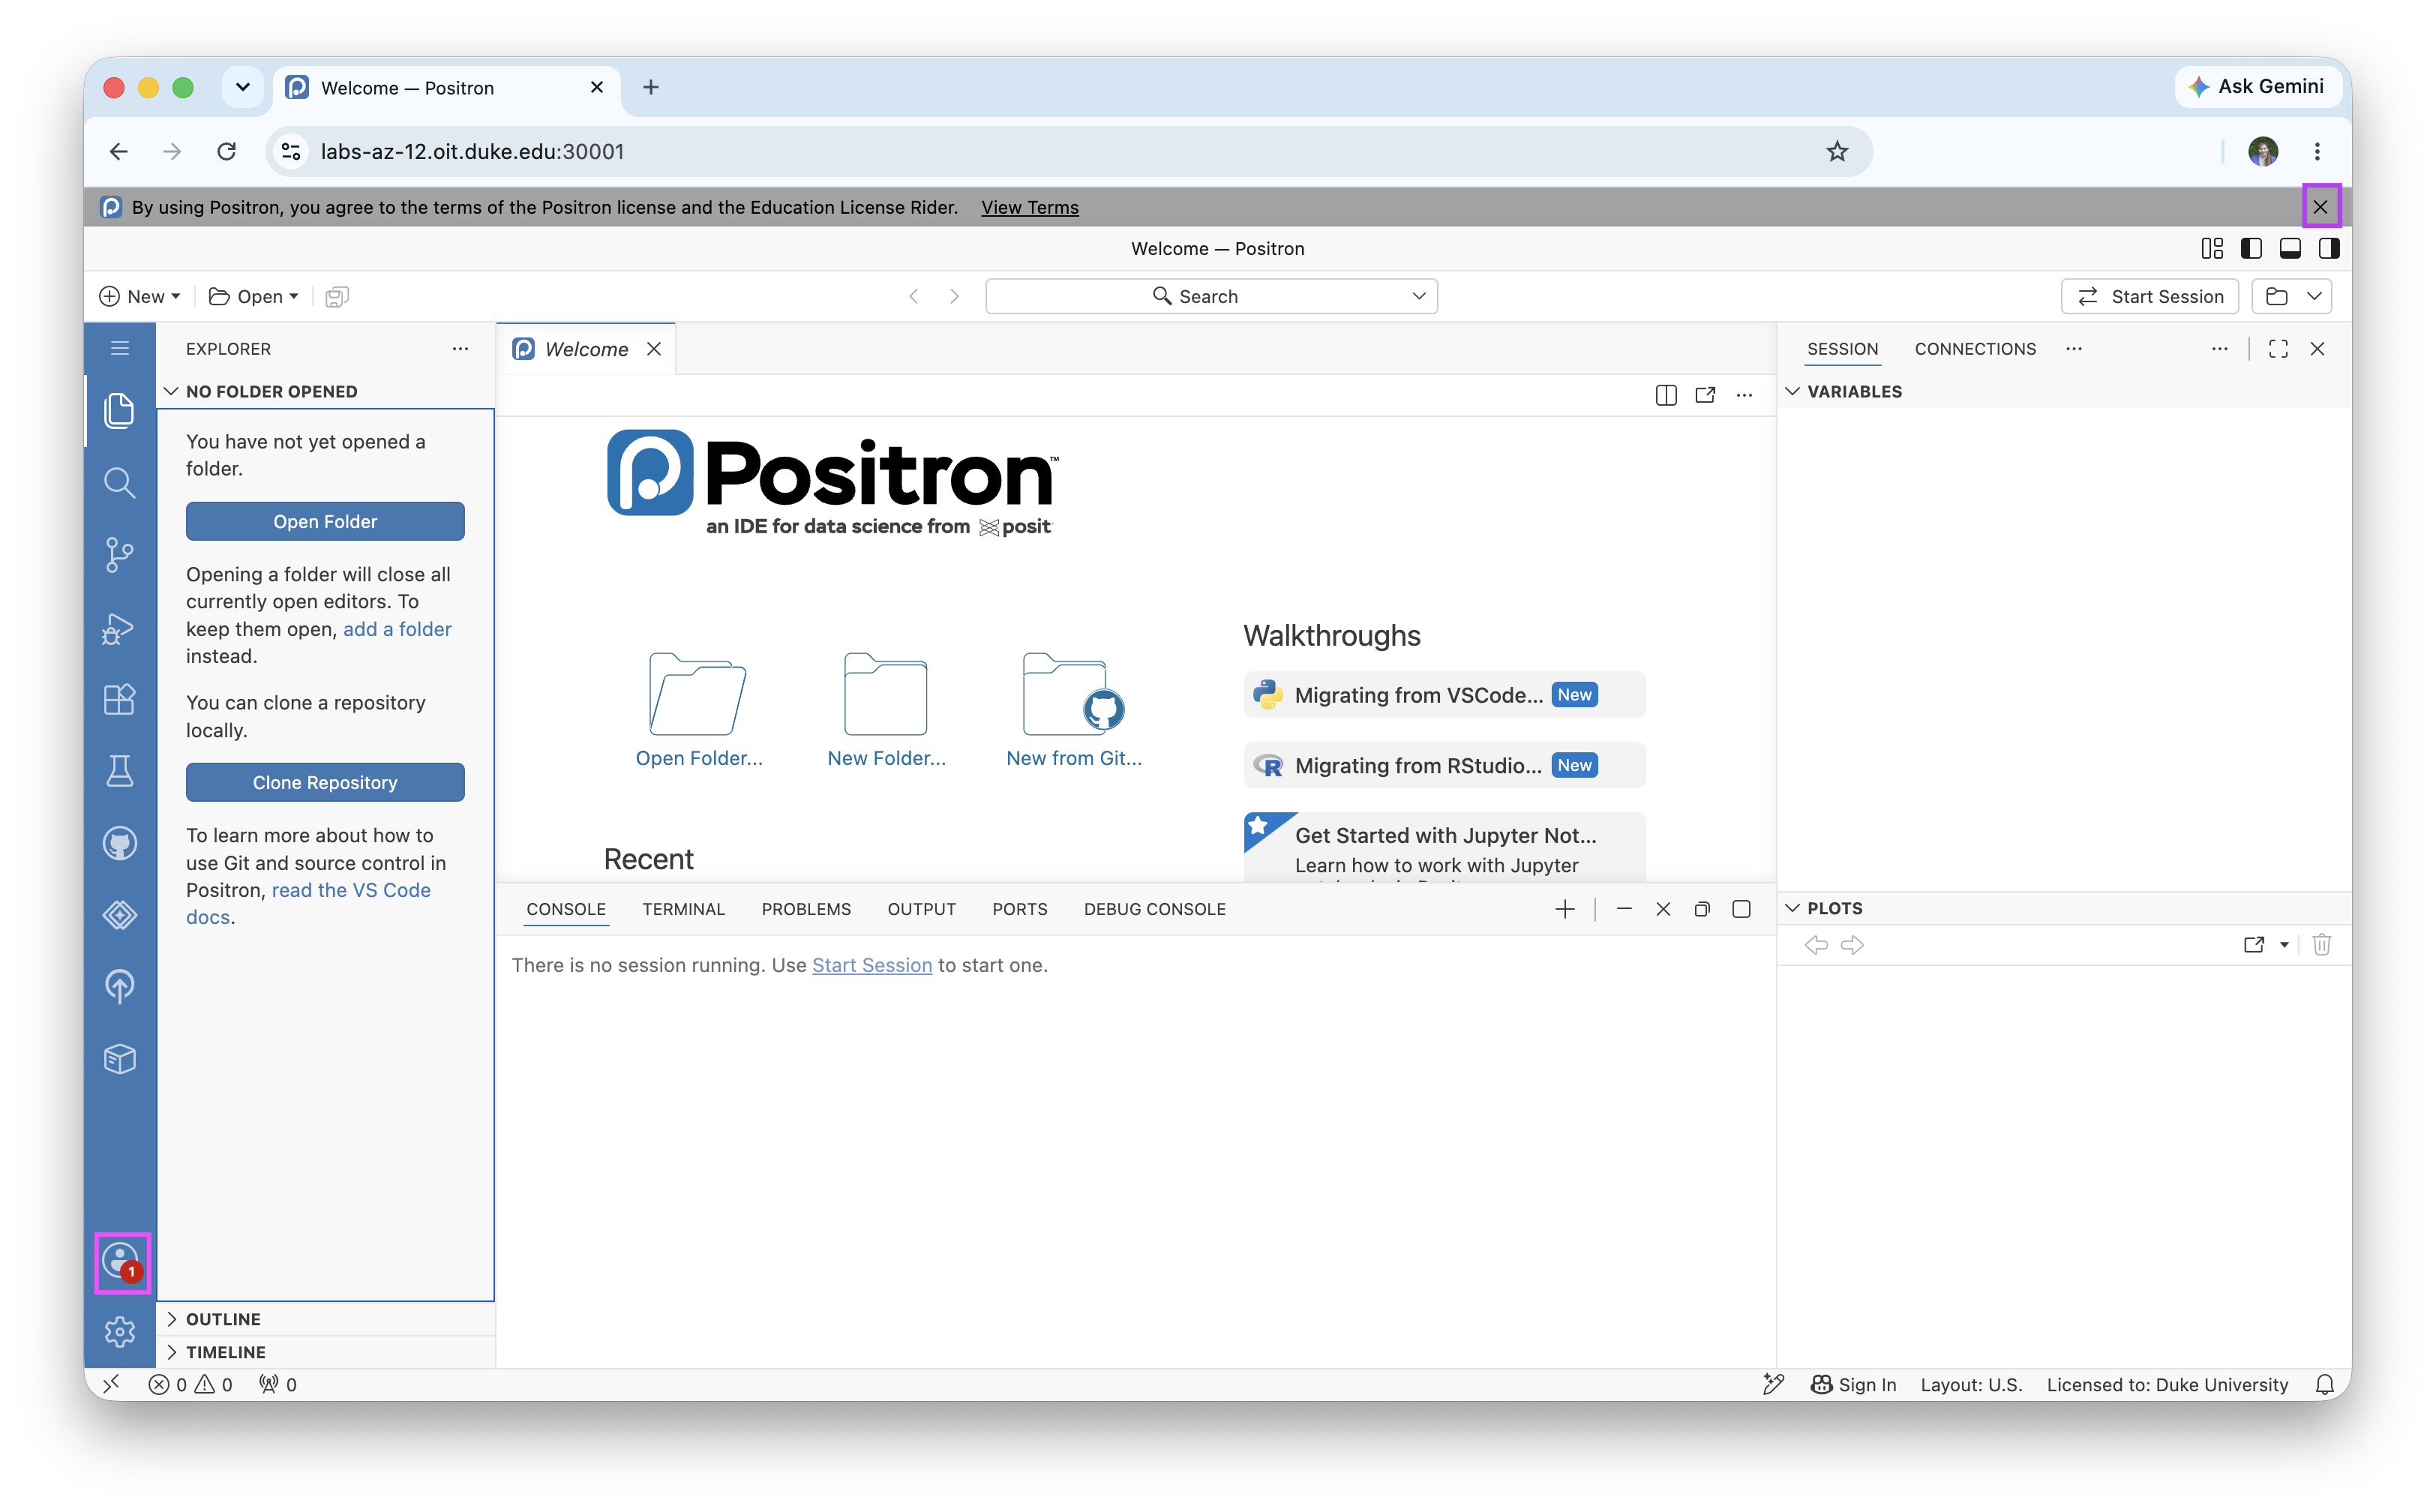
You can also safely stash away the banner that says “By using Positron, you agree to the terms of the Positron license and the Education License Rider.” by clicking on the
xin the upper right corner of the banner. -
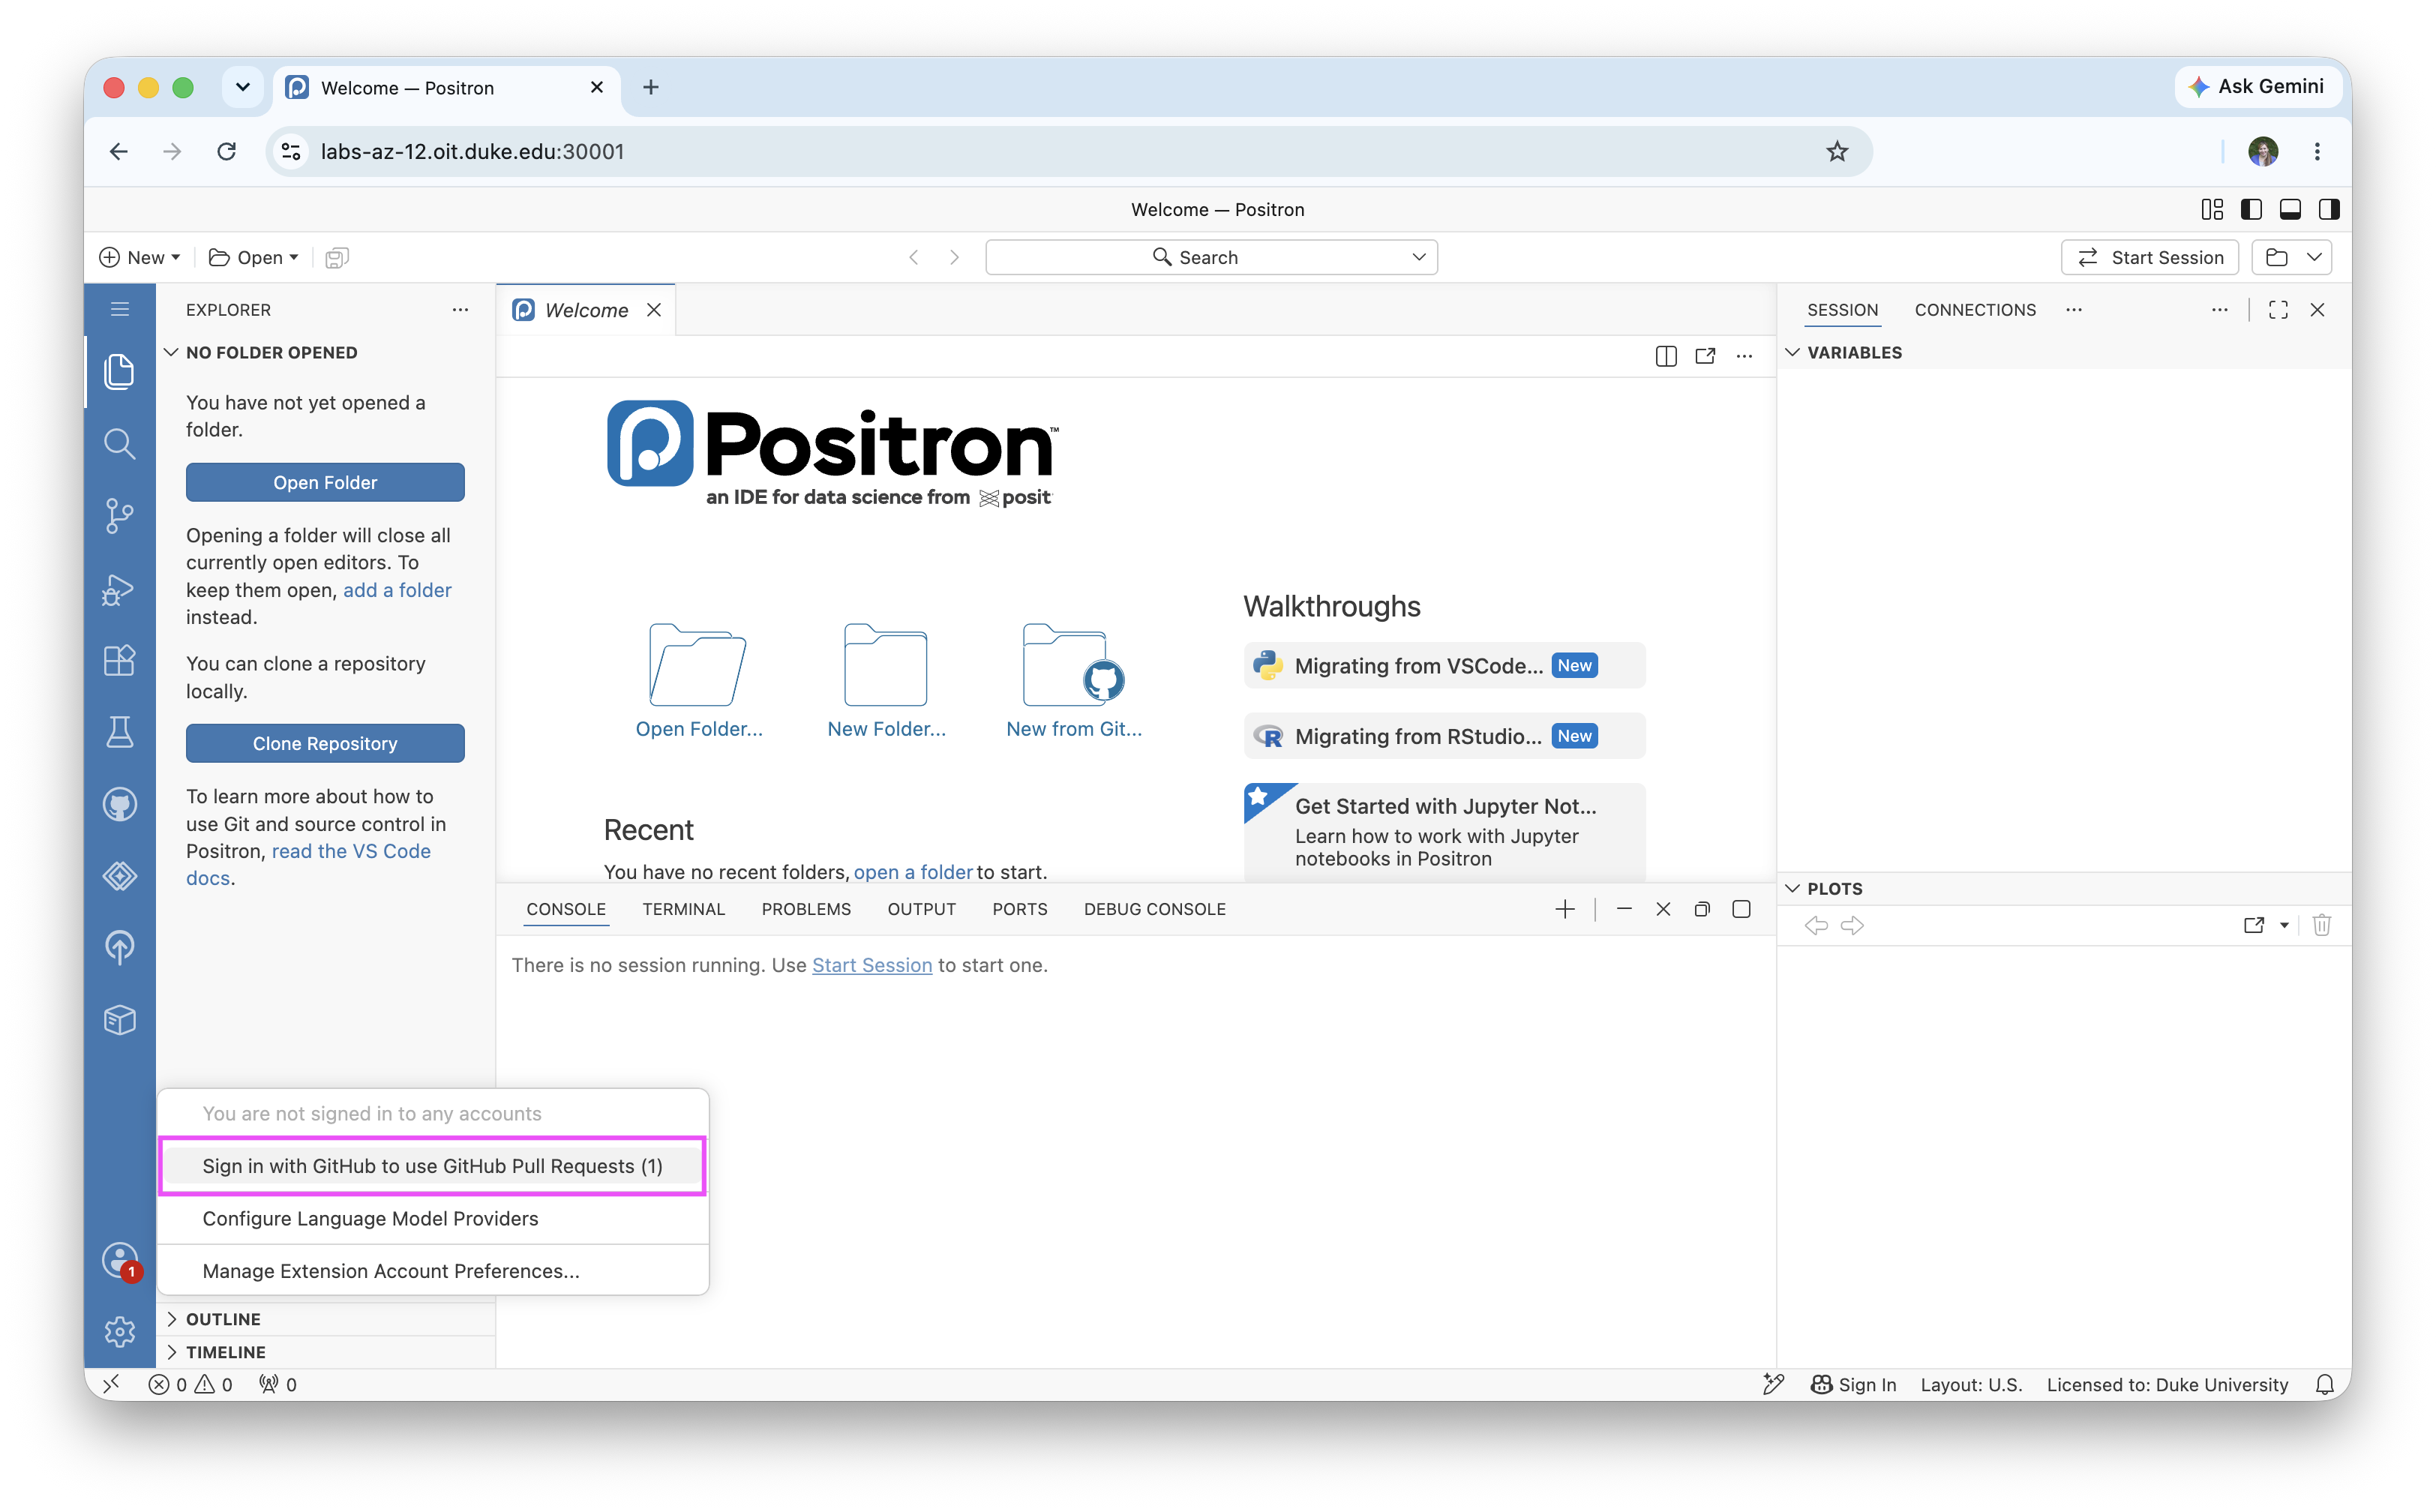
Step 2. In the Accounts panel, select Sign in with GitHub to use GitHub Pull Requests (1).
-
Step 3. A pop-up window with an authorization code will appear. Select Copy & Continue to Browser.
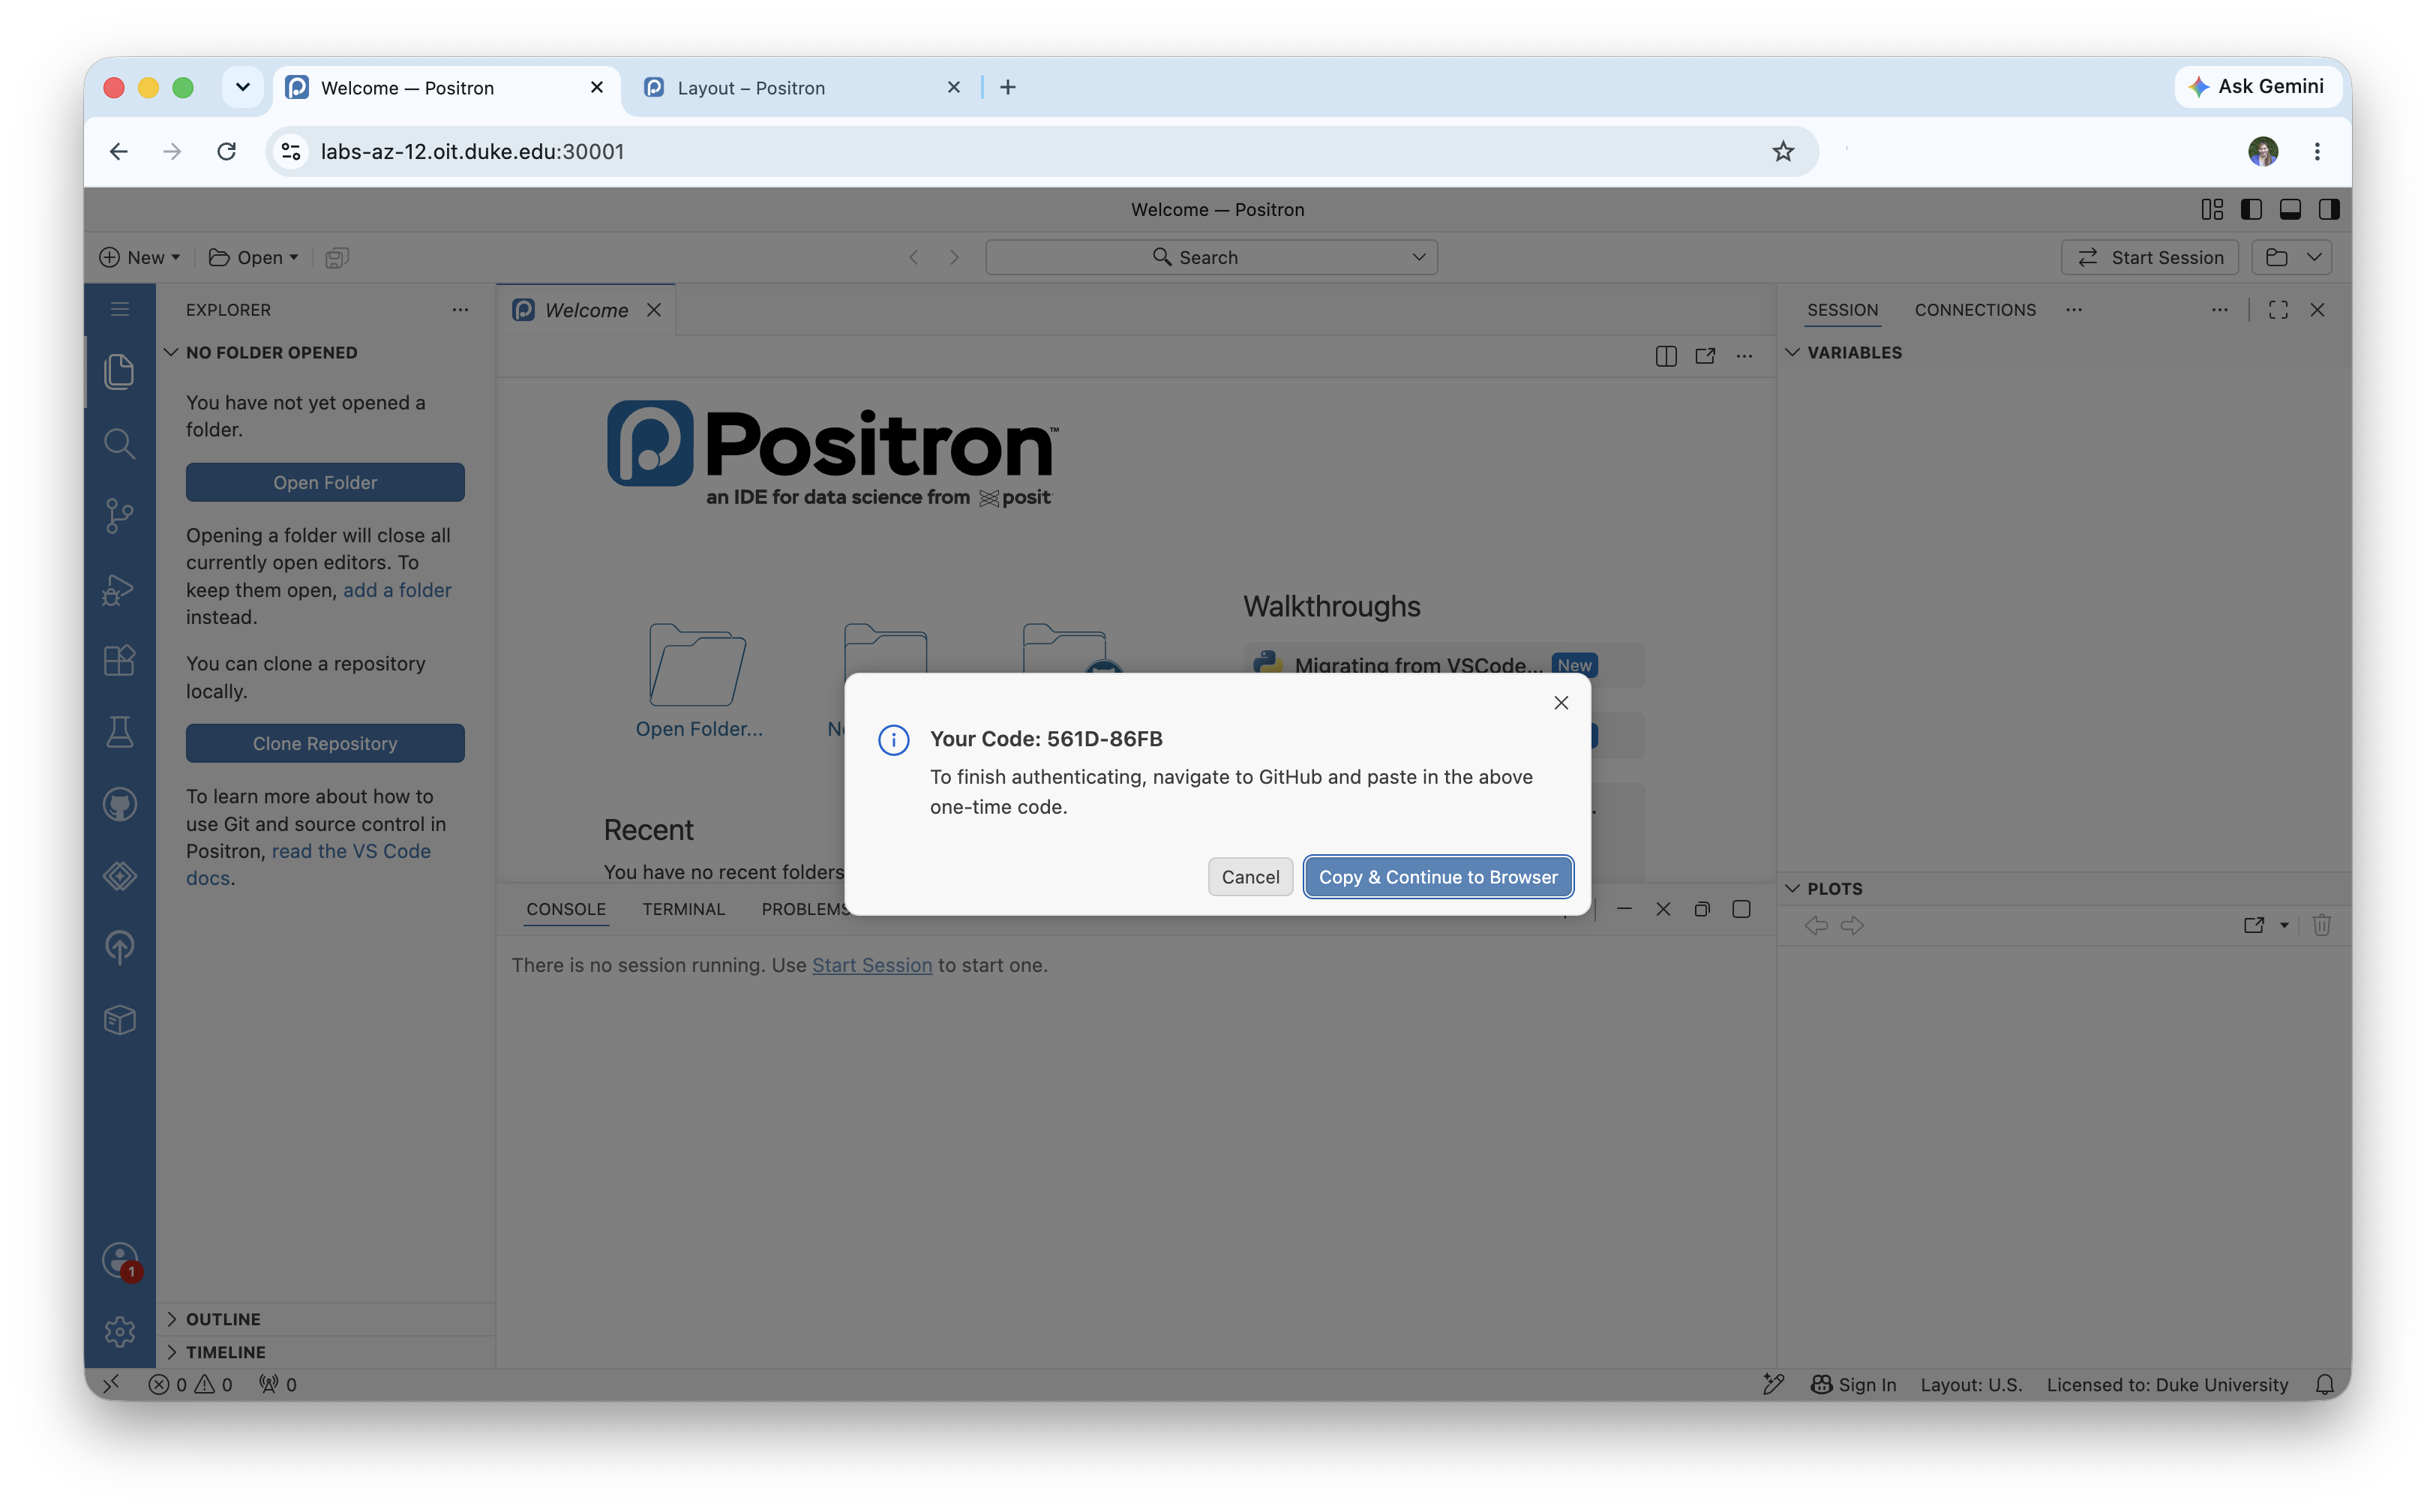 Not seeing a pop-up window?
Your browser may block pop-ups, in which case you may get a message to allow pop-ups for this website. If so, select Retry to allow pop-ups for your container website.
-
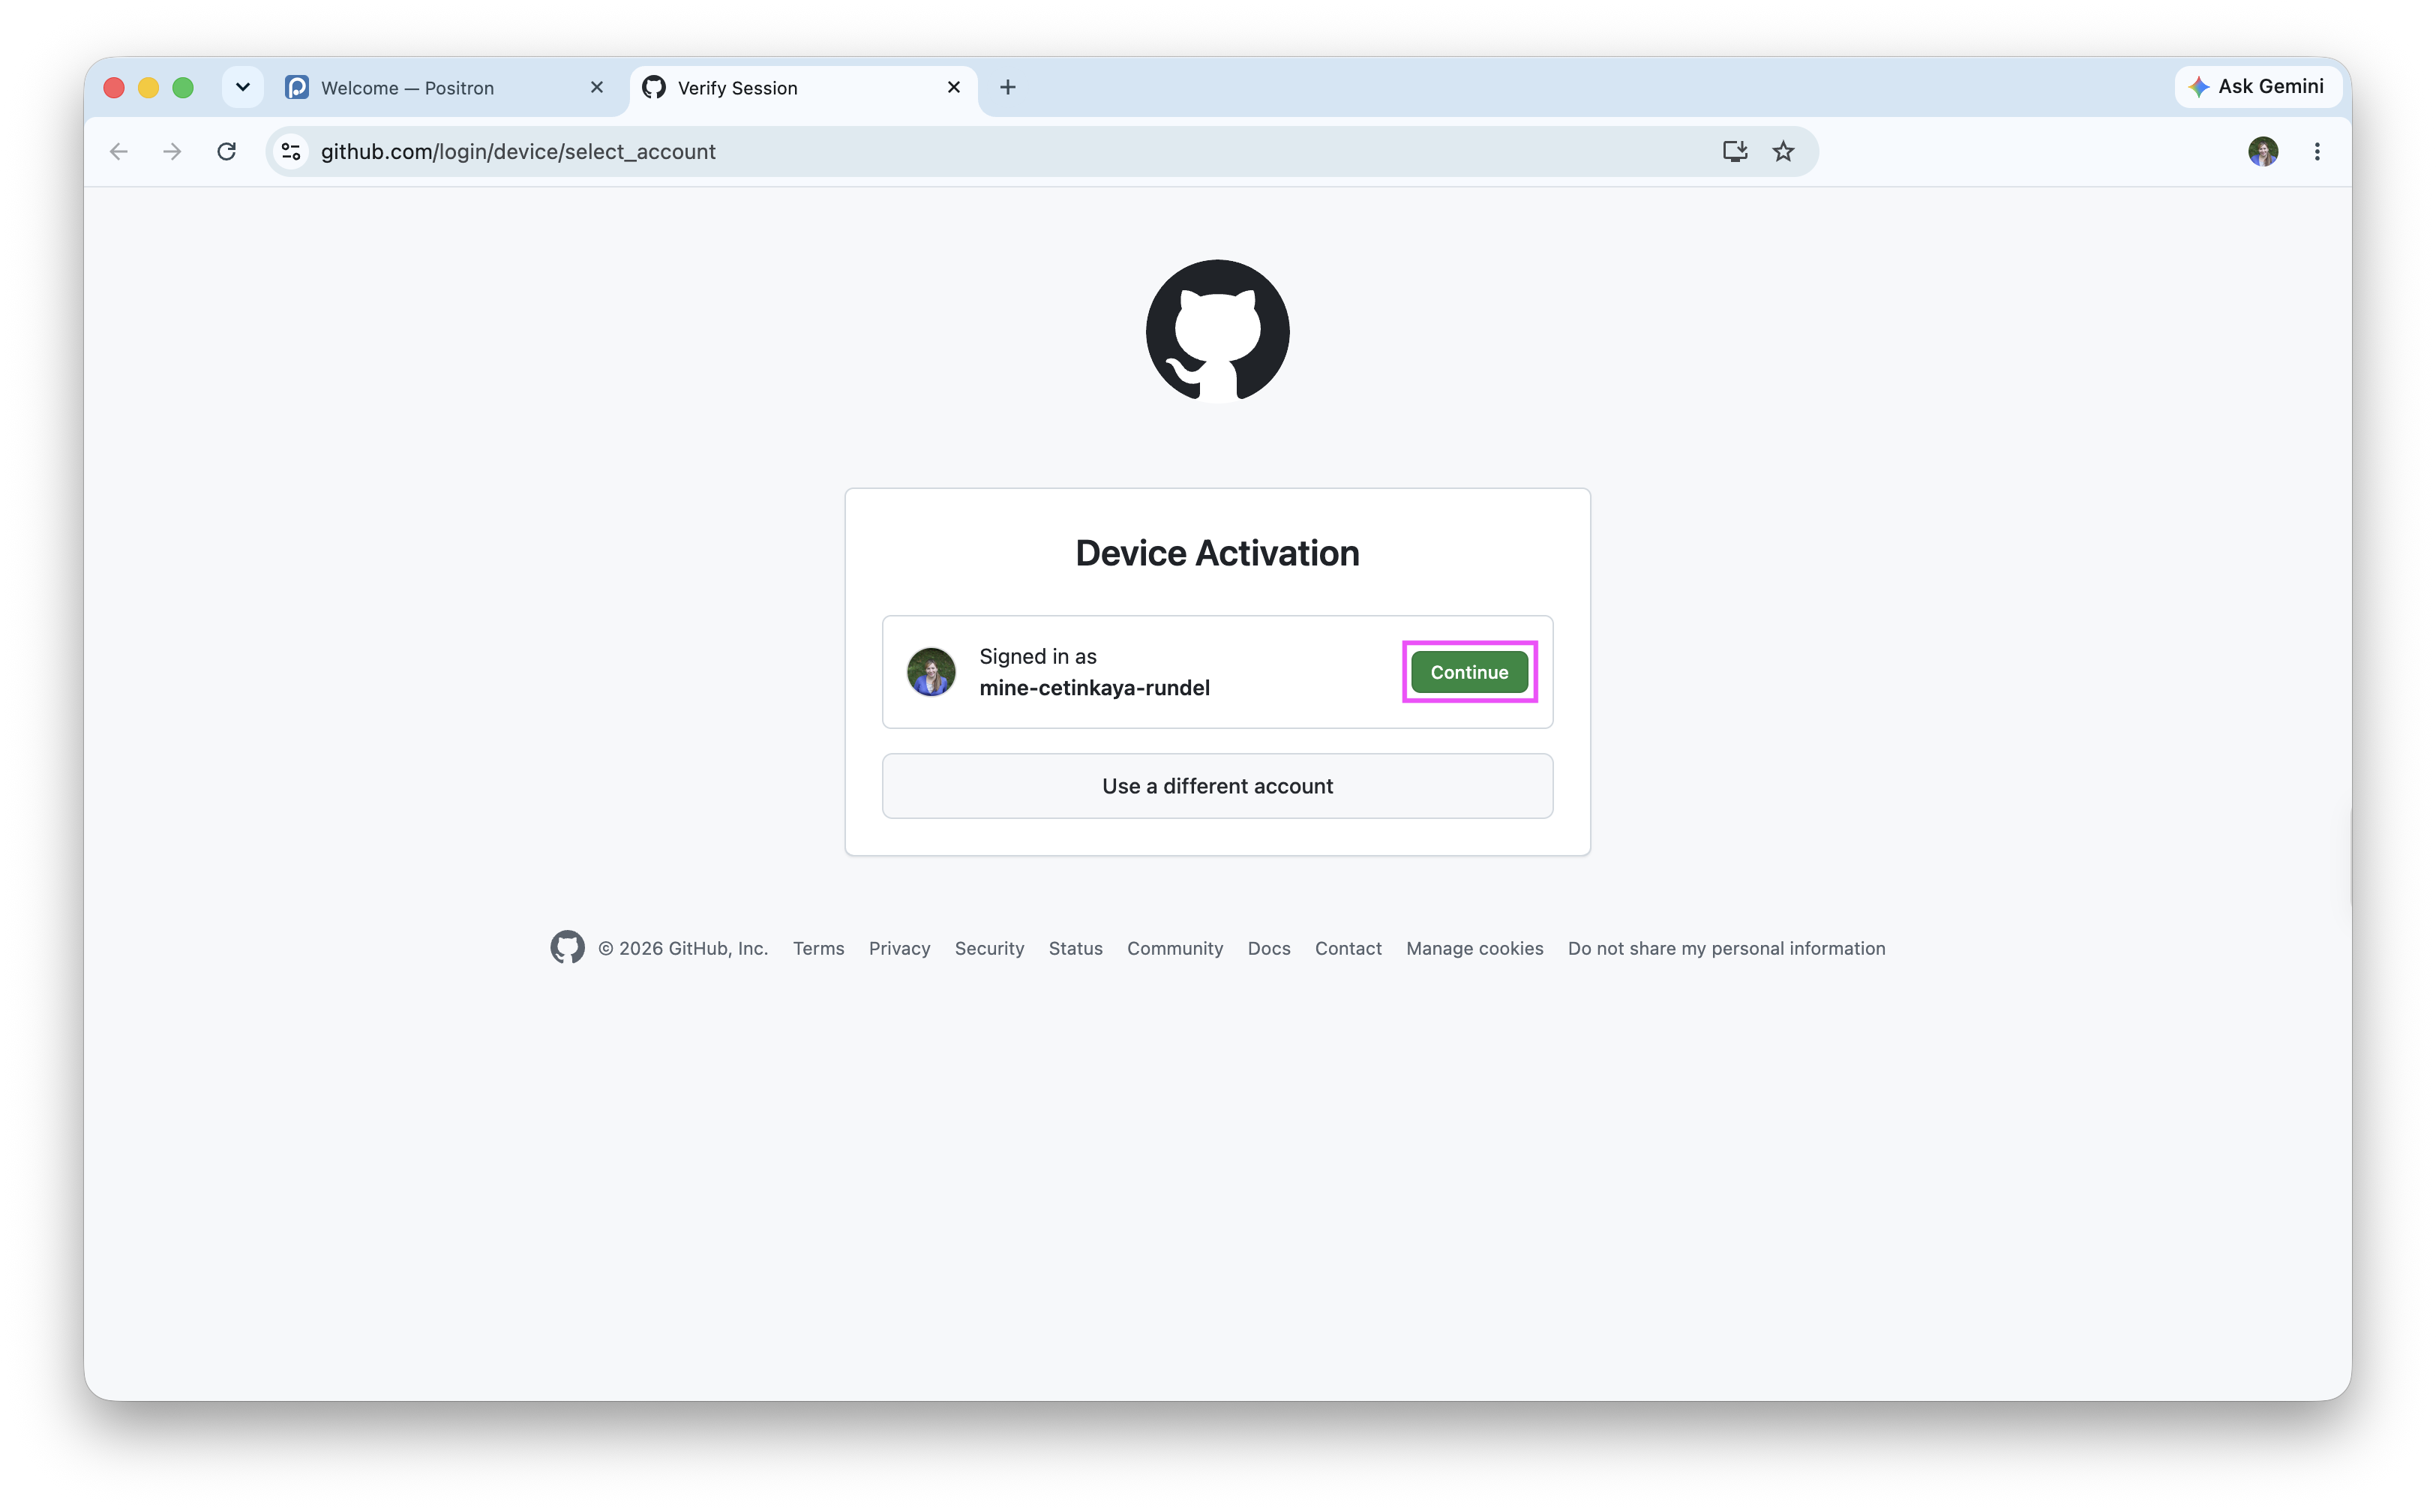
Step 4. You should now be on a GitHub webpage to verify your credentials. Make sure that the account username you’re seeing is the one you’re using for this course, and then click Continue.
-
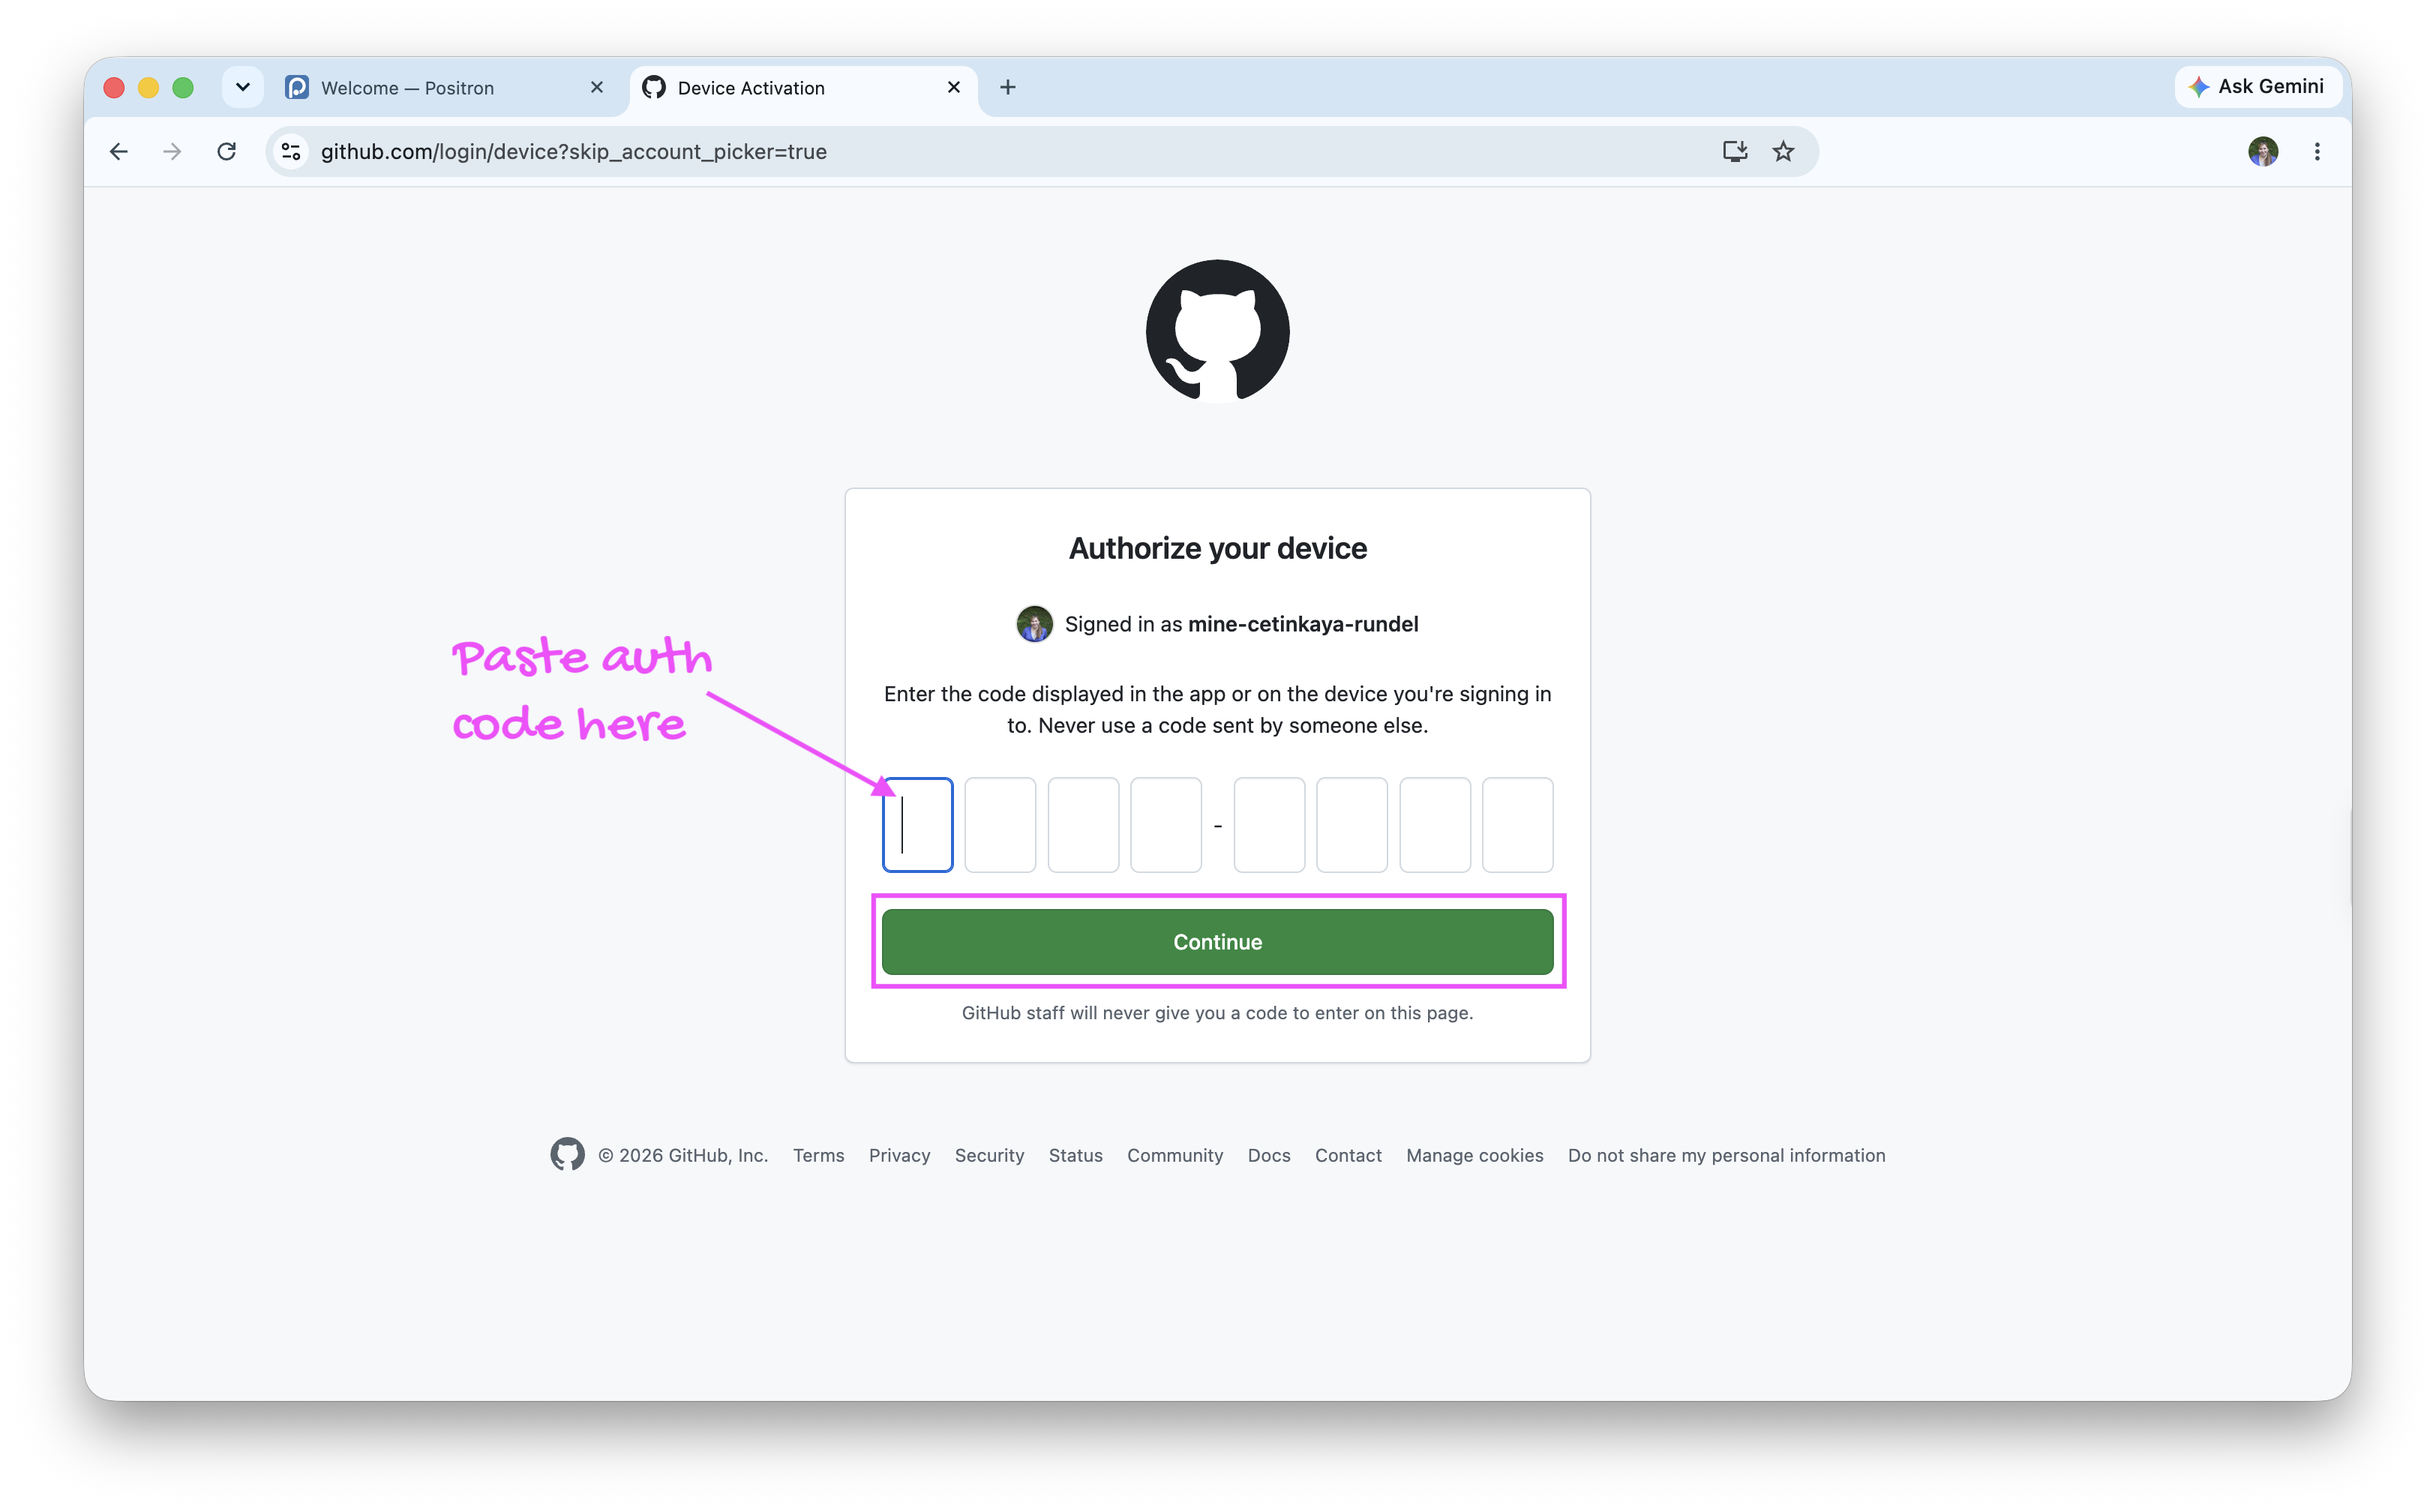
Step 5. Paste the code (e.g., control-v on PC; command-v on Mac; or select Edit, then Paste) into the GitHub screen, and click Continue.
-
Step 6. Now authorize access between Positron and GitHub by clicking on the green Authorize Visual-Studio-Code button. You may need to sign in again to Confirm access.
Asked to log in again?Just follow the steps to do so!
-
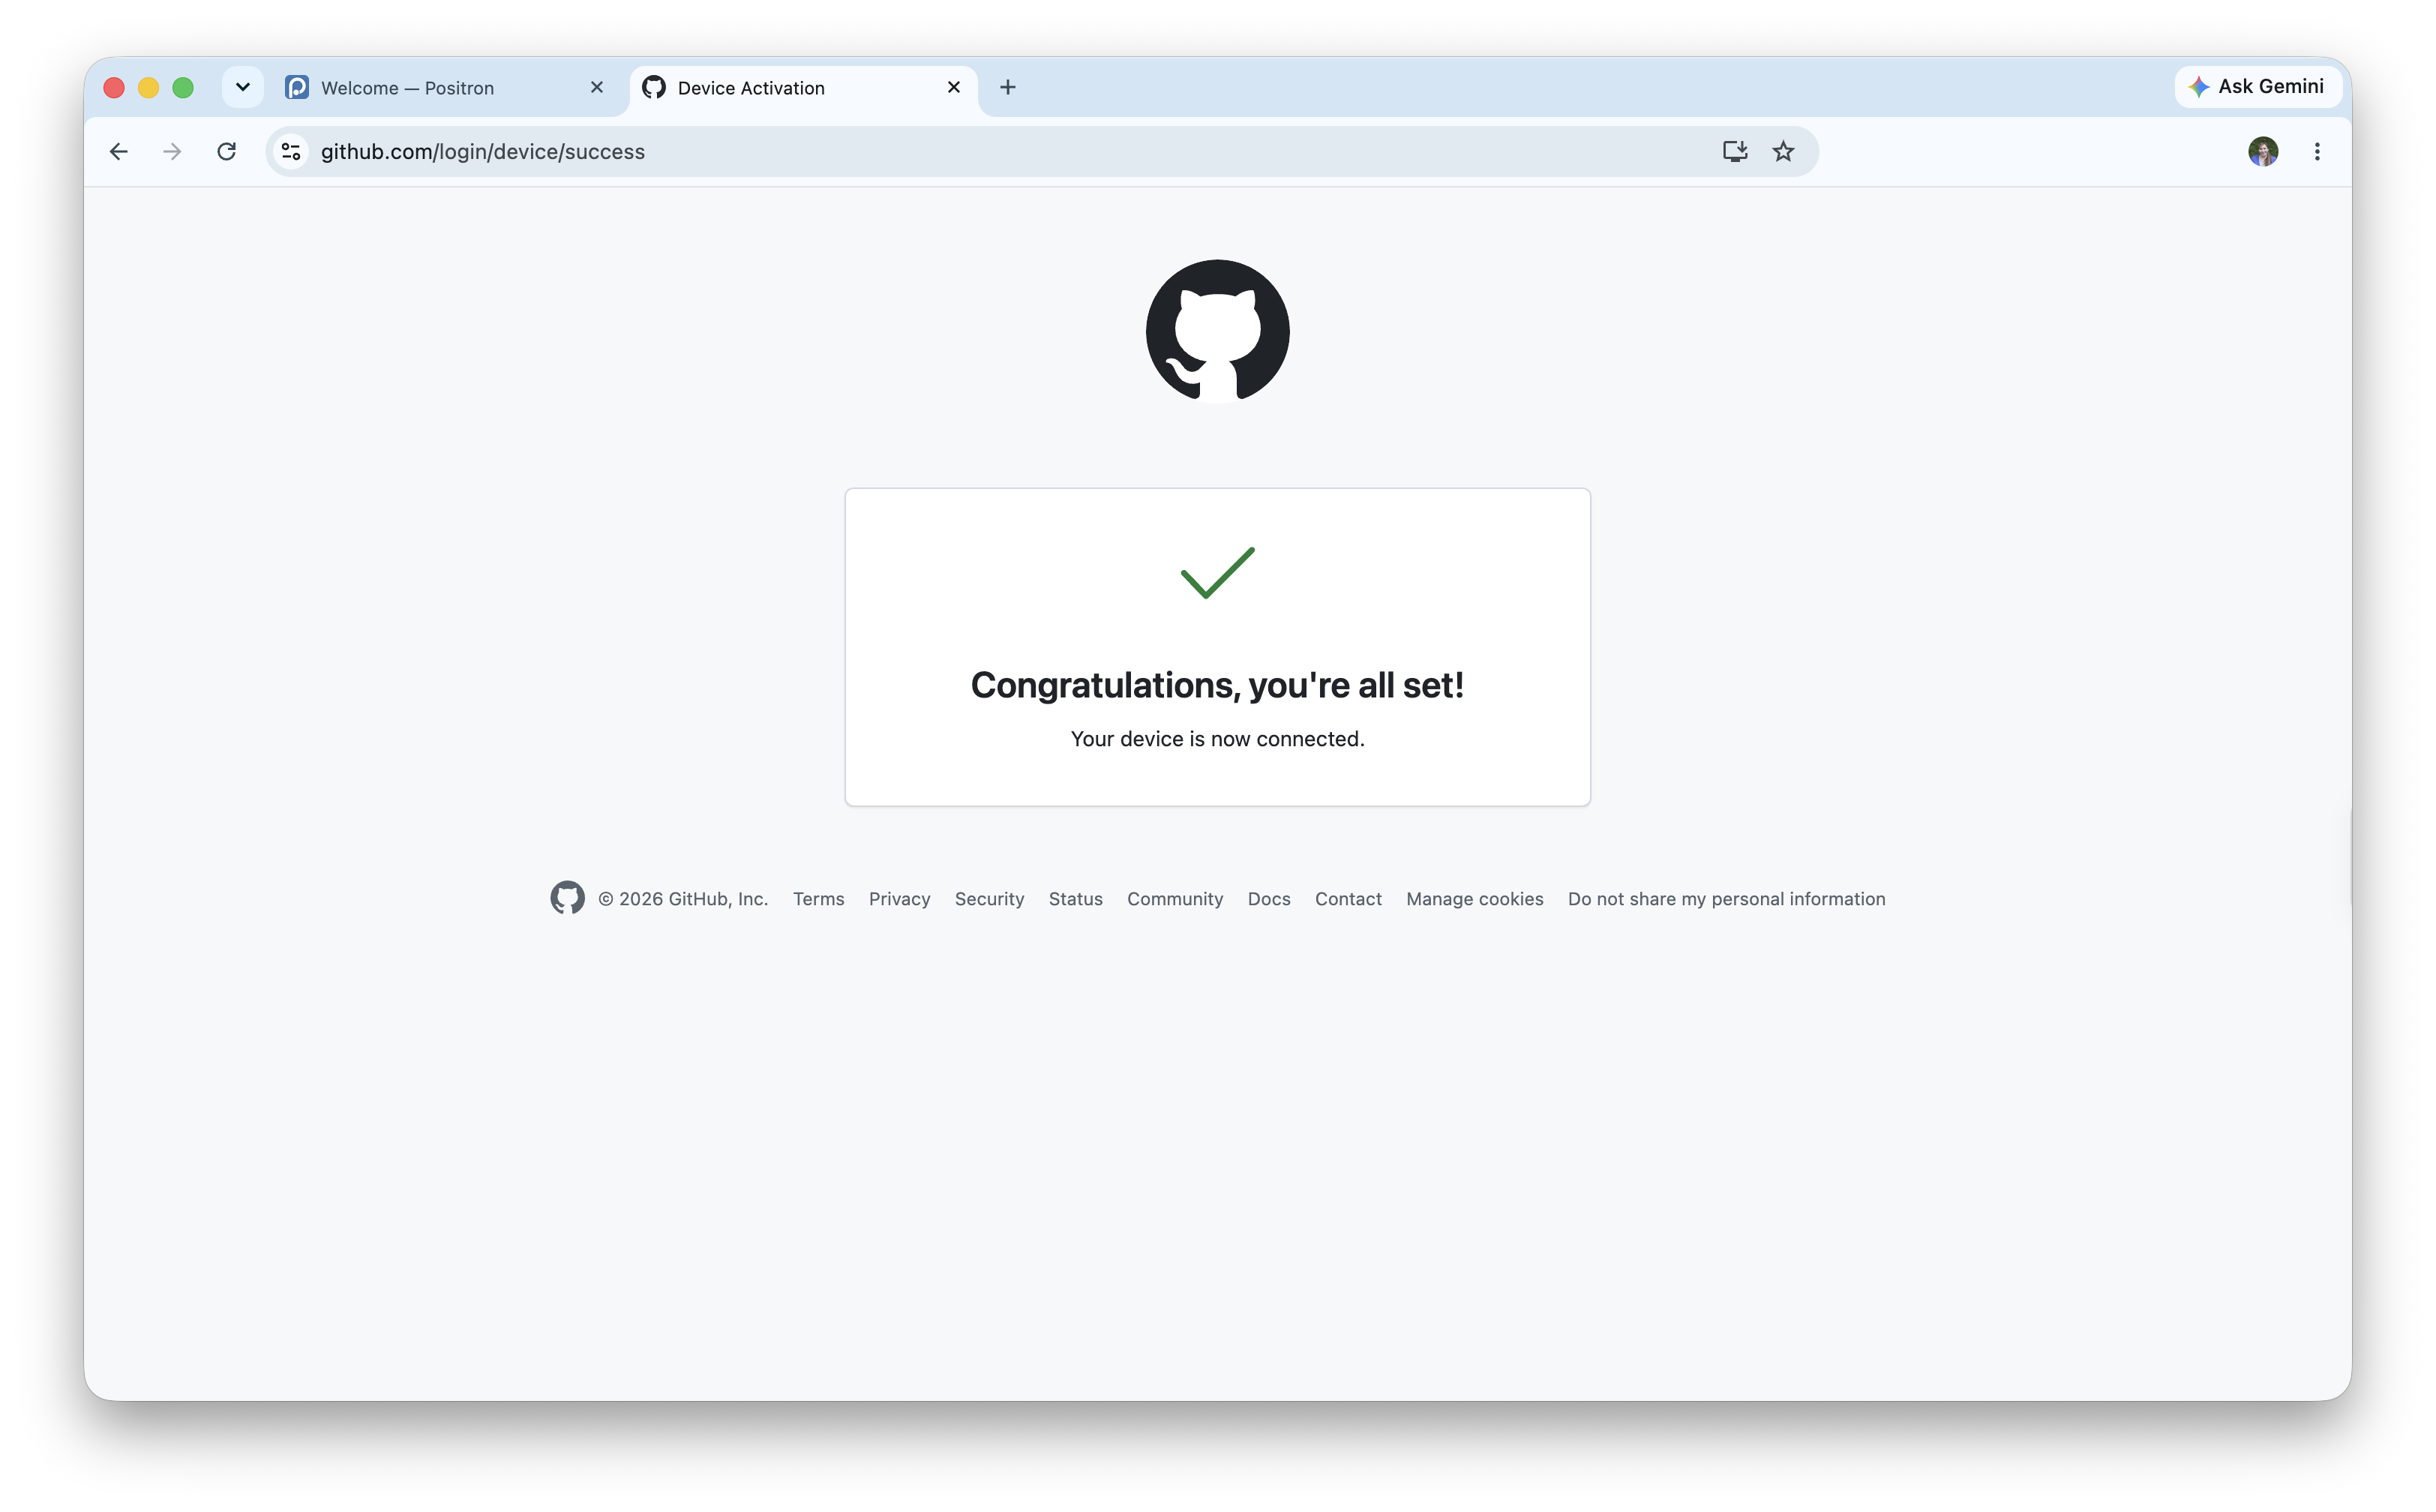
Step 7. You should now see a screen stating, “Congratulations, you’re all set!”
-
Step 8. Navigate back to your container tab. If you click on Accounts icon again, you should now see that you are signed into your GitHub account within Positron and your GitHub username should appear there, followed by
(GitHub).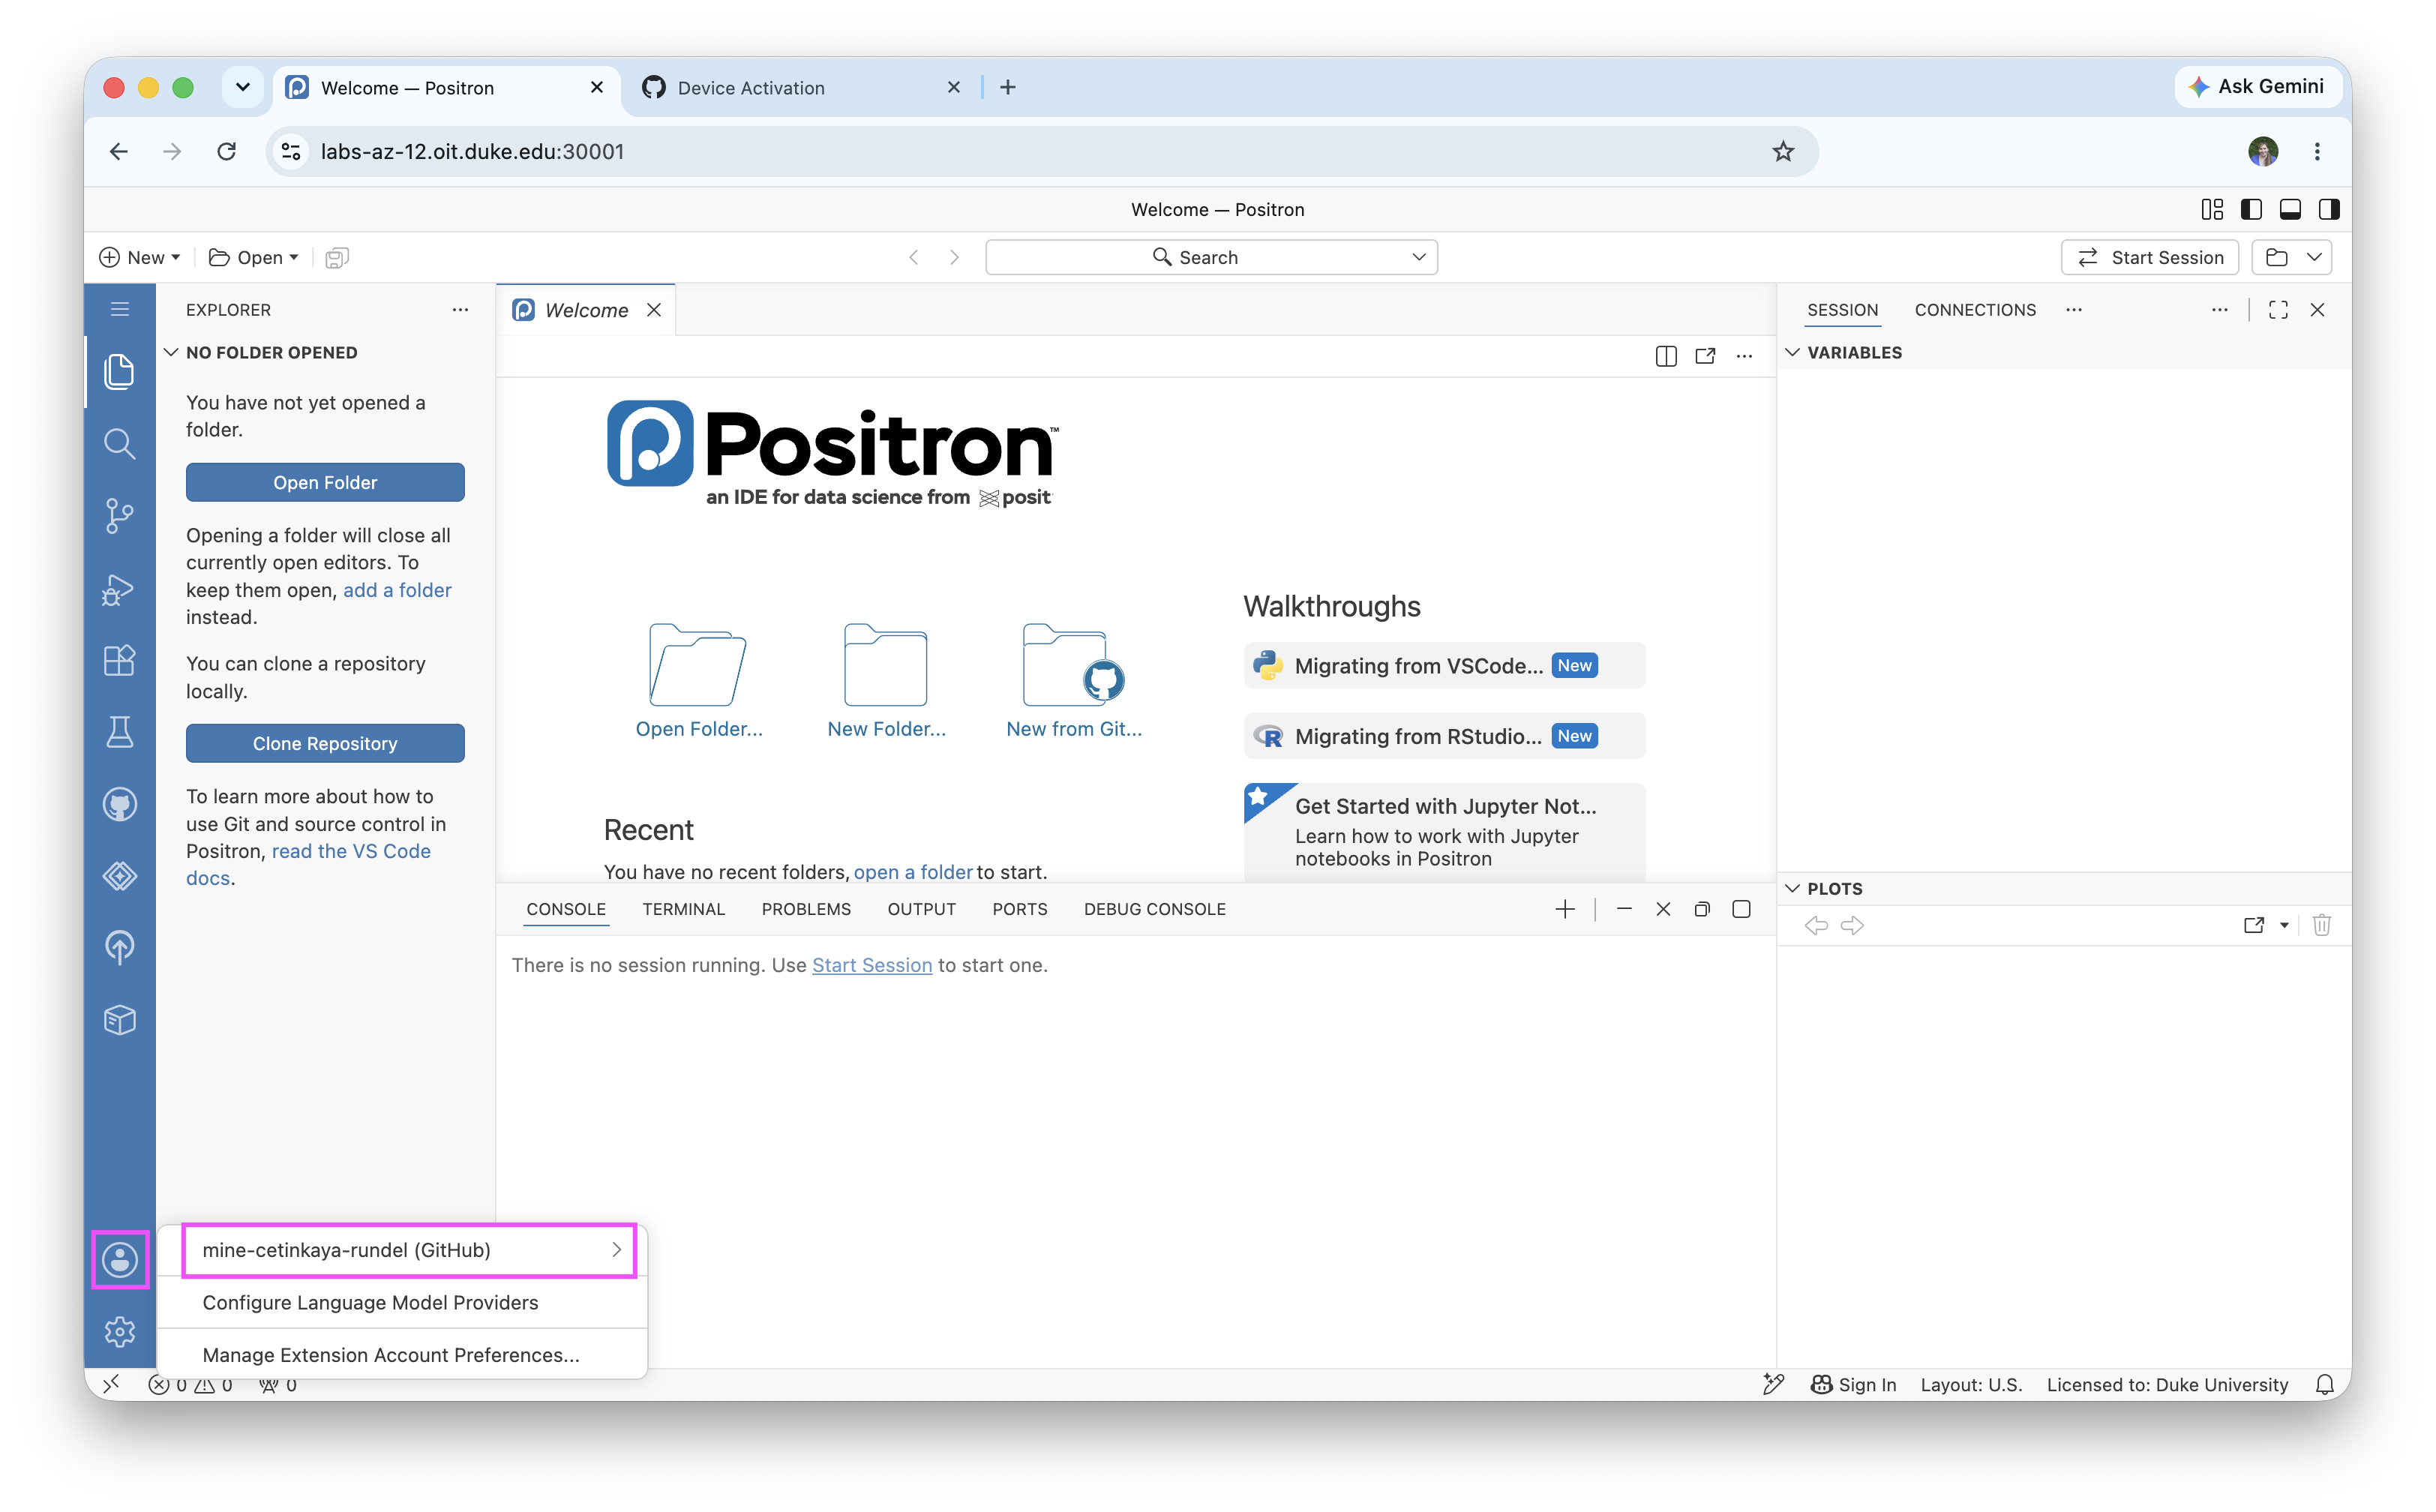
Getting an error in Positron?
We have identified two possible errors that you may encounter when signing into GitHub from Positron.
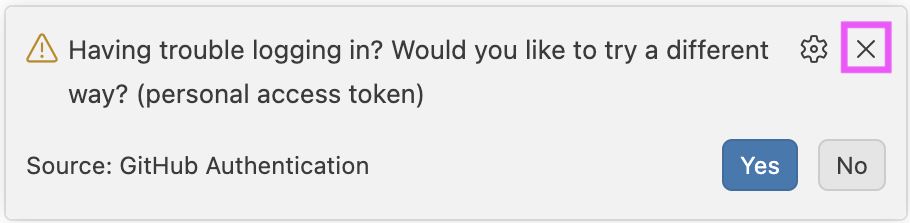
- If you get an error in Positron that says something like “Having trouble logging in? Would you like to try a different way? (personal access token)” (or similar), you can ignore it. Click
xon the corner of the error pop-up and click on Accounts again. If you still don’t see your username in the Accounts menu, flag a TA for help!
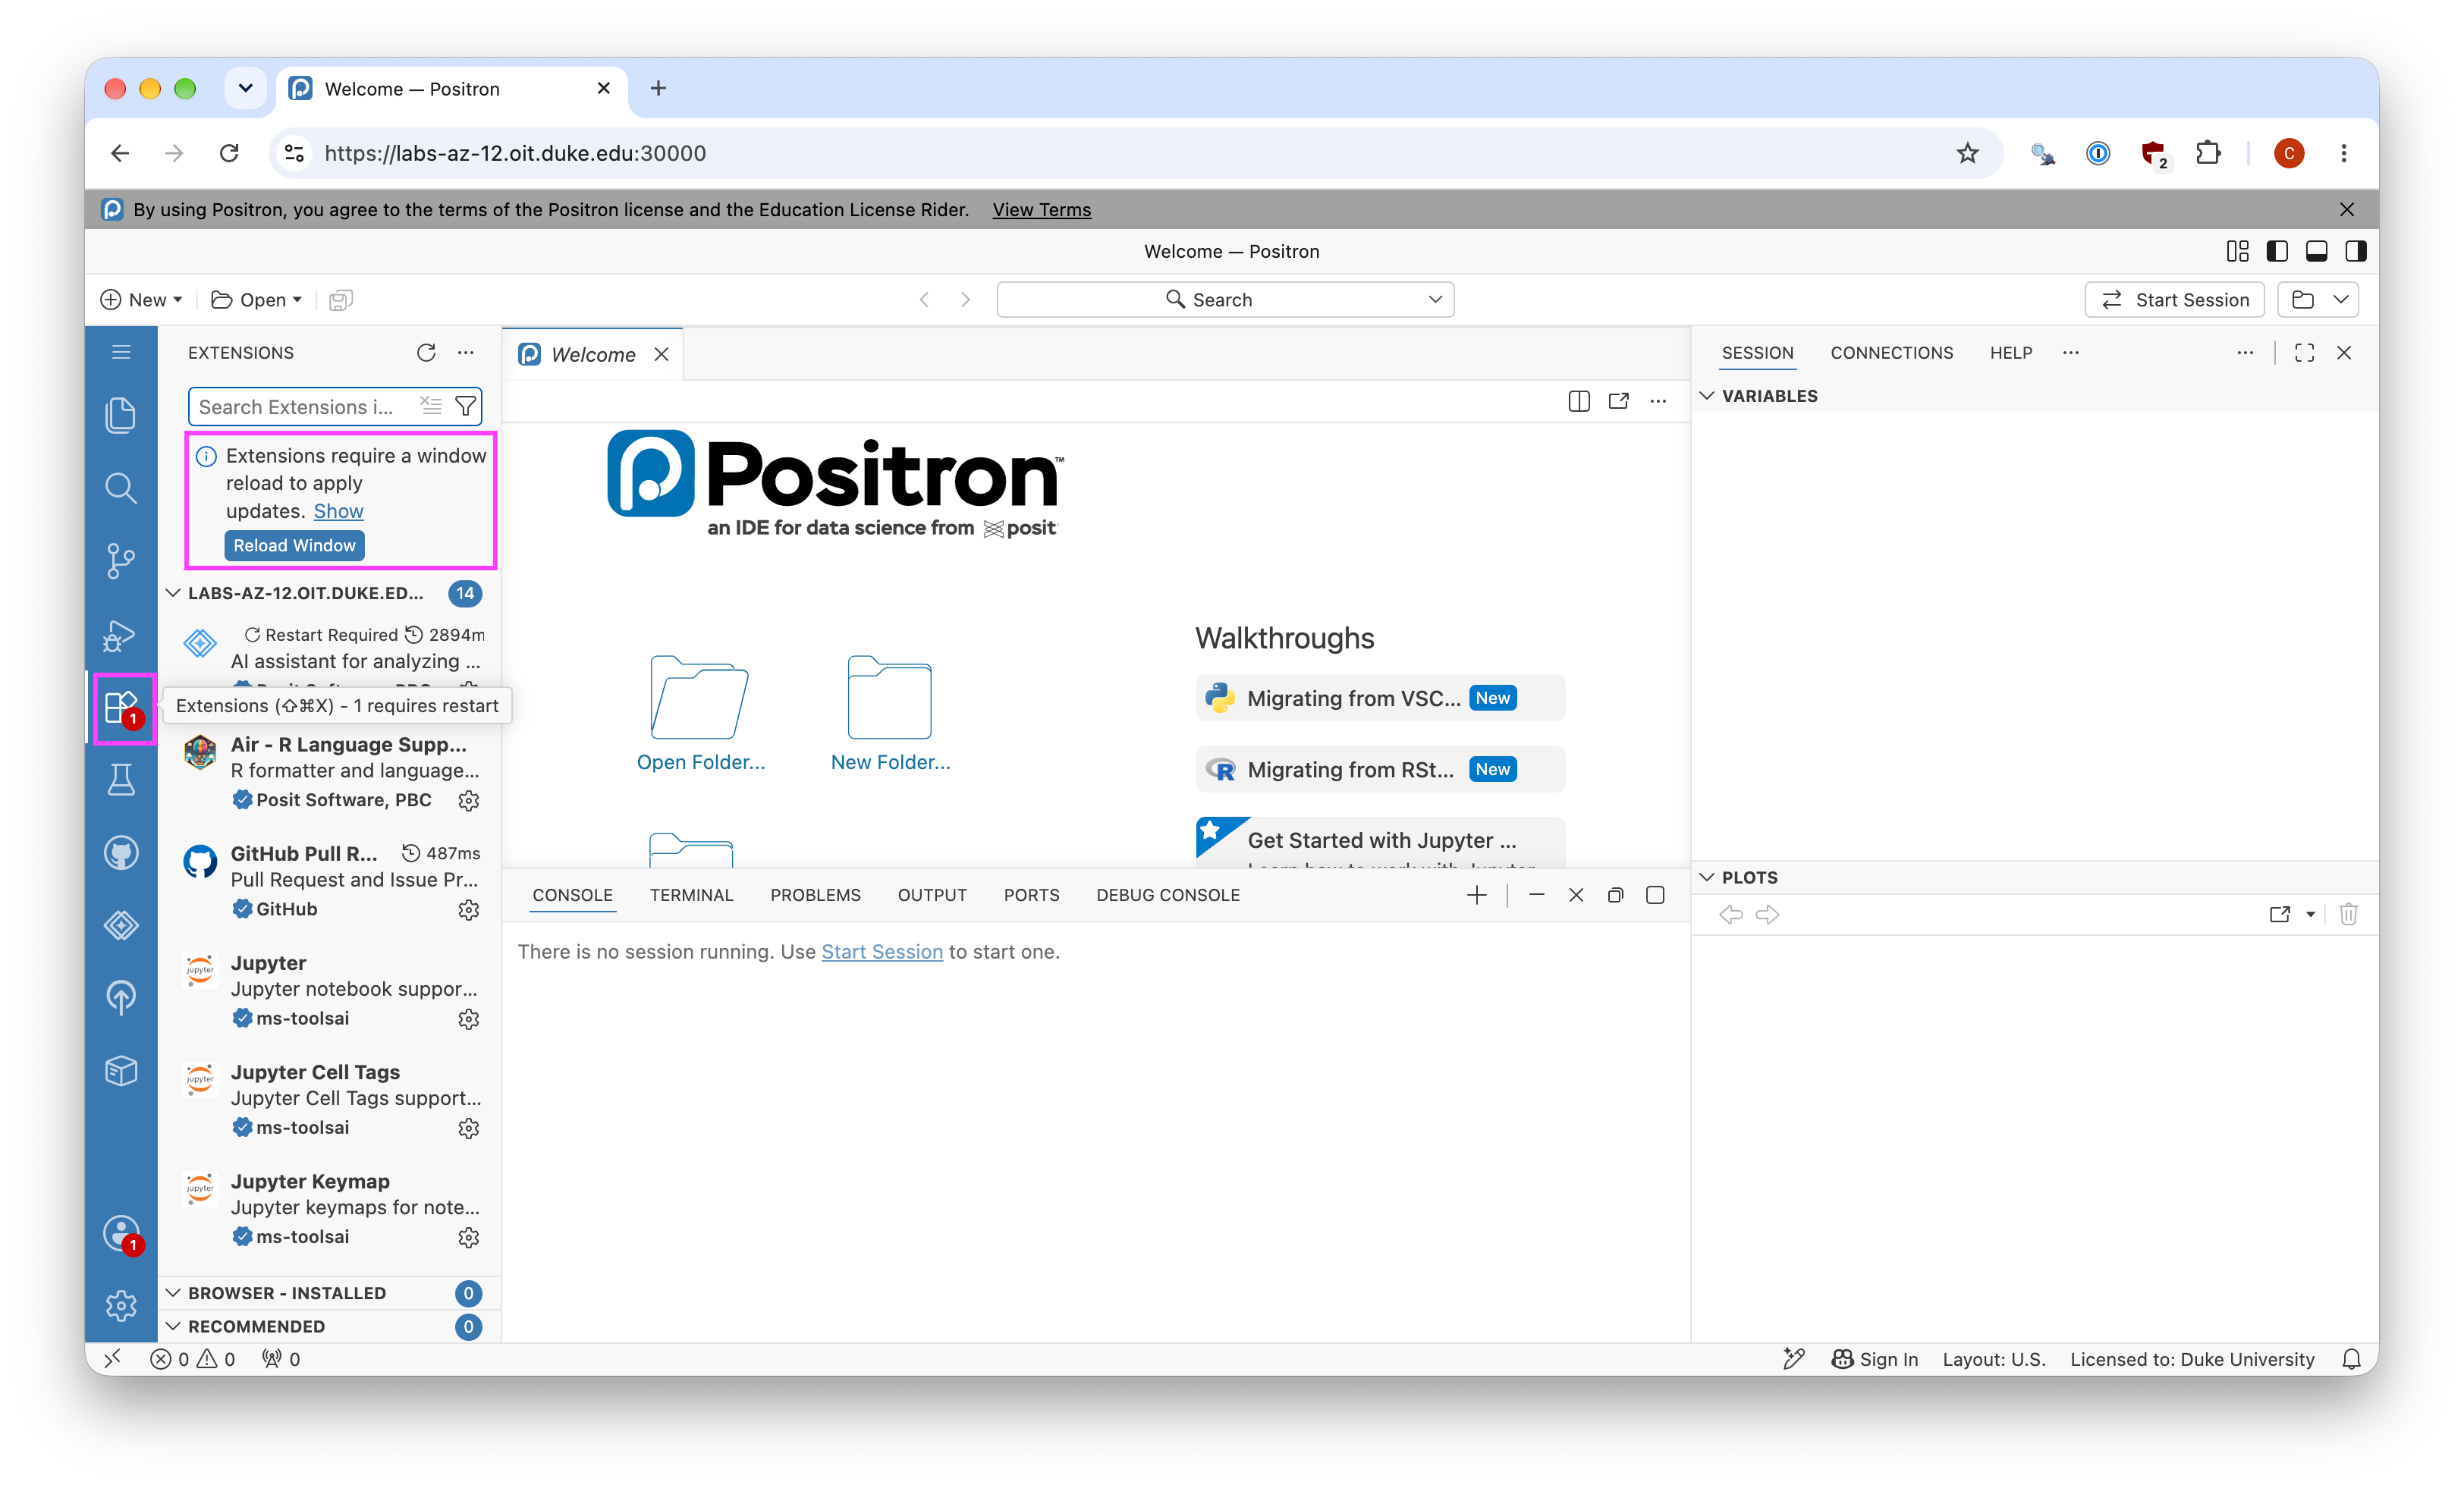
- If you get an error in Positron that says an Extension needs to be updated or restarted, click on the Extensions icon in the Activity Bar, and then Reload Window. Then, start over in Step 1 and try again. If you still don’t see your username in the Accounts menu, flag a TA for help!
Configure Git to introduce yourself
There is one more thing we need to do before getting started on the assignment. Specifically, we need to configure your Git so that Positron can communicate with GitHub. This requires two pieces of information: your (real, human first and last) name and email address (that you used when creating your GitHub account).
To do so, you will use the use_git_config() function from the usethis package.
Note
You’ve heard a bit about 📦 packages in the context of R, and you’ll hear a lot more throughout the semester. As a reminder, they’re how developers write functions and bundle them to distribute to the community (and more on this later too!).
-
Step 1: In the Console in Positron, select Start Session. Under Start New Console Session, click R 4.6.1 to start an R session.
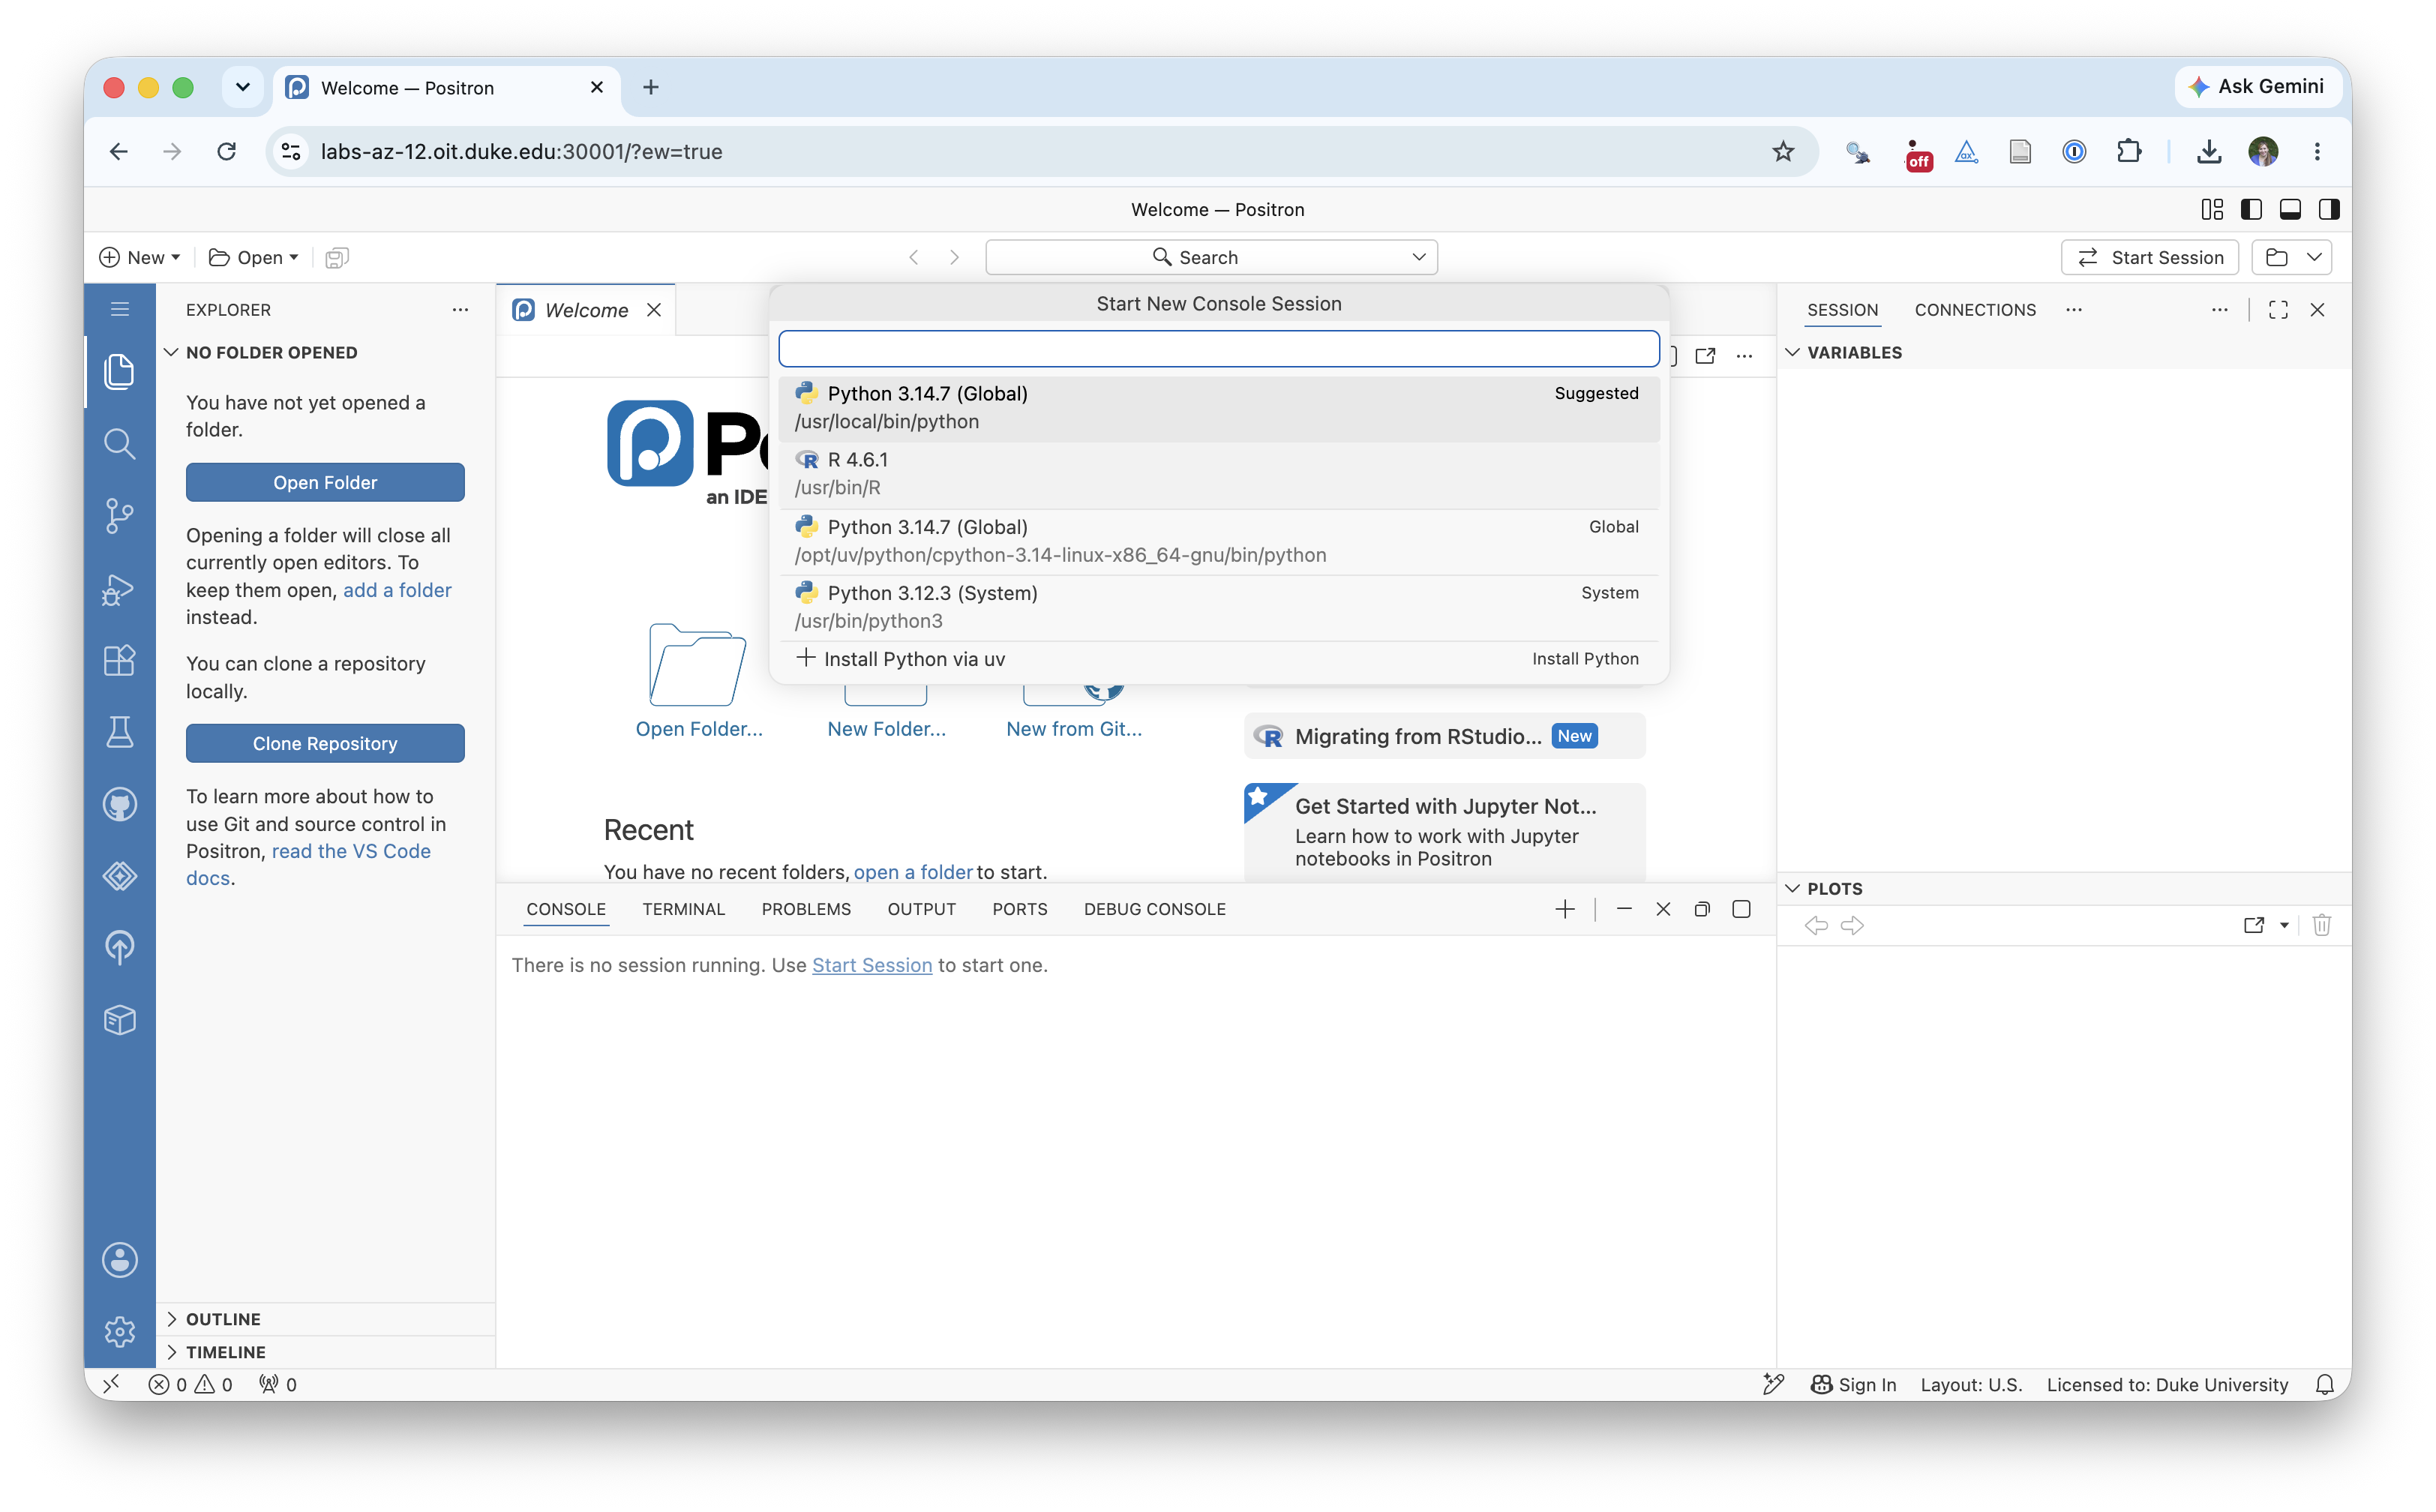
The first time you do this, it may take a minute or so to install the
tinytexpackage to set up your R environment for the course. Once it’s done, you’ll see a message in your console stating “Installation successful” -
Step 2: Then type the following lines of code in the Console, filling in your name and the address associated with your GitHub account, and hit enter/return.
Getting an error about pasting from the clipboard?If you’re copying and pasting, you might see a warning message about your container wanting to see text and images copied to the clipboard. Hit Allow to allow this.
For example, mine would be
usethis::use_git_config( user.name = "Mine Çetinkaya-Rundel", user.email = "cetinkaya.mine@gmail.com" )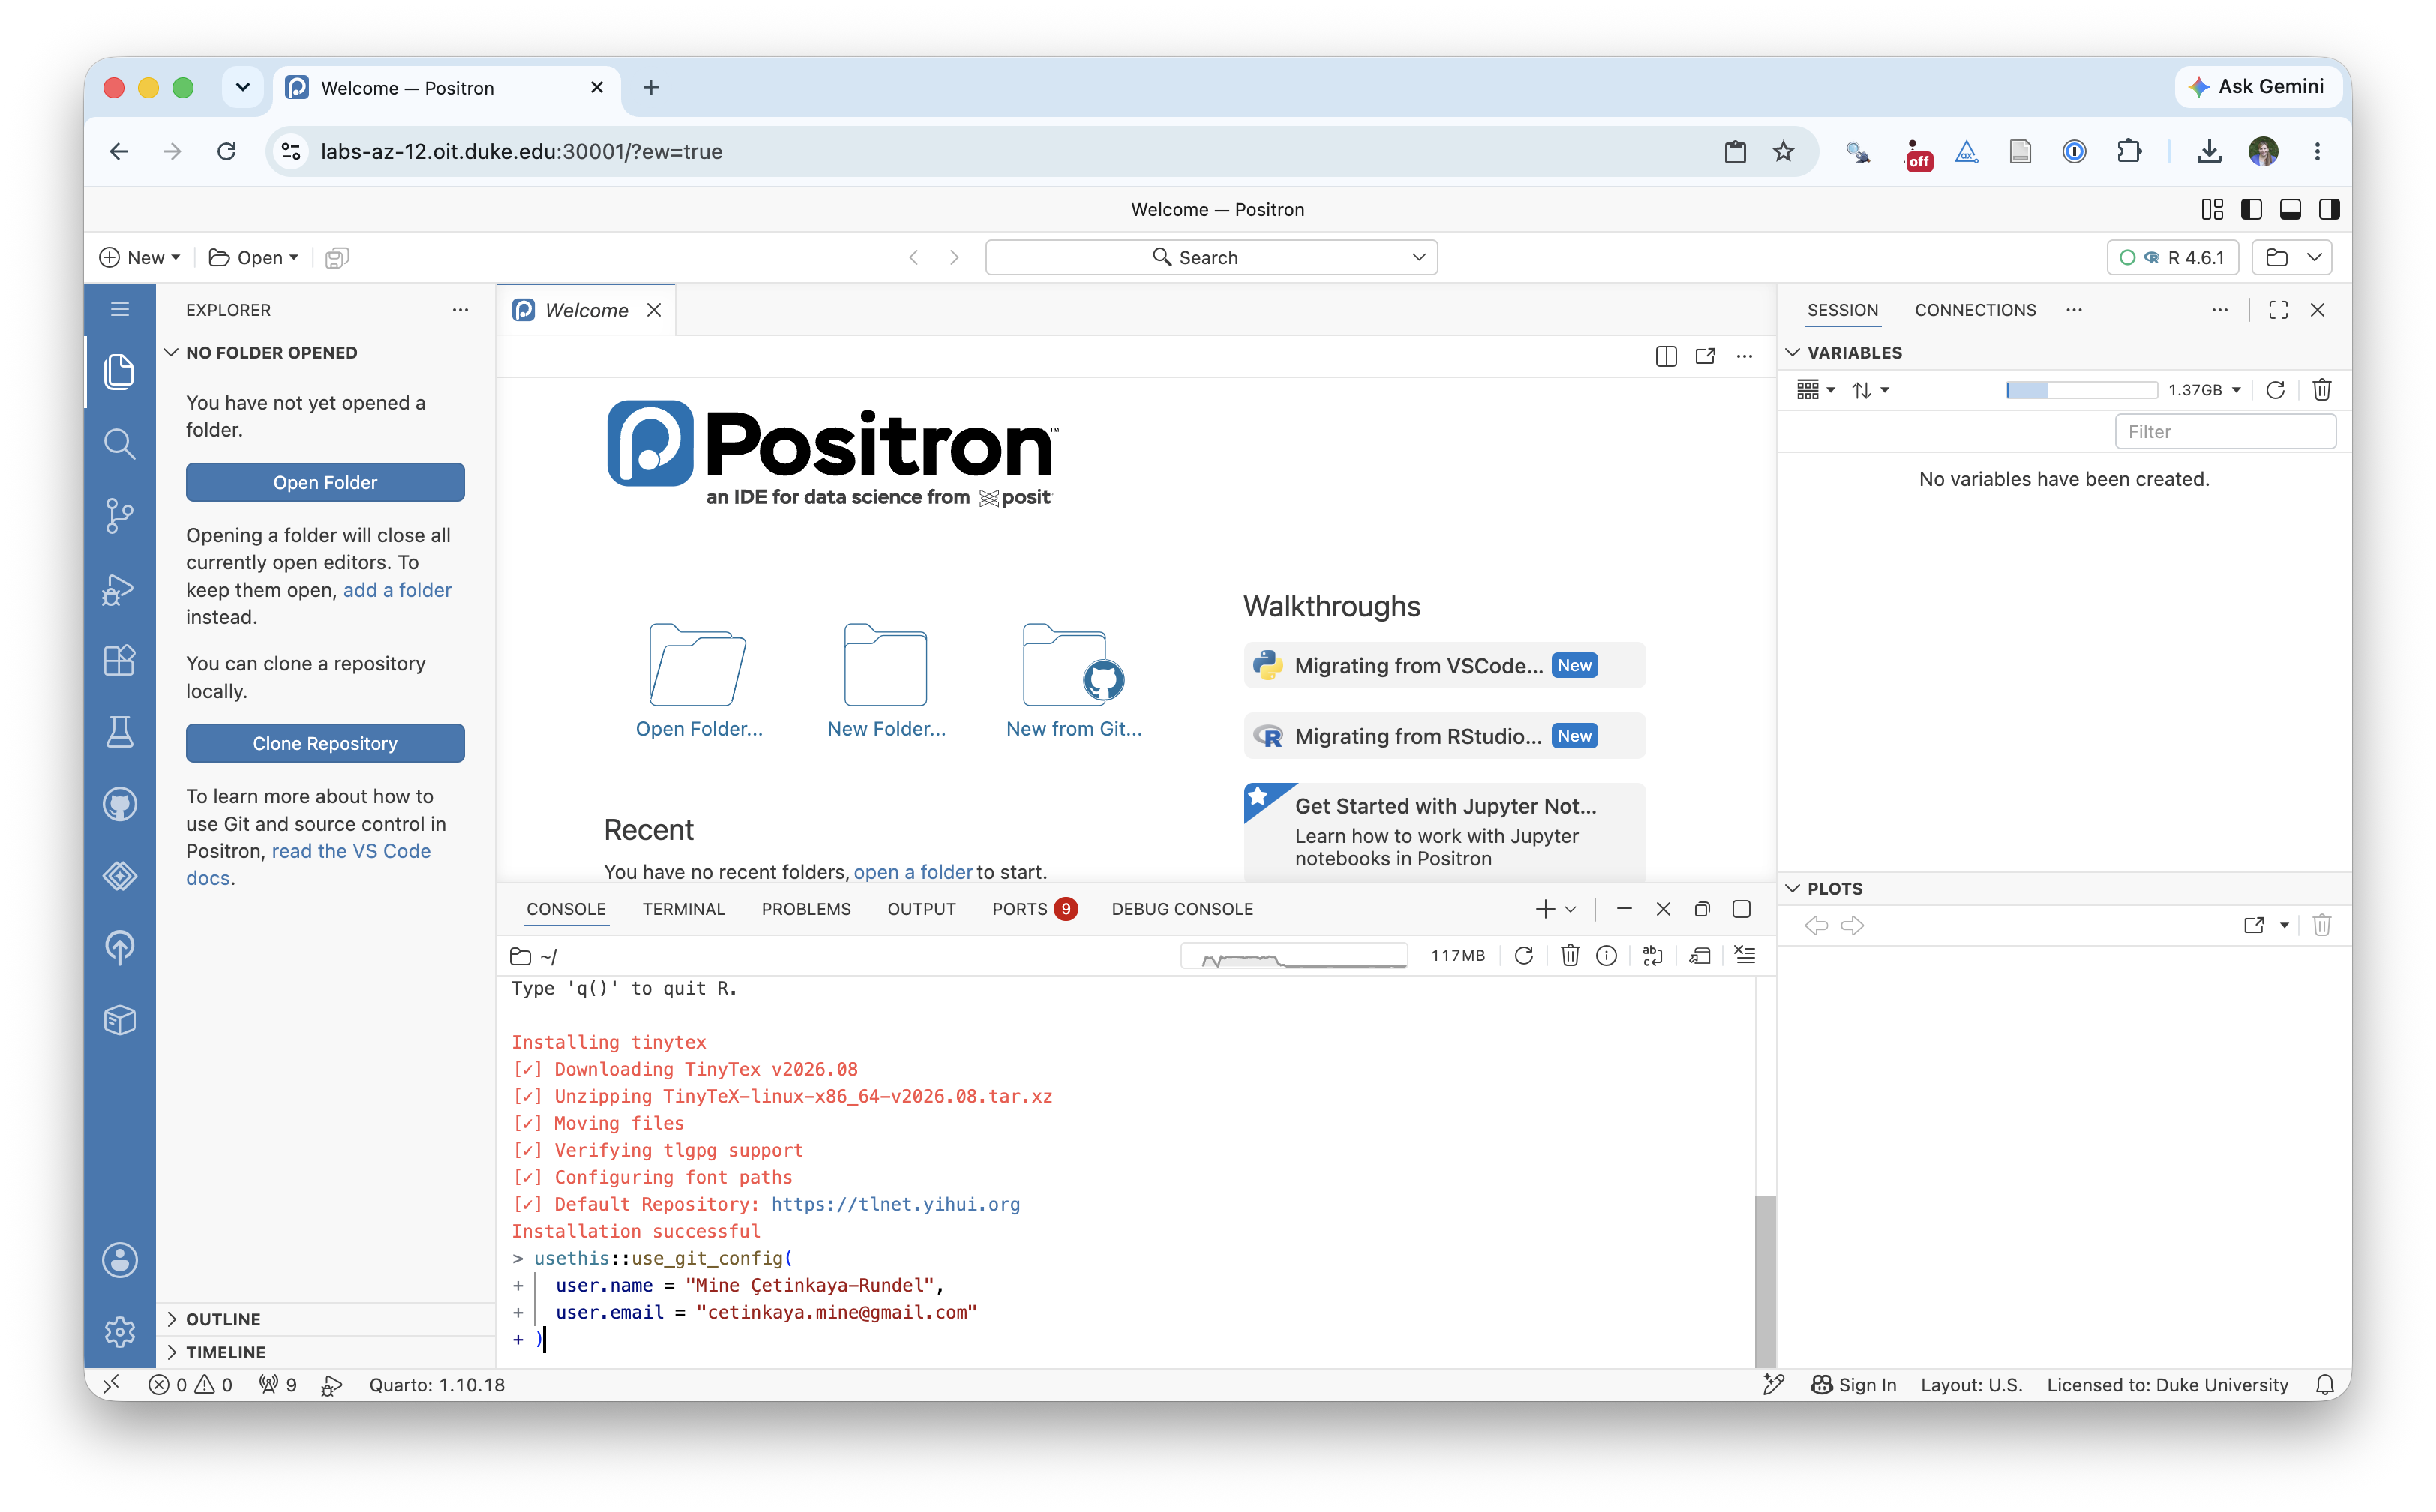 Note
NoteI used my Gmail address because that is the email I used to create my GitHub account. You should also be using the email address you used to create your GitHub account, it’s ok if it isn’t your Duke email. If you don’t do this, we won’t be able to tell who you are and give you points for the work you do…3
You are now ready to interact with GitHub via Positron!
Hello, STA 199 students!
Now that you have your computational toolkit setup, it’s time to do some real data exploration. And what’s more exciting to explore than your own selves. In this section you’ll be provided a real but anonymized portion of your own Getting to know you survey responses. Each row in this dataset represents one of you, but we encourage you to not try to identify yourself or others in the data. And it would be pretty difficult to do so anyway because we’ve only shared your responses to which section you’re in, how much statistics and programming experience you have, some of the ways you learn best, and some types of data you’re interested in.
Clone your first repository
Now that you have your GitHub account set up, you can clone your first repository. That is, you take a repository on GitHub that we have prepared for you and download it to your Positron container so that you can work with it. And not just download the files, but do it in a way that allows you to keep your local copy of the repository in sync with the version on GitHub, by staging and then committing your changes and then pushing your work back to GitHub.
To do so, follow these steps.
-
Step 1: Go to the repository for lab-0 in the course GitHub organization:
https://github.com/sta199-f26/lab-0-YOUR-GITHUB-NAME.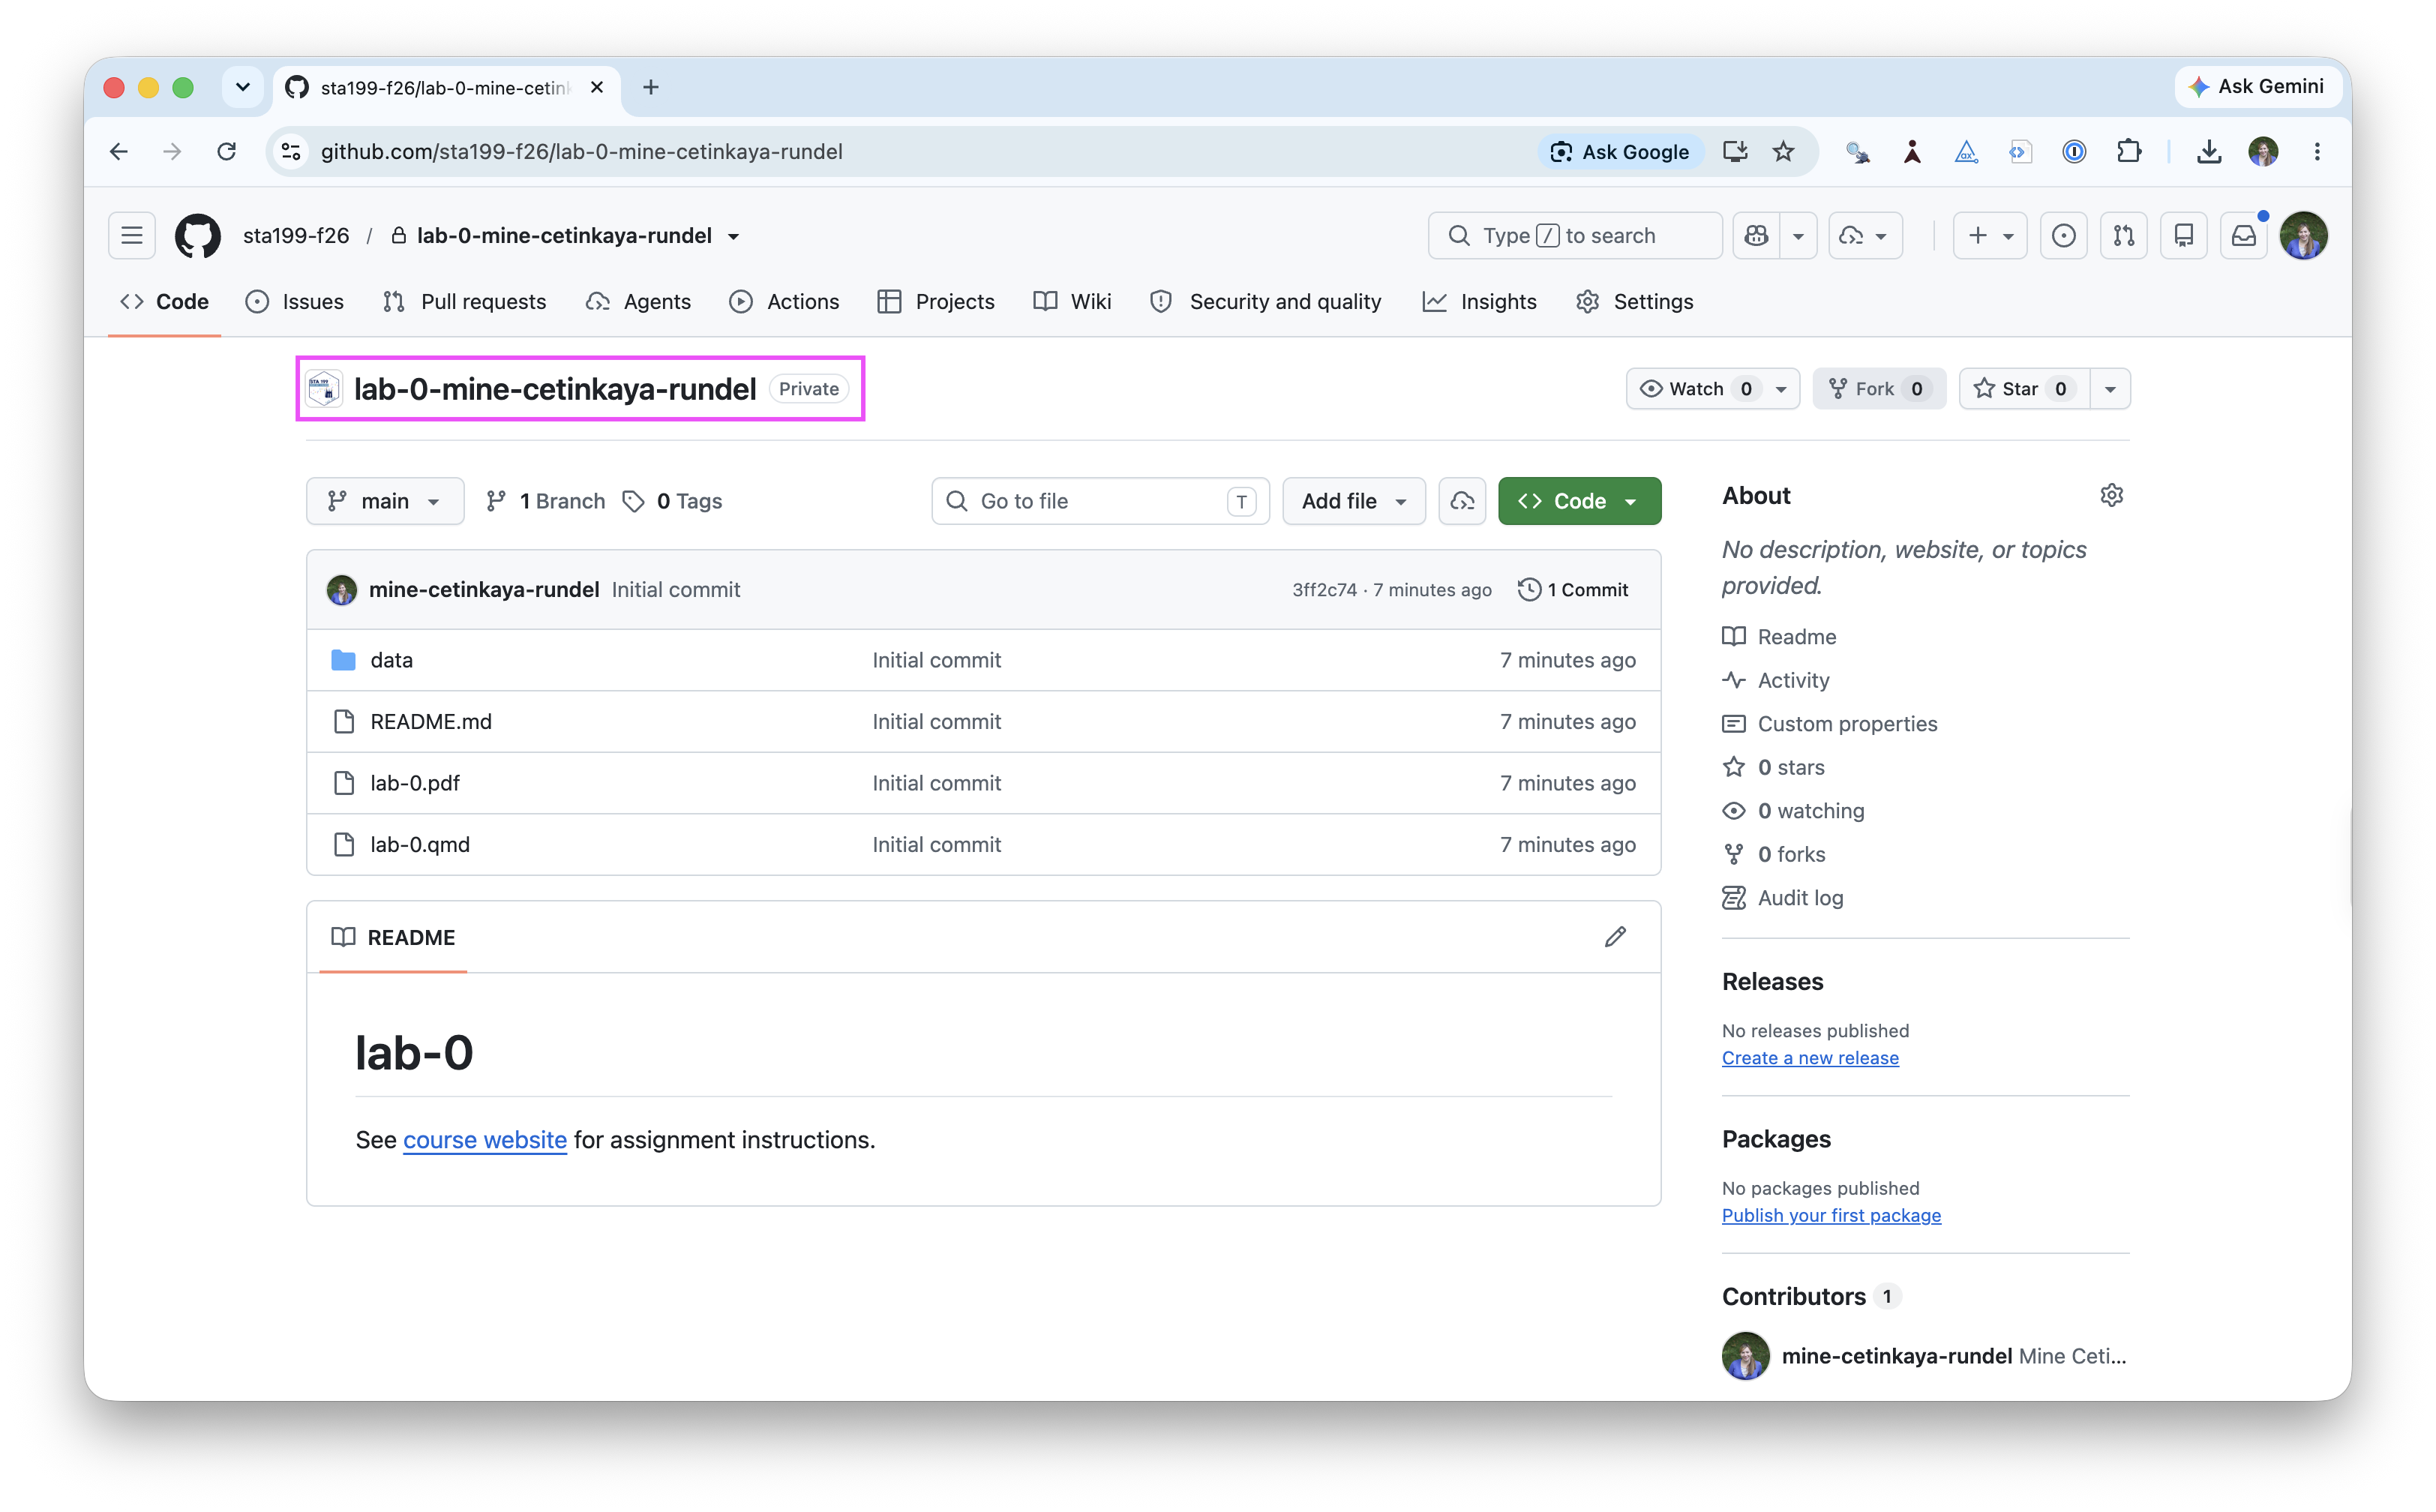
-
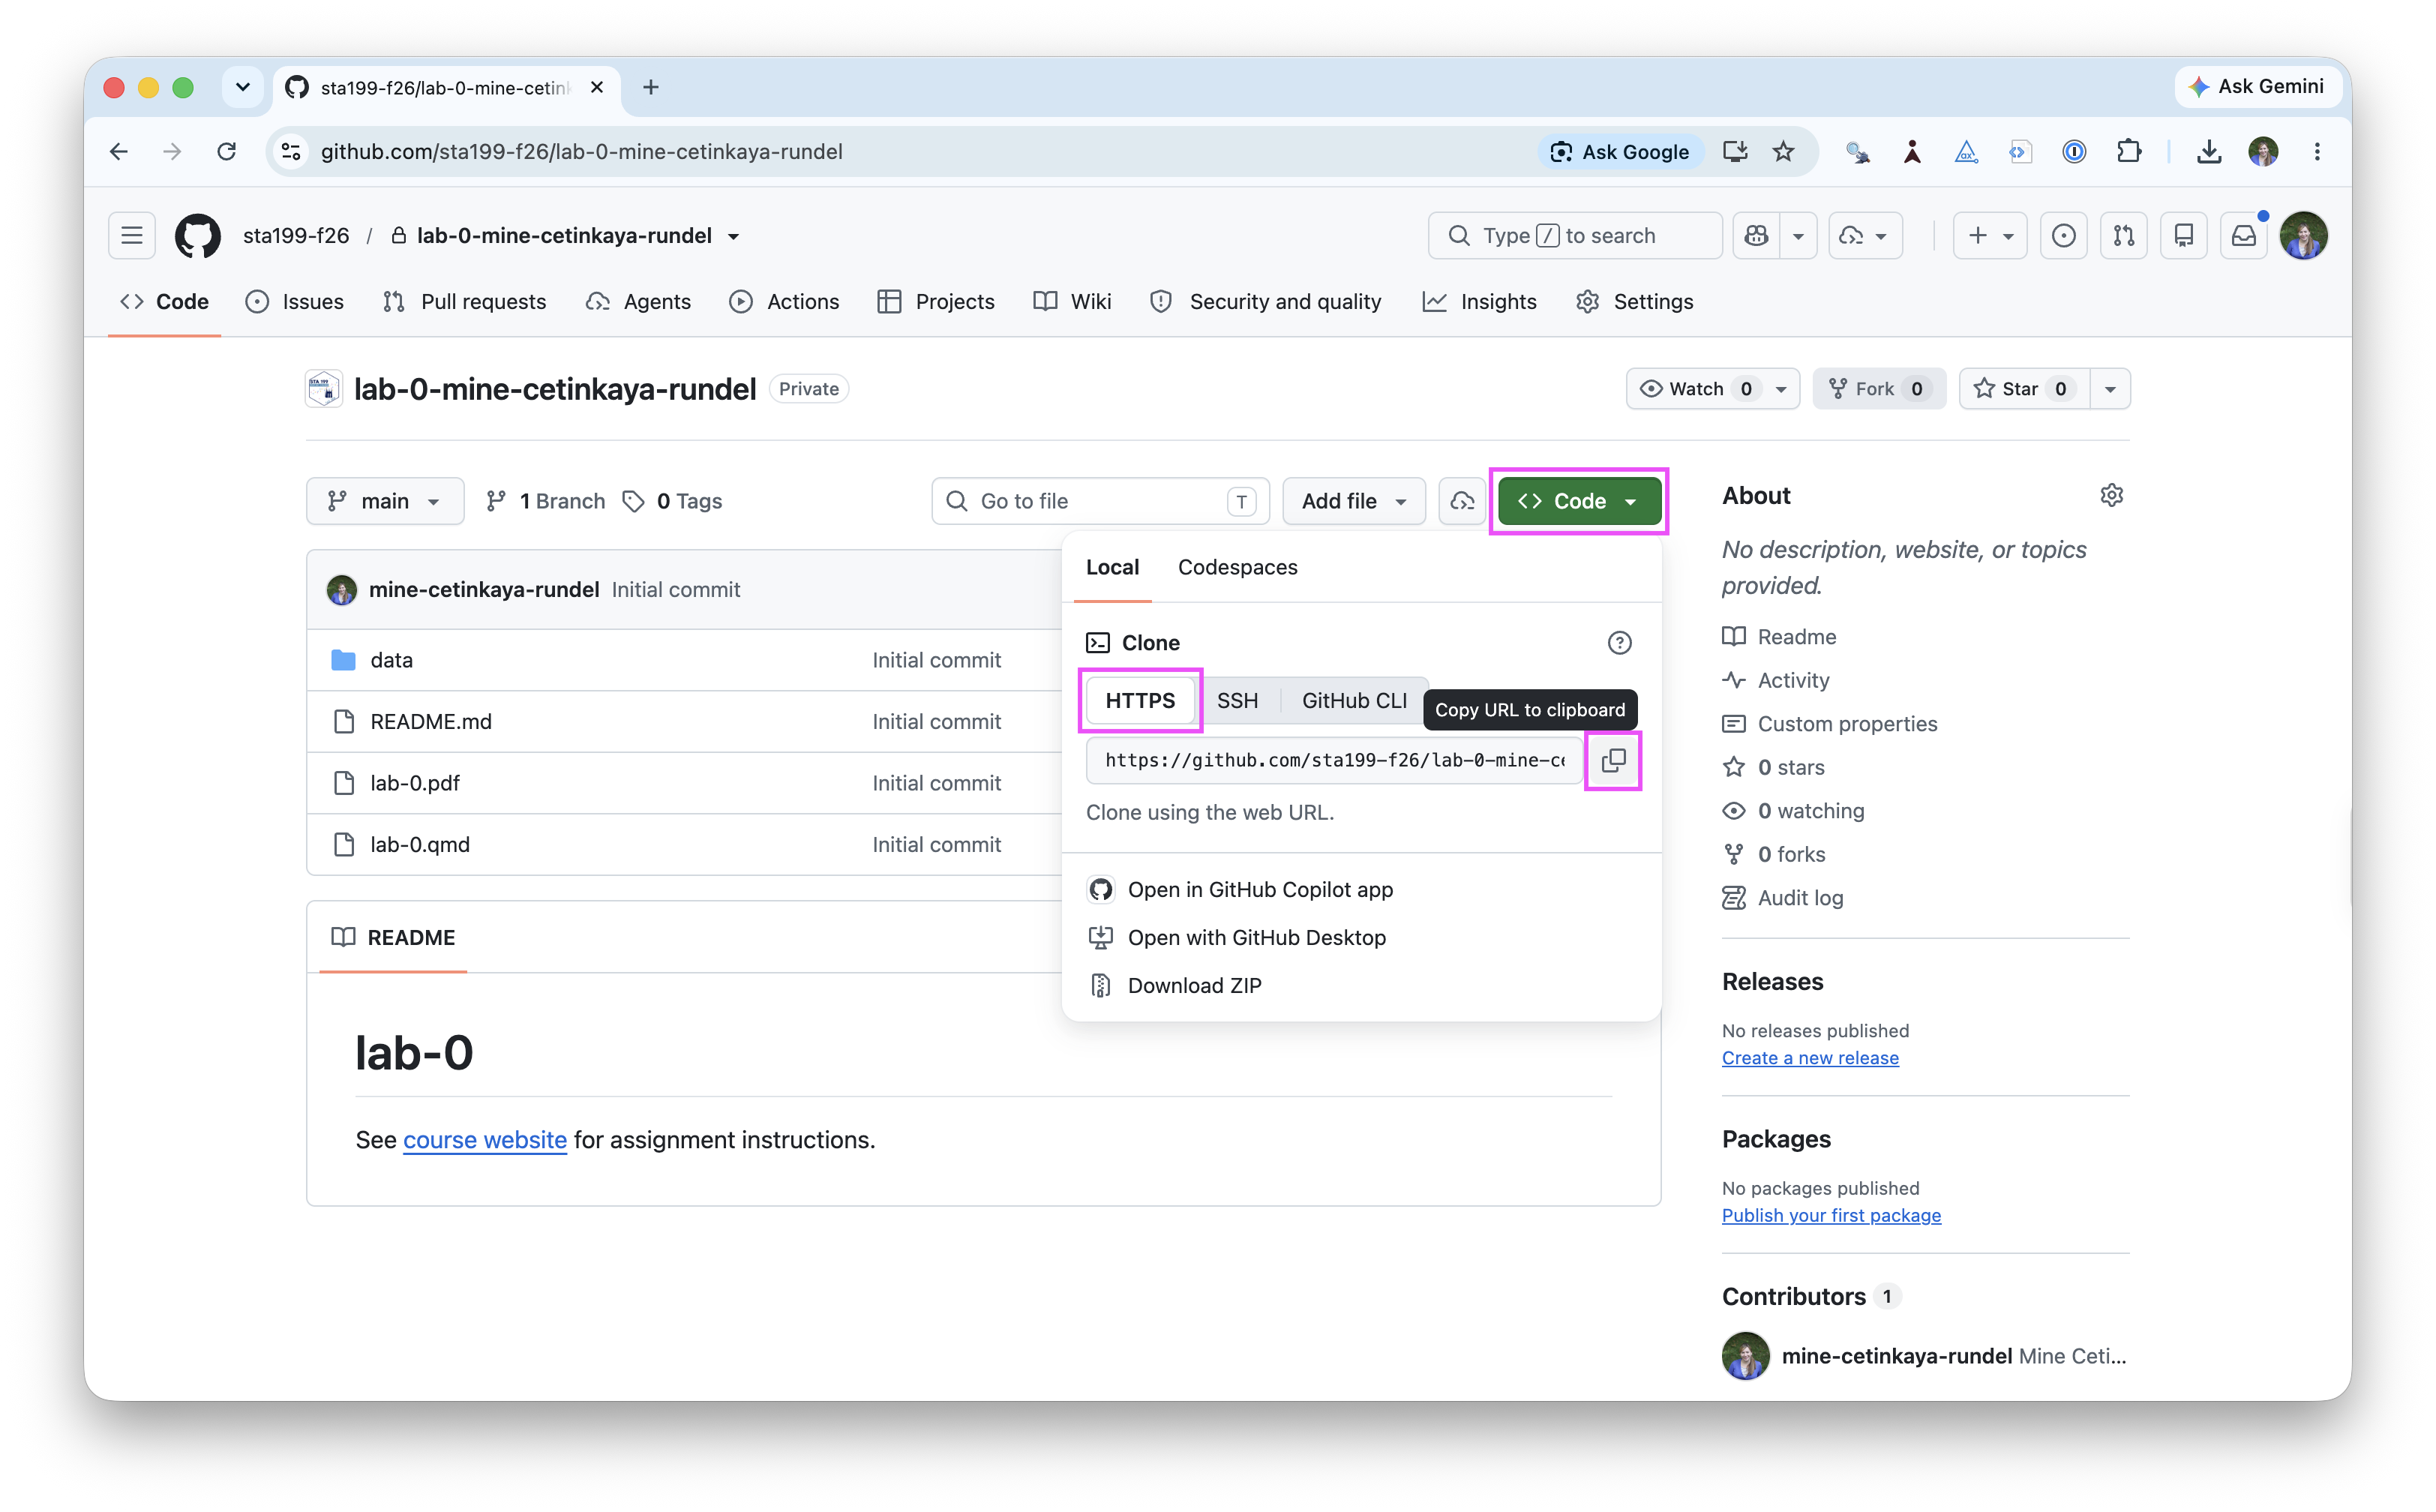
Step 2: Click on the green CODE button, select HTTPS under Clone. Click on the clipboard icon to copy the repo URL.
-
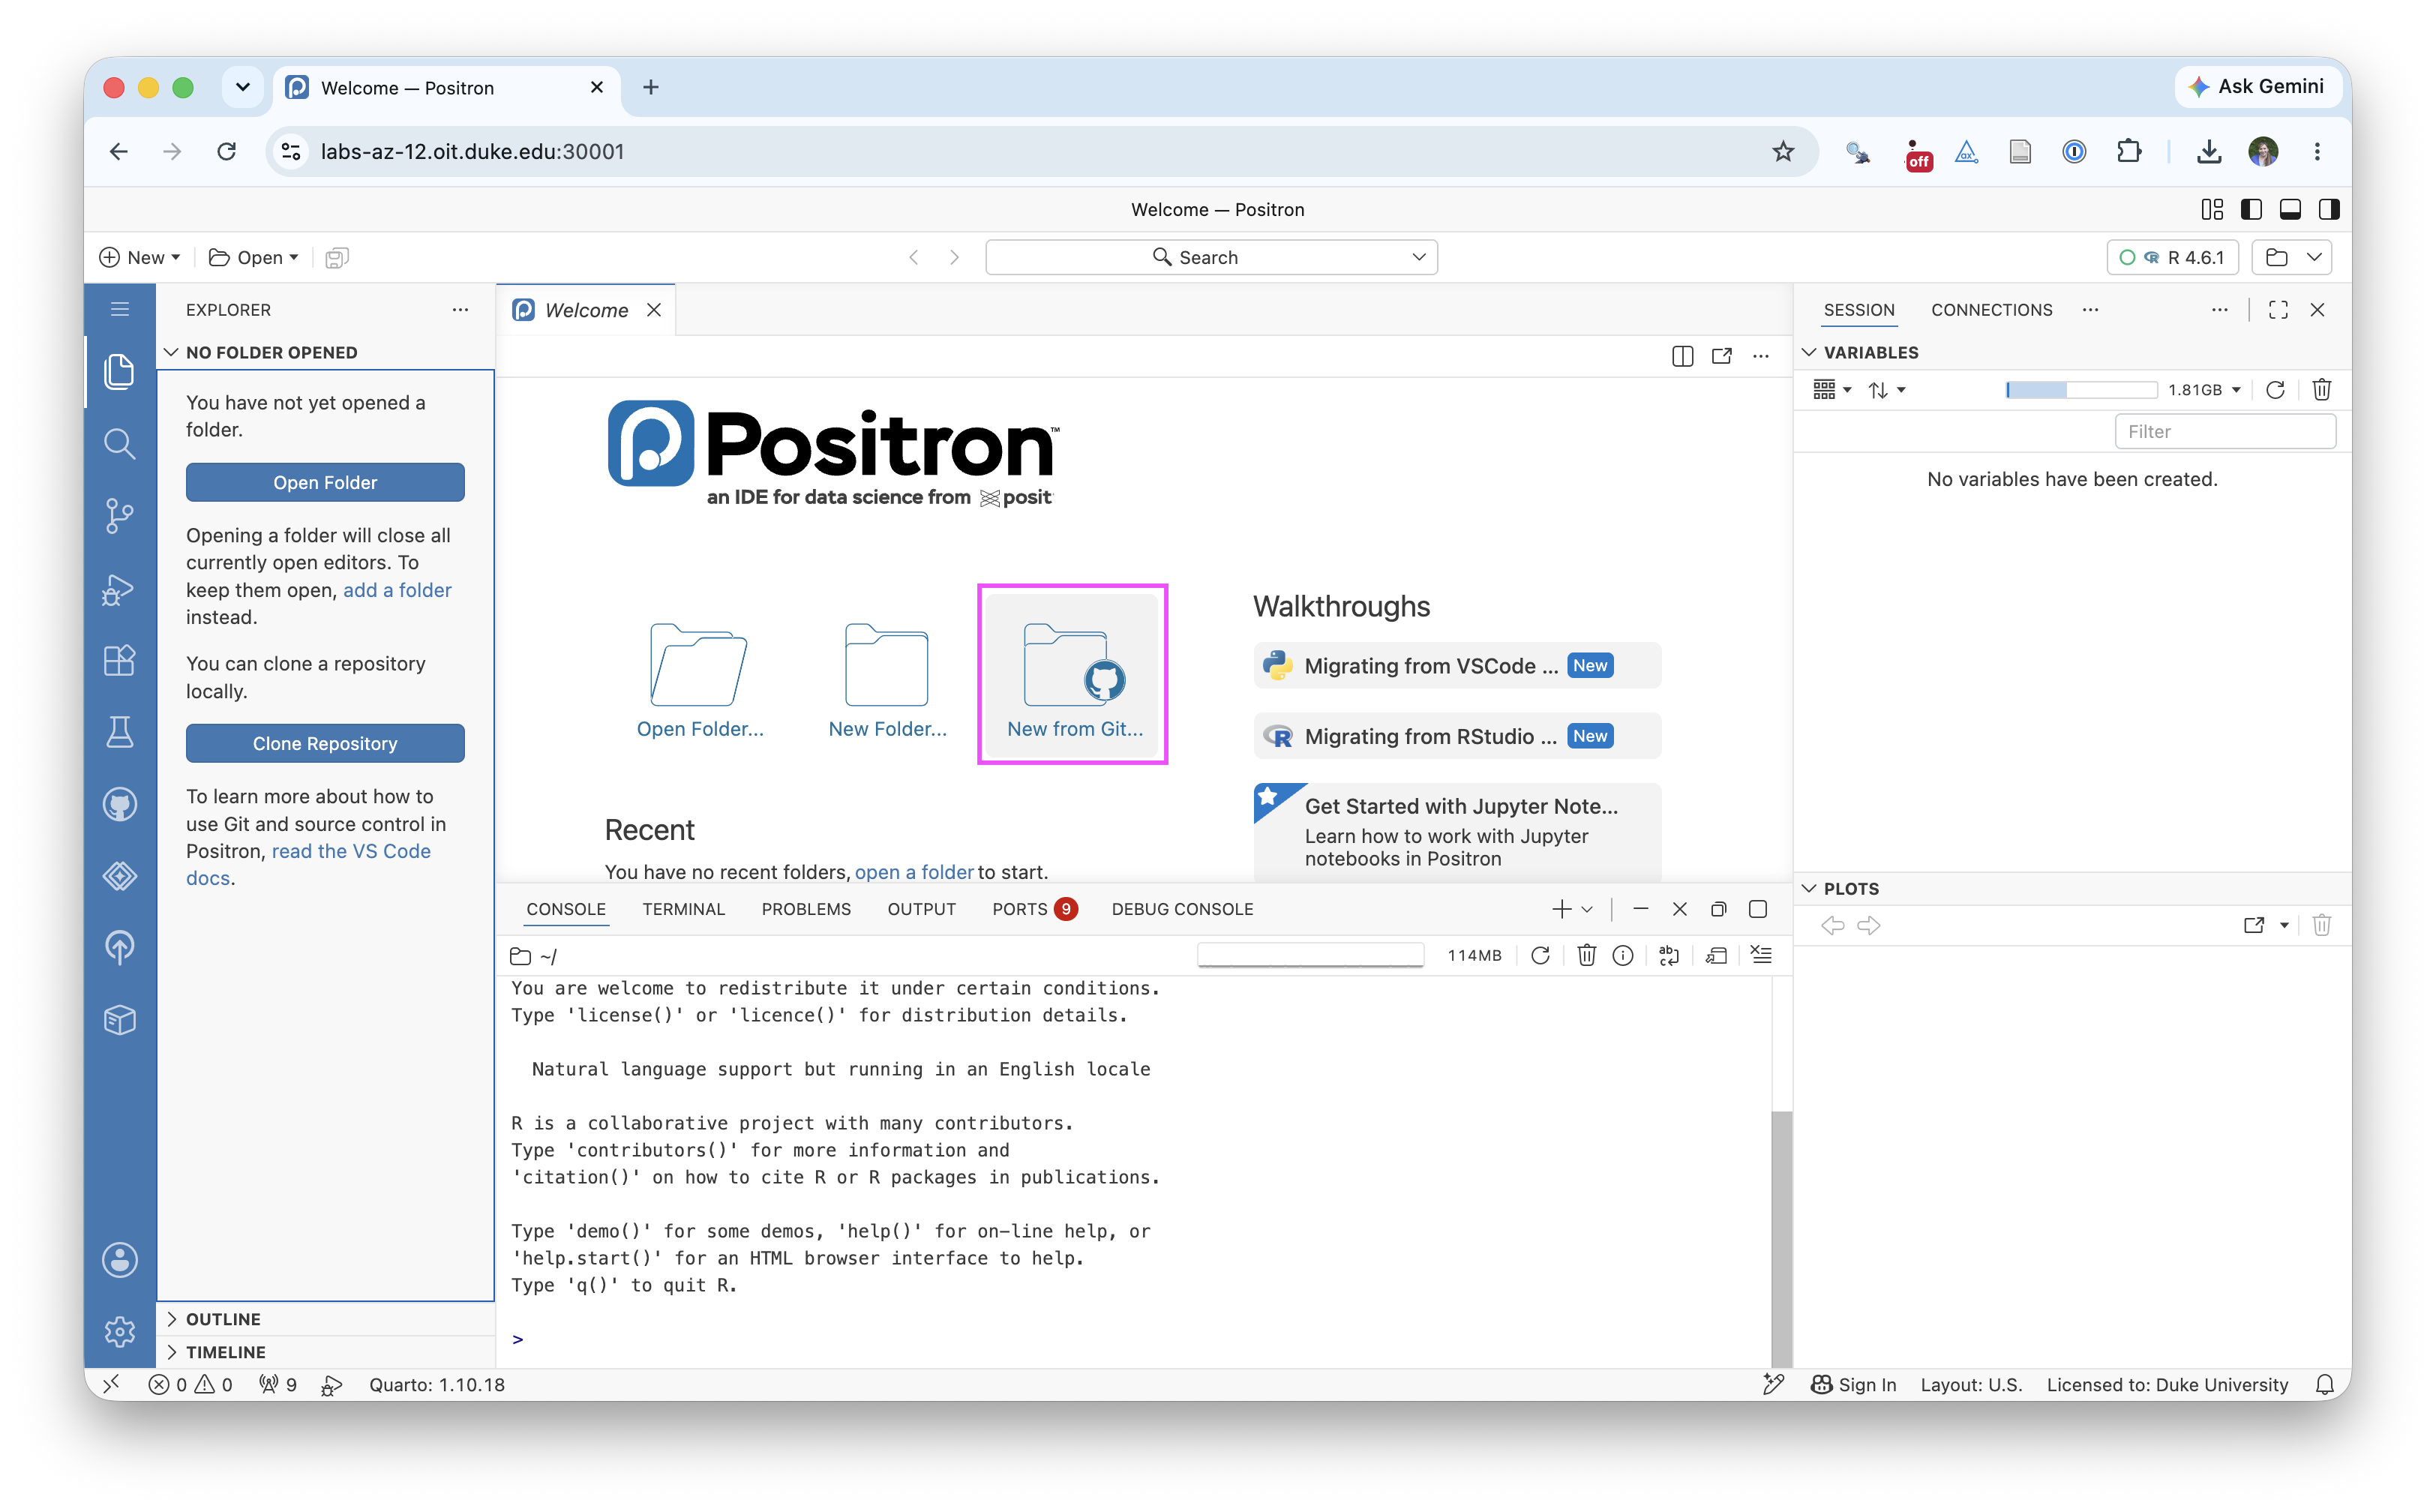
Step 3: In Positron’s Welcome window, click on New Folder From Git….
-
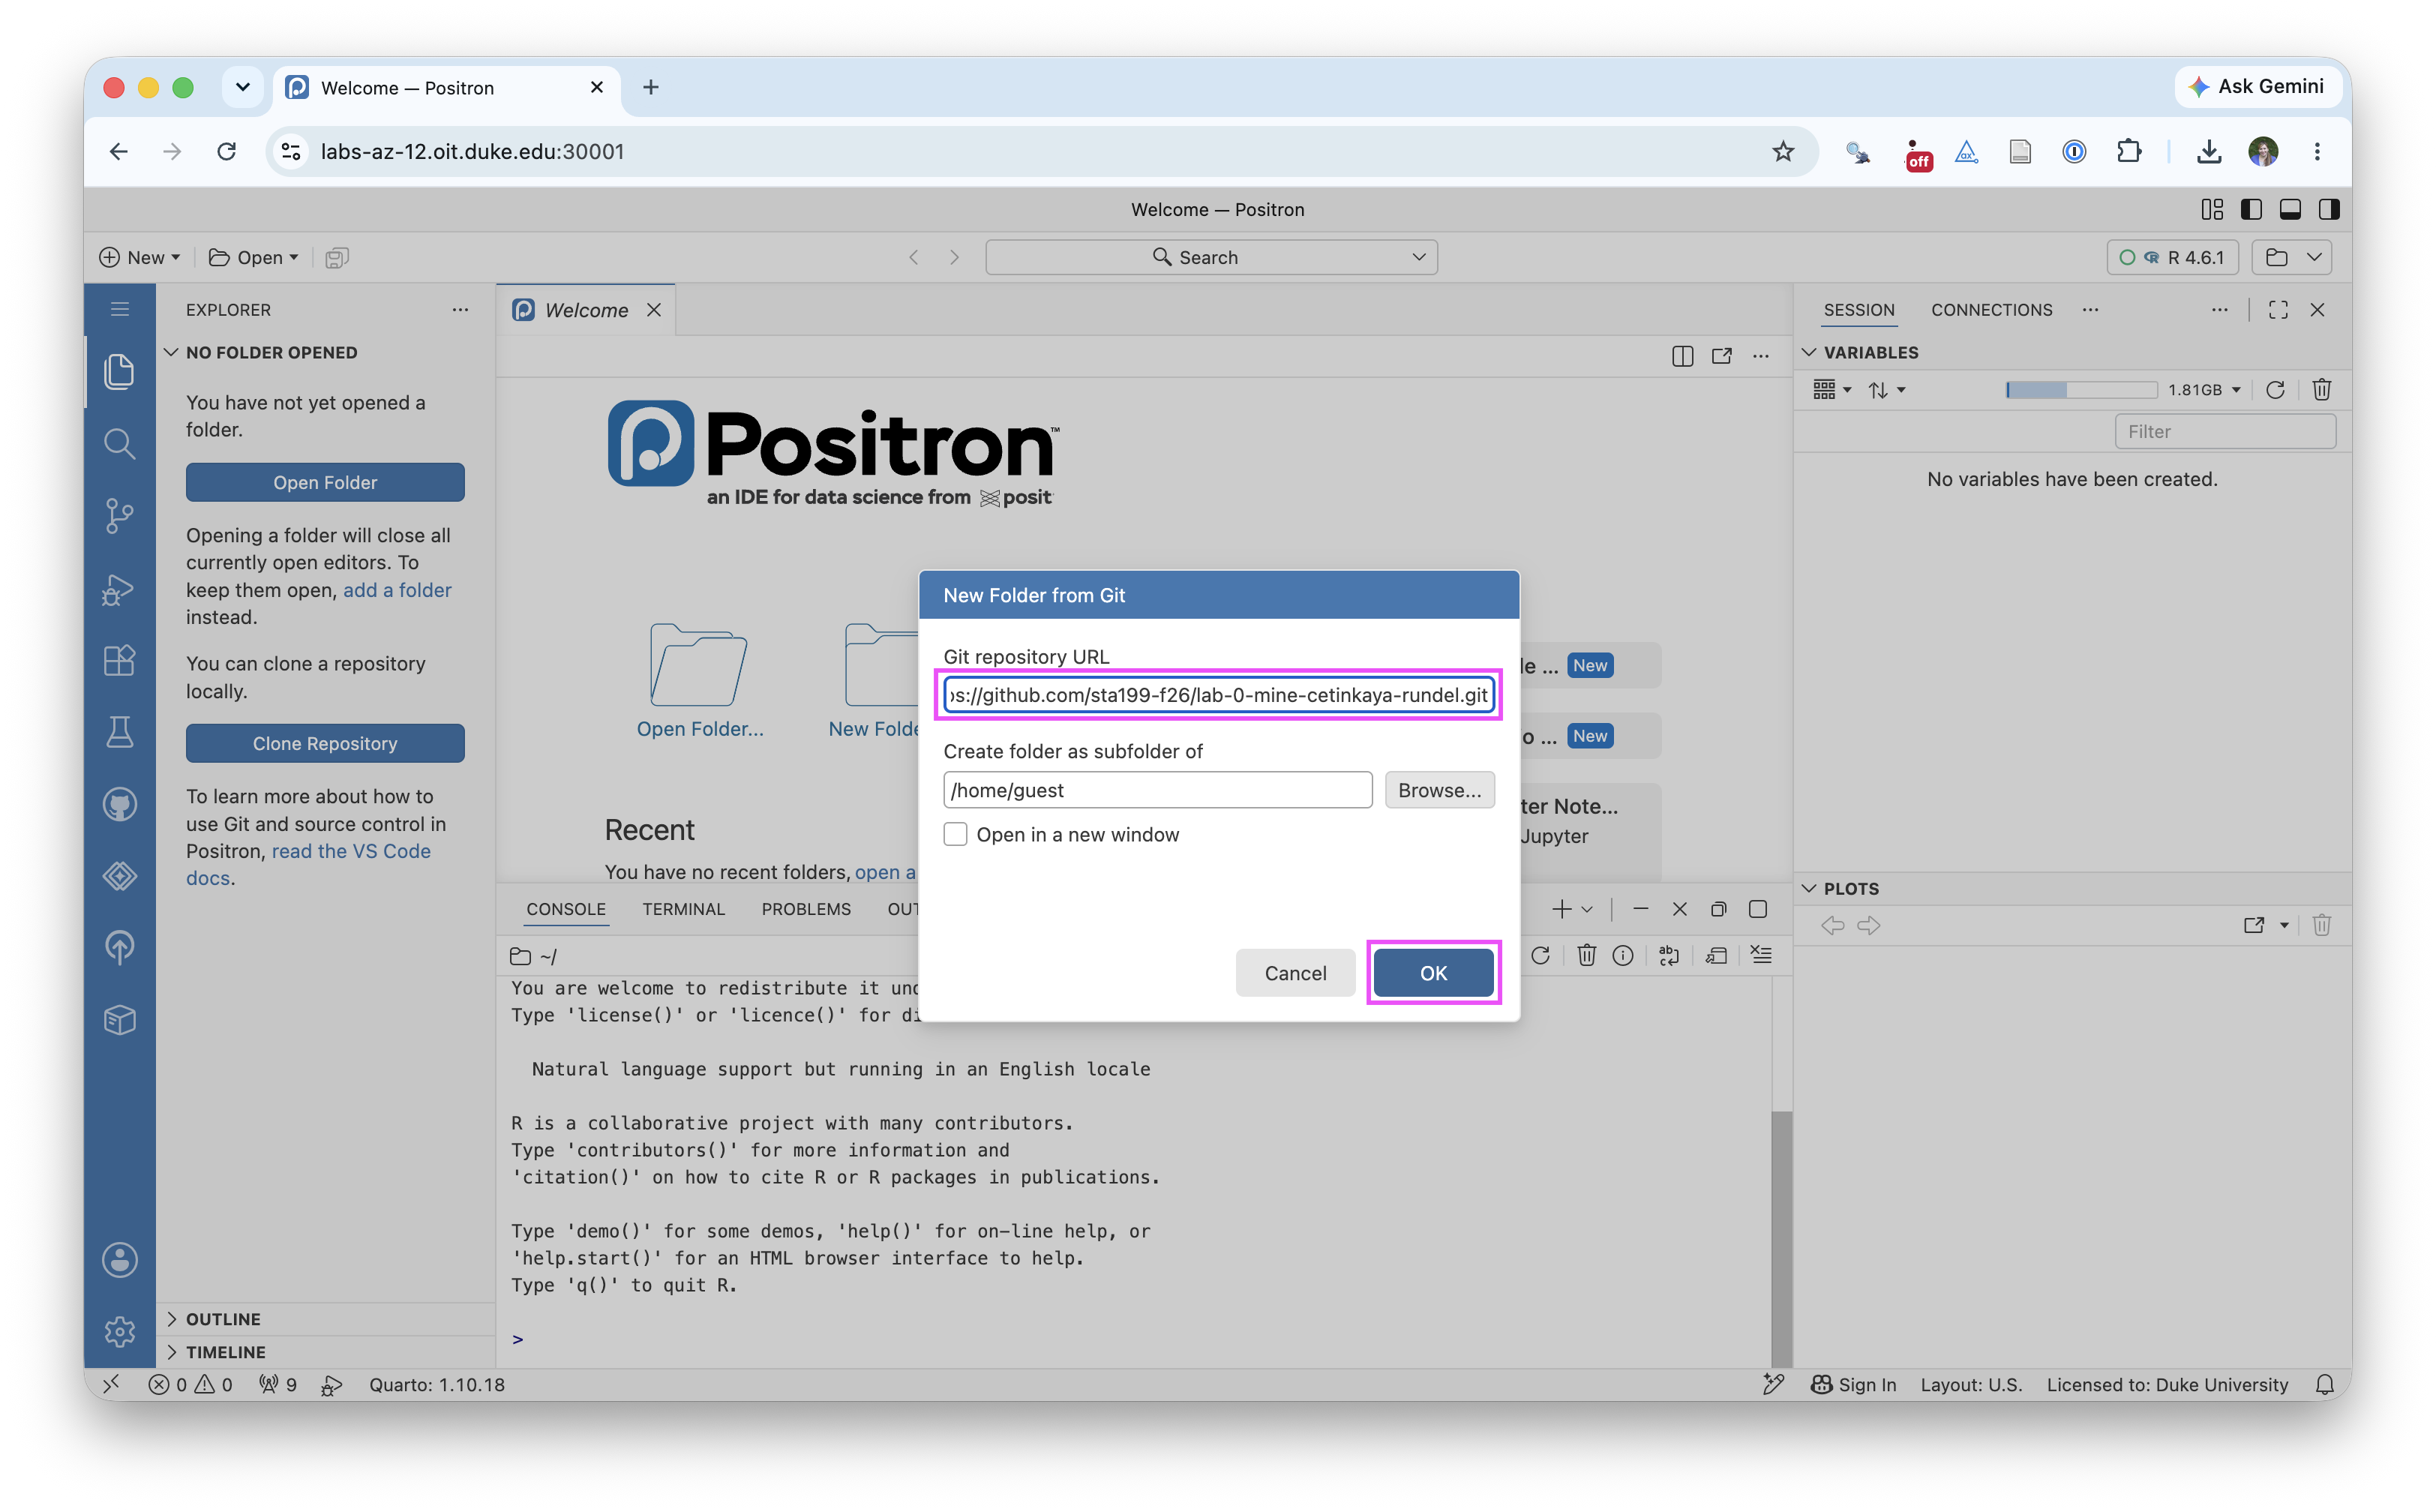
Step 4: Paste the URL of the lab-0 repo into the dialog box labeled Git repository URL. Again, please make sure to have HTTPS highlighted under Clone when you copy the address. Then click OK.
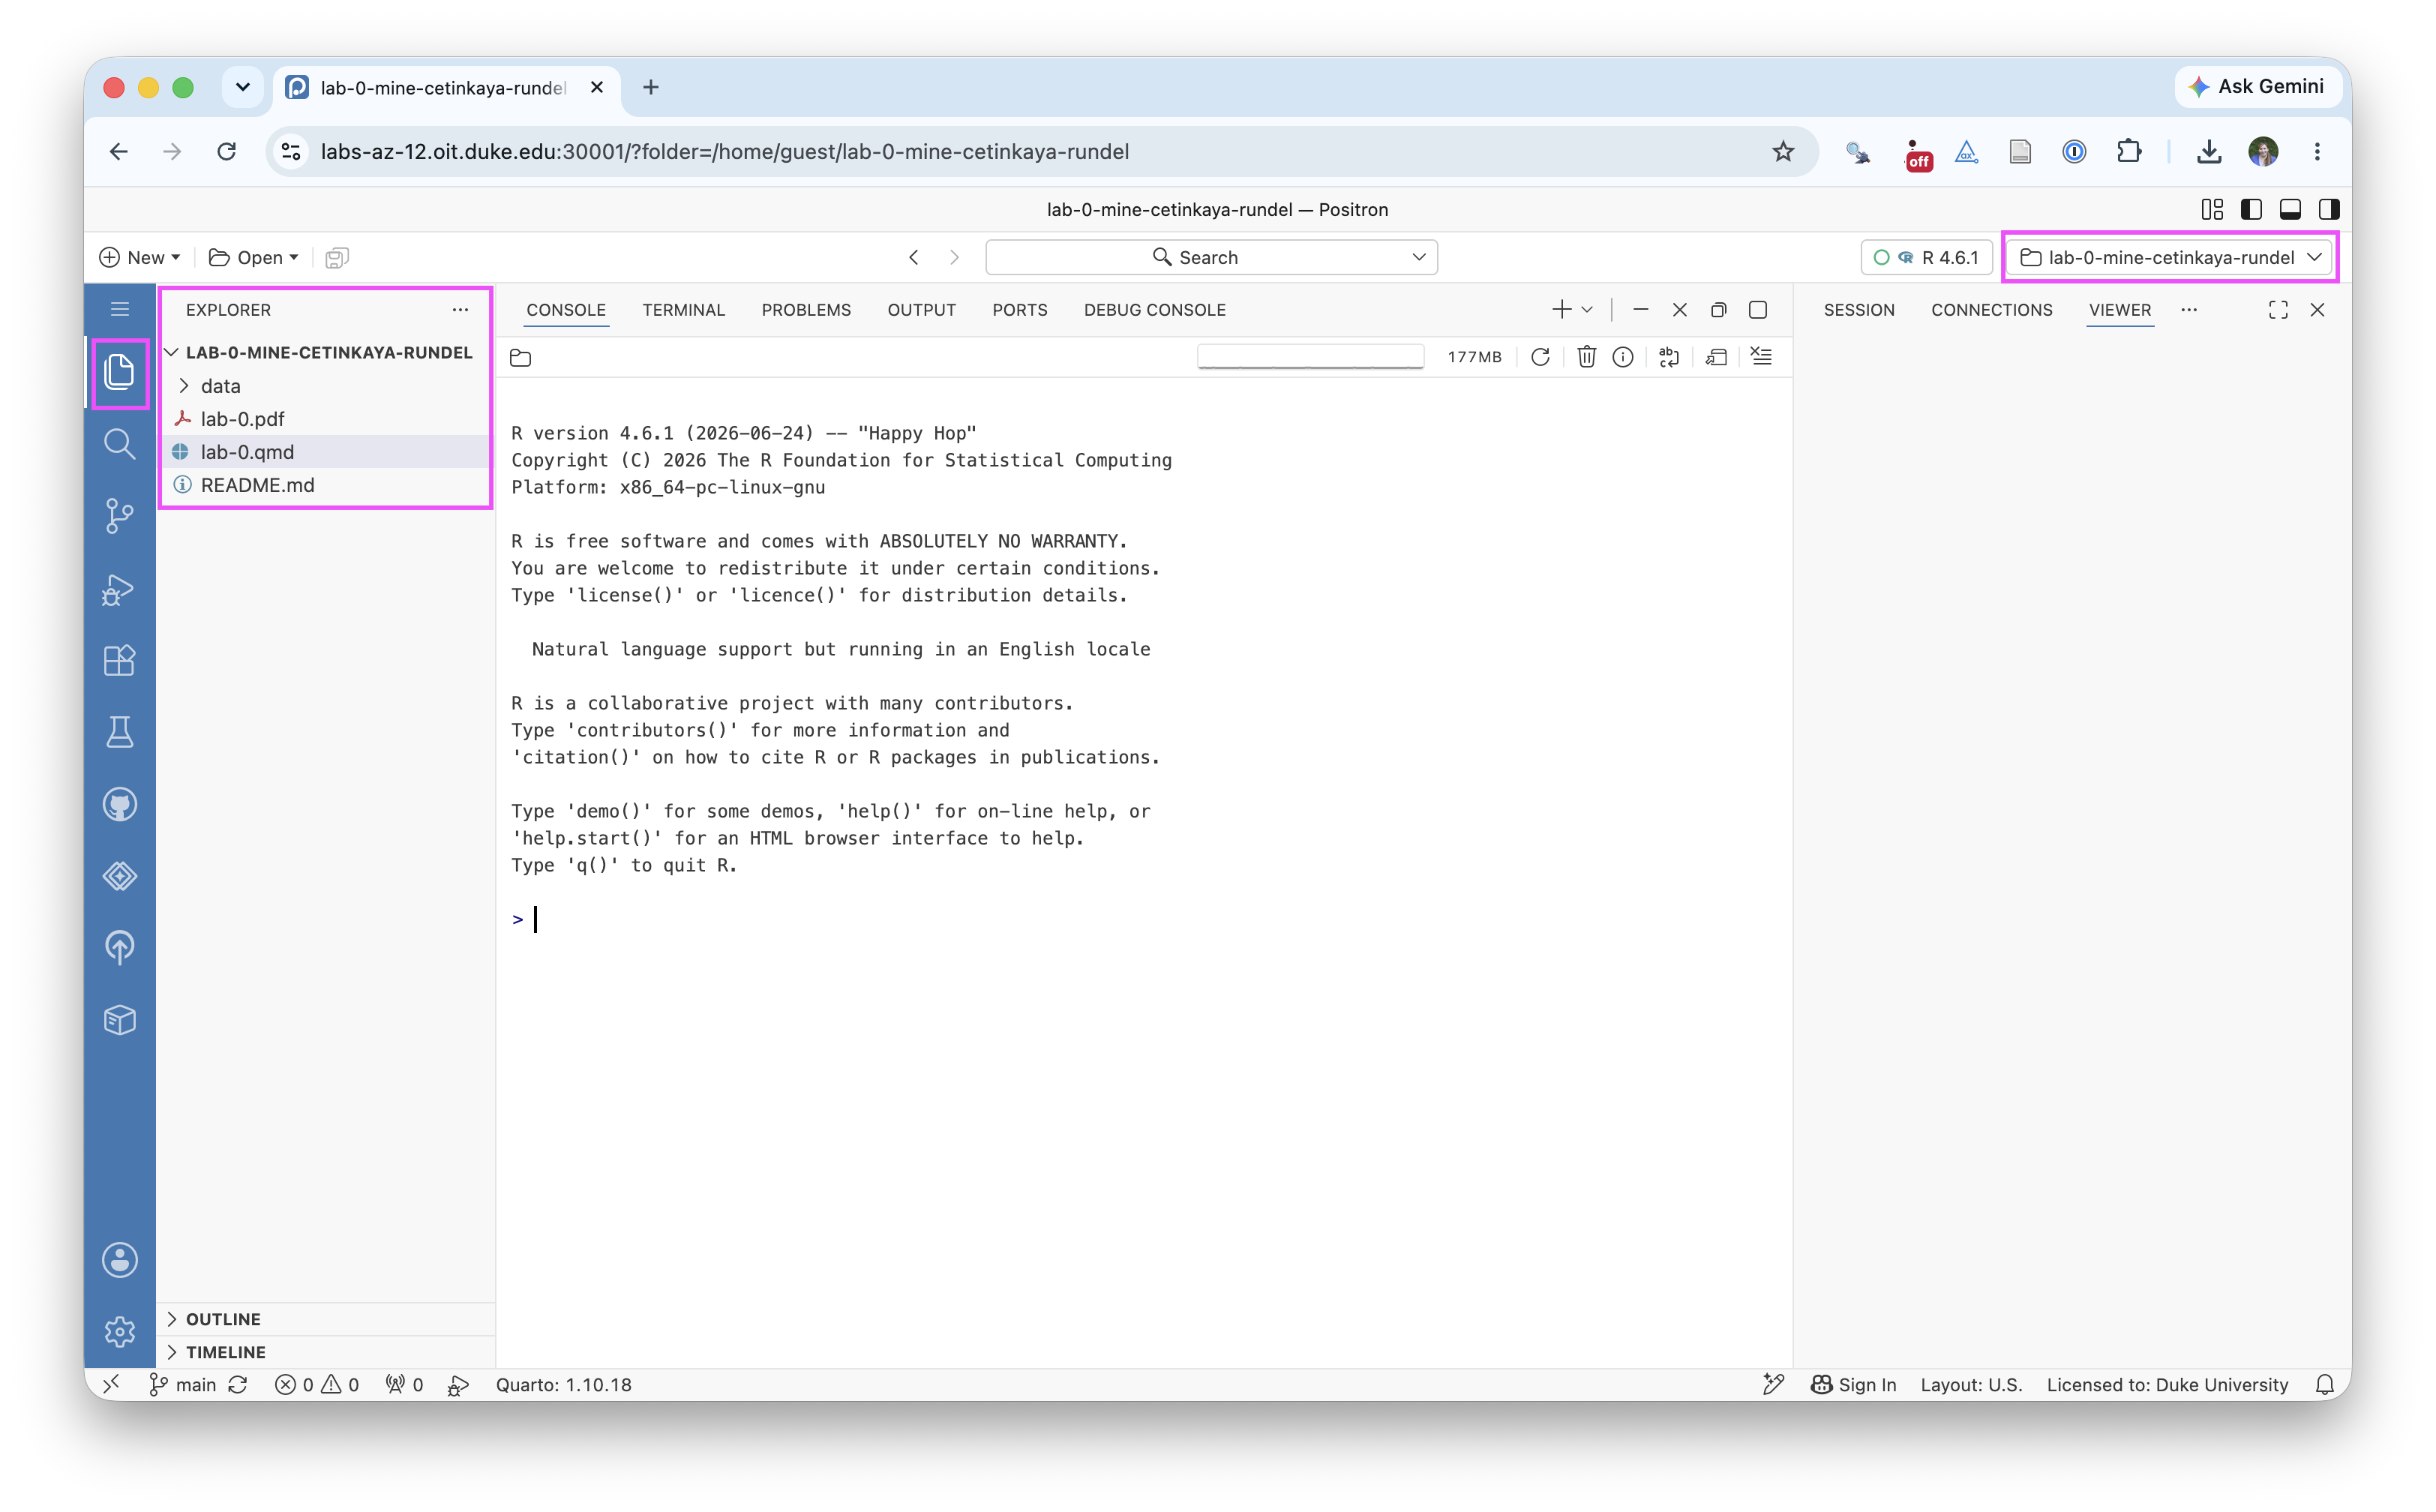
These steps will clone the repository from GitHub to your Positron container and create a new Positron folder for you. This might take a few seconds. Once done, the files from your GitHub repo will appear in the Explorer panel in Positron. If you don’t see it, click the Explorer icon (the page icon at the very top of the left-hand sidebar).
Seeing a dialog box asking if you trust the authors of this folder?
If you see a dialog box asking if you trust the authors of this folder, click Yes. This is a security feature of Positron to ensure that you are aware that you are downloading files from the internet. You can safely trust the authors of this repository, as it is part of your course materials.
Work on Lab 0
FINALLY!!!
The mise en place is finally done. And it’s time to do a tiny bit of data exploration to close the loop.
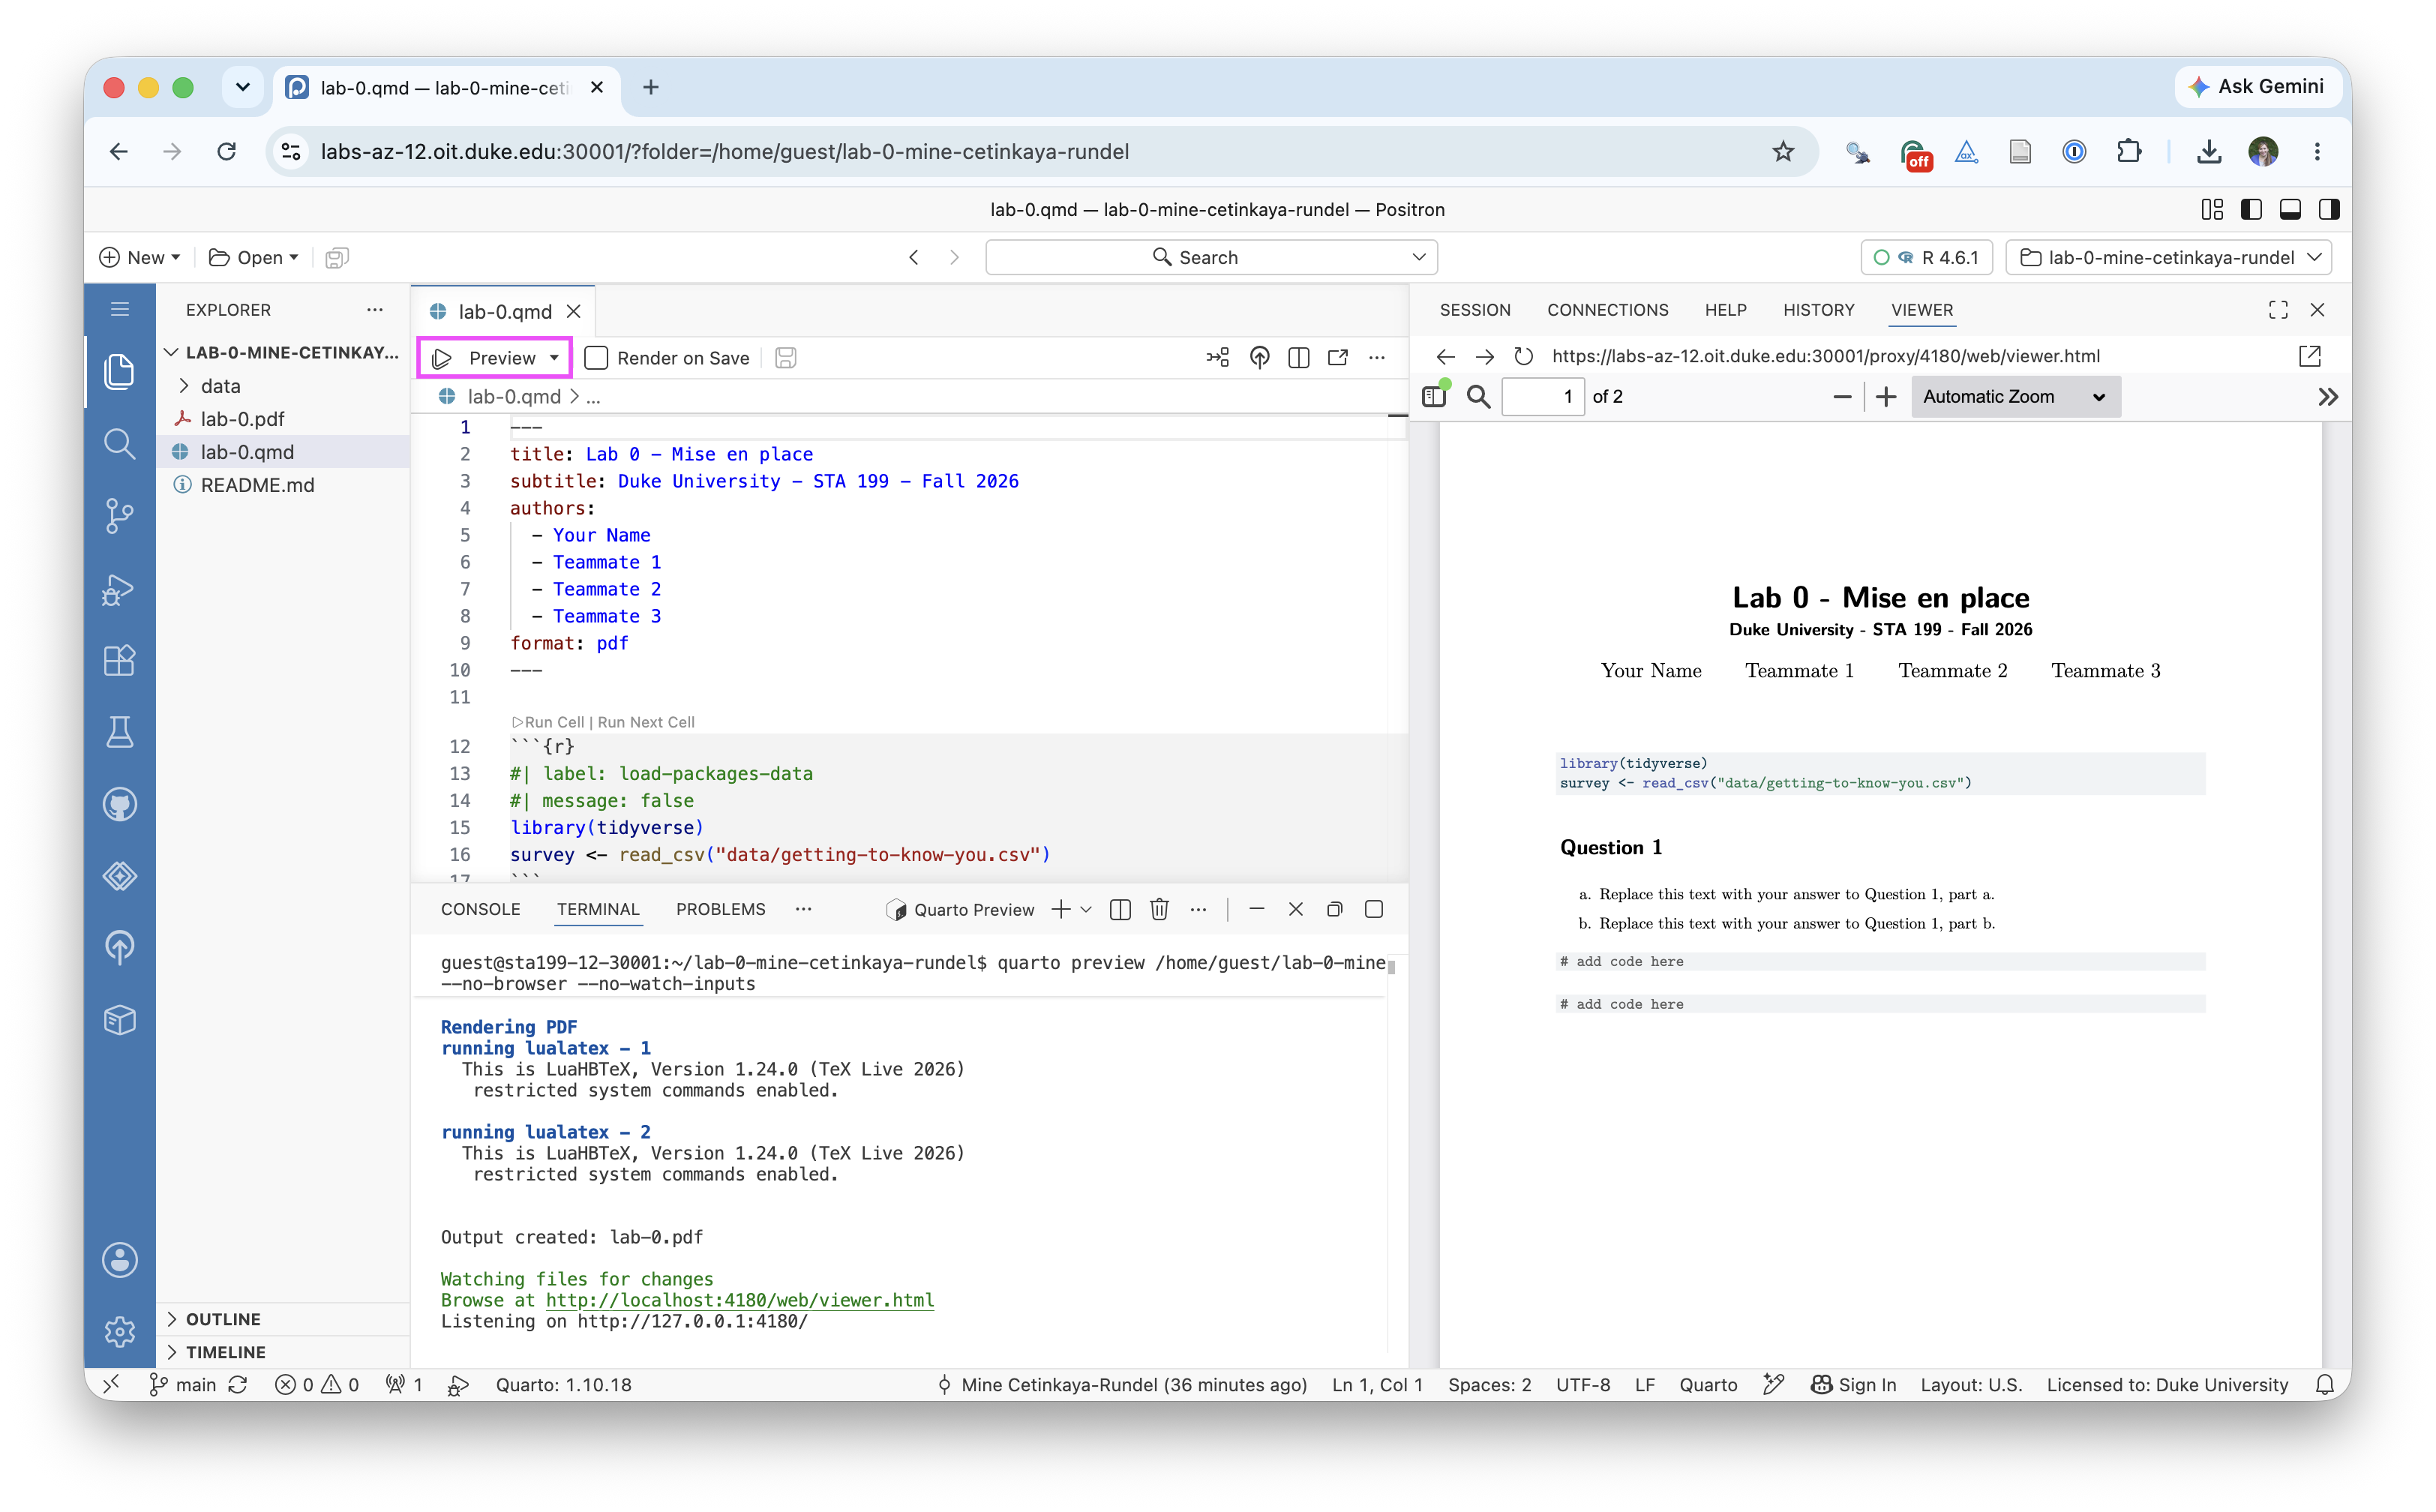
First, open the Quarto file lab-0.qmd. You can do this by clicking on the file name. This will open the file name in the Explorer pane. Before you start working on the lab, click Preview to see what the rendered document looks like.
Update authors
In the YAML header at the top of the document, update the author field to include your name and your teammates’ names. Preview the document again to make sure your names appear correctly.
You’ve made updates, previewed the document to confirm they look good, now it’s time to take a record of this change.
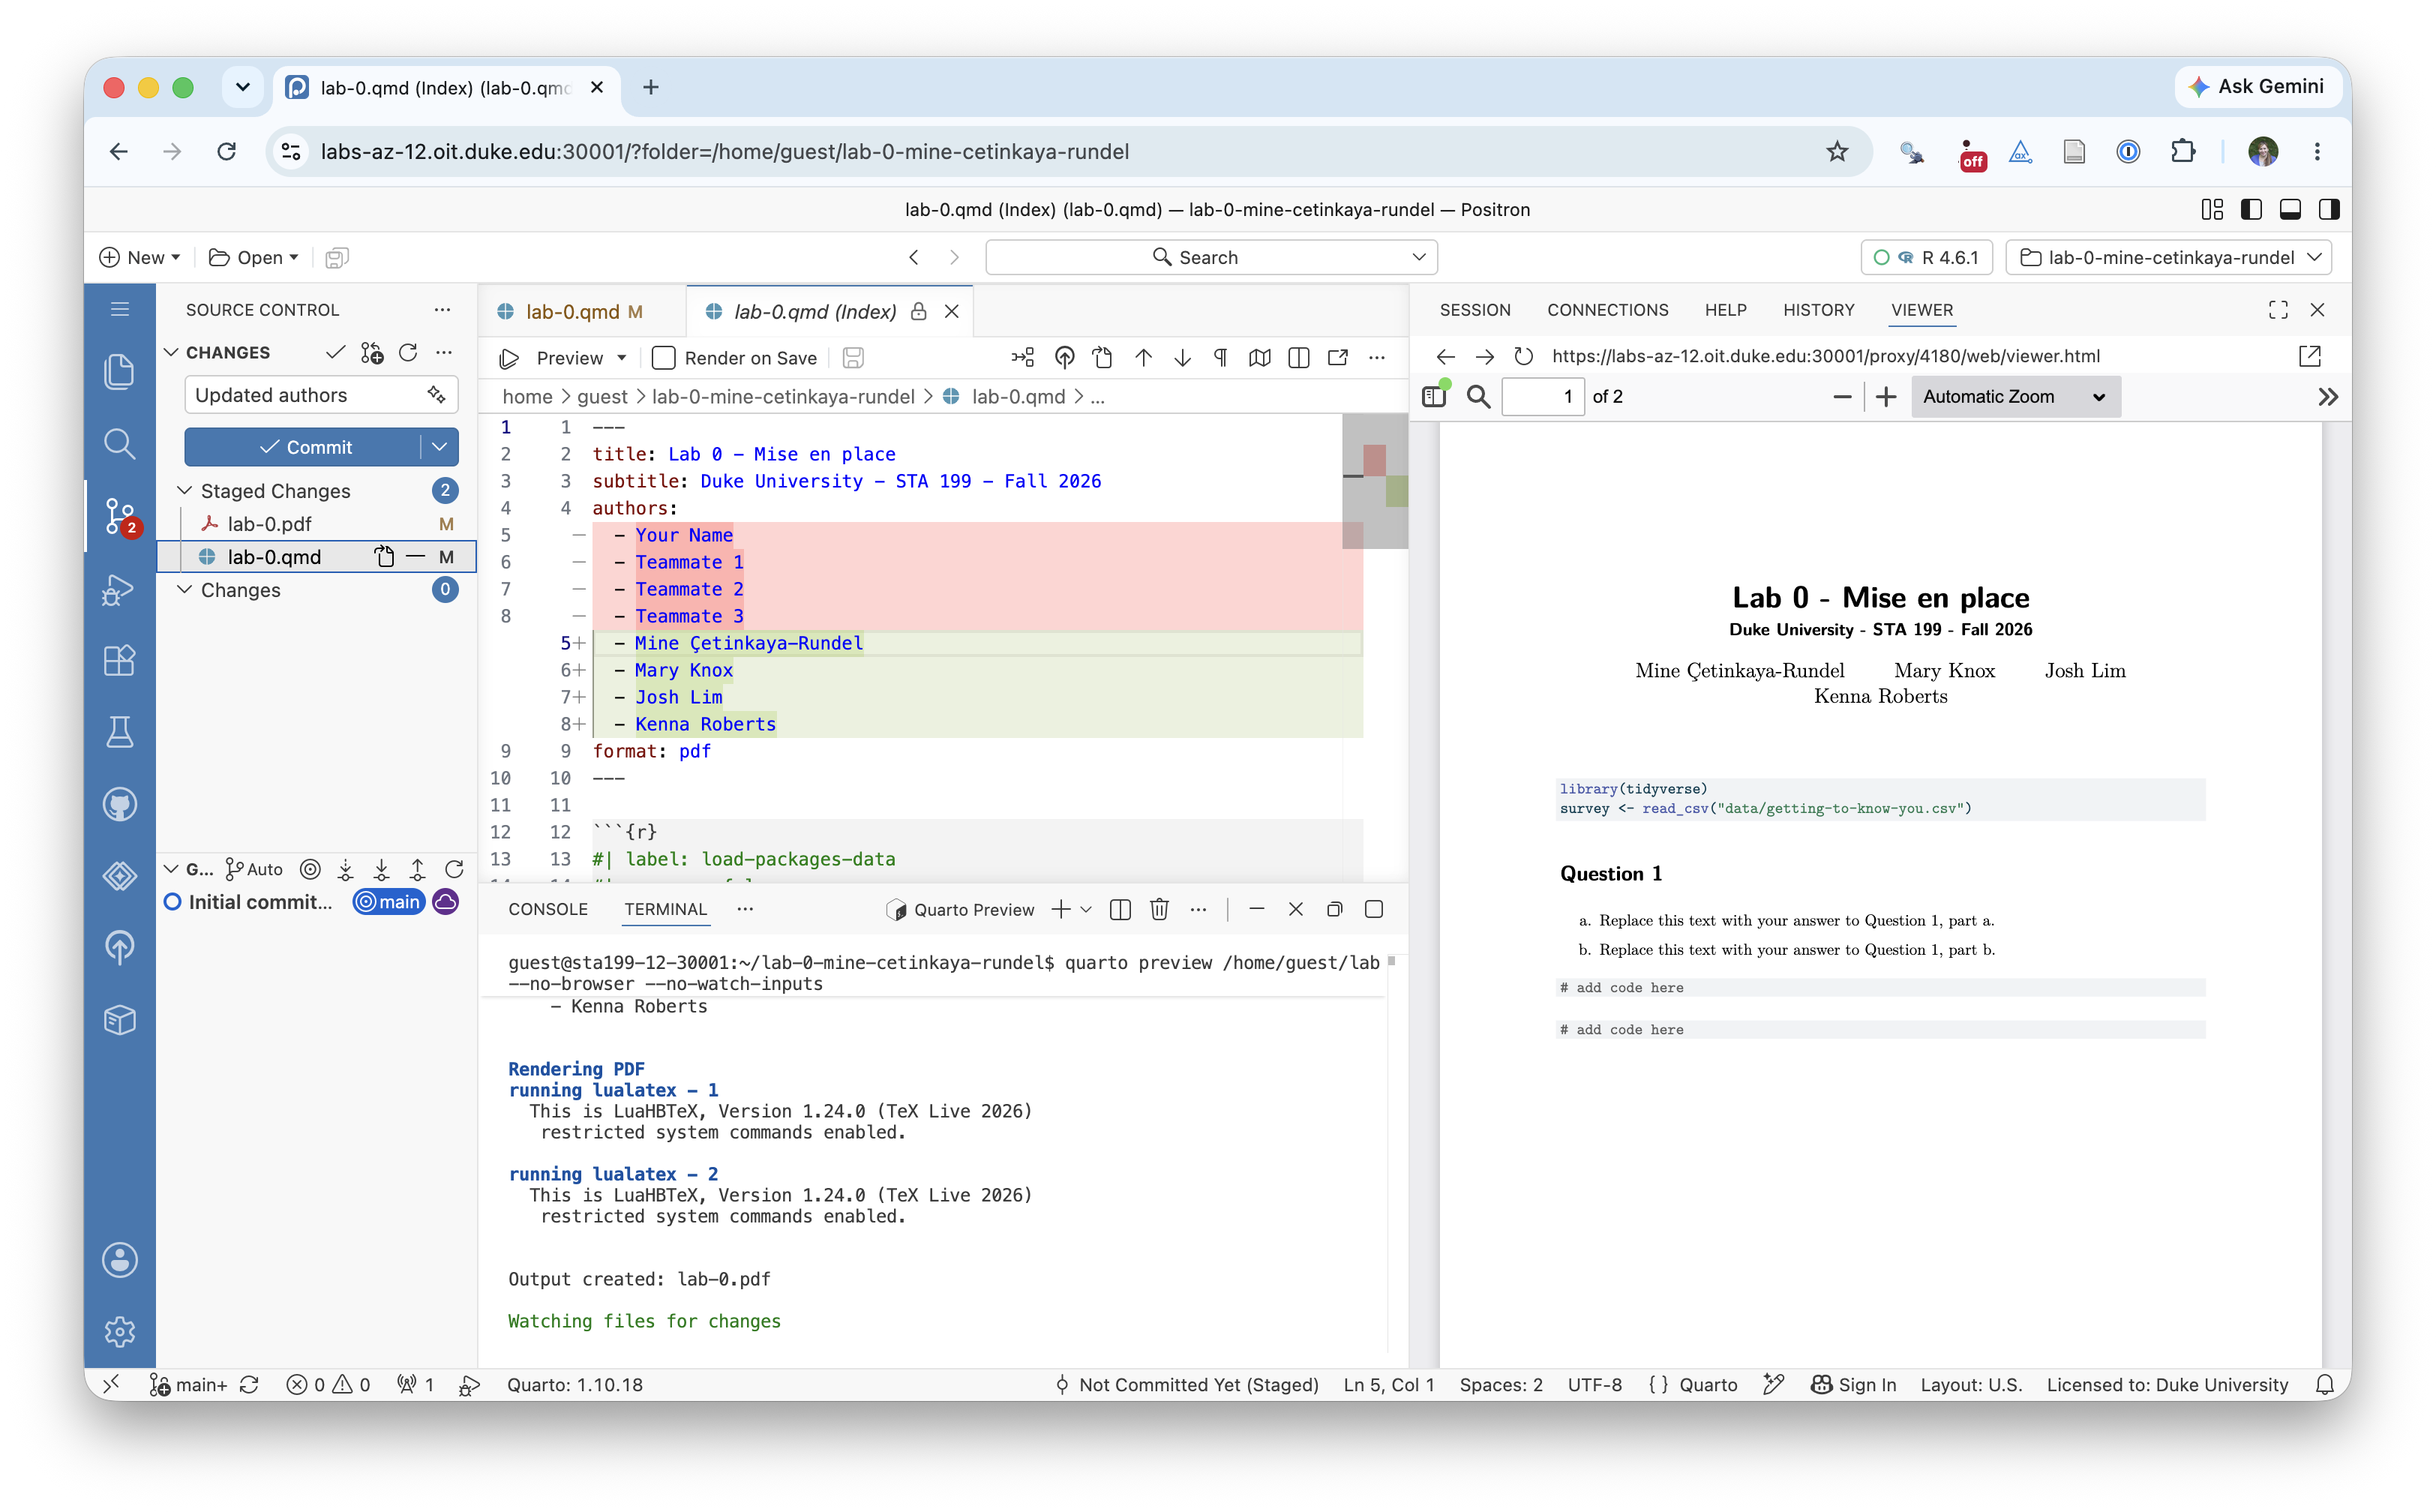
Go to Source Control in the Activity bar (the icon that looks like a branch with a dot on it). You should see the files lab-0.qmd and lab-0.pdf listed under Changes. If you want to view what changed, click on lab-0.qmd to view the “diff” (i.e., the difference between the current version and the previous version) of the file. In this view red indicates lines that were removed and green indicates lines that were added.
If all looks good, click on the + icon next to the file names to stage the changes. Then, in the Message box, type a message describing your change (e.g., “Updated authors”) and click Commit.
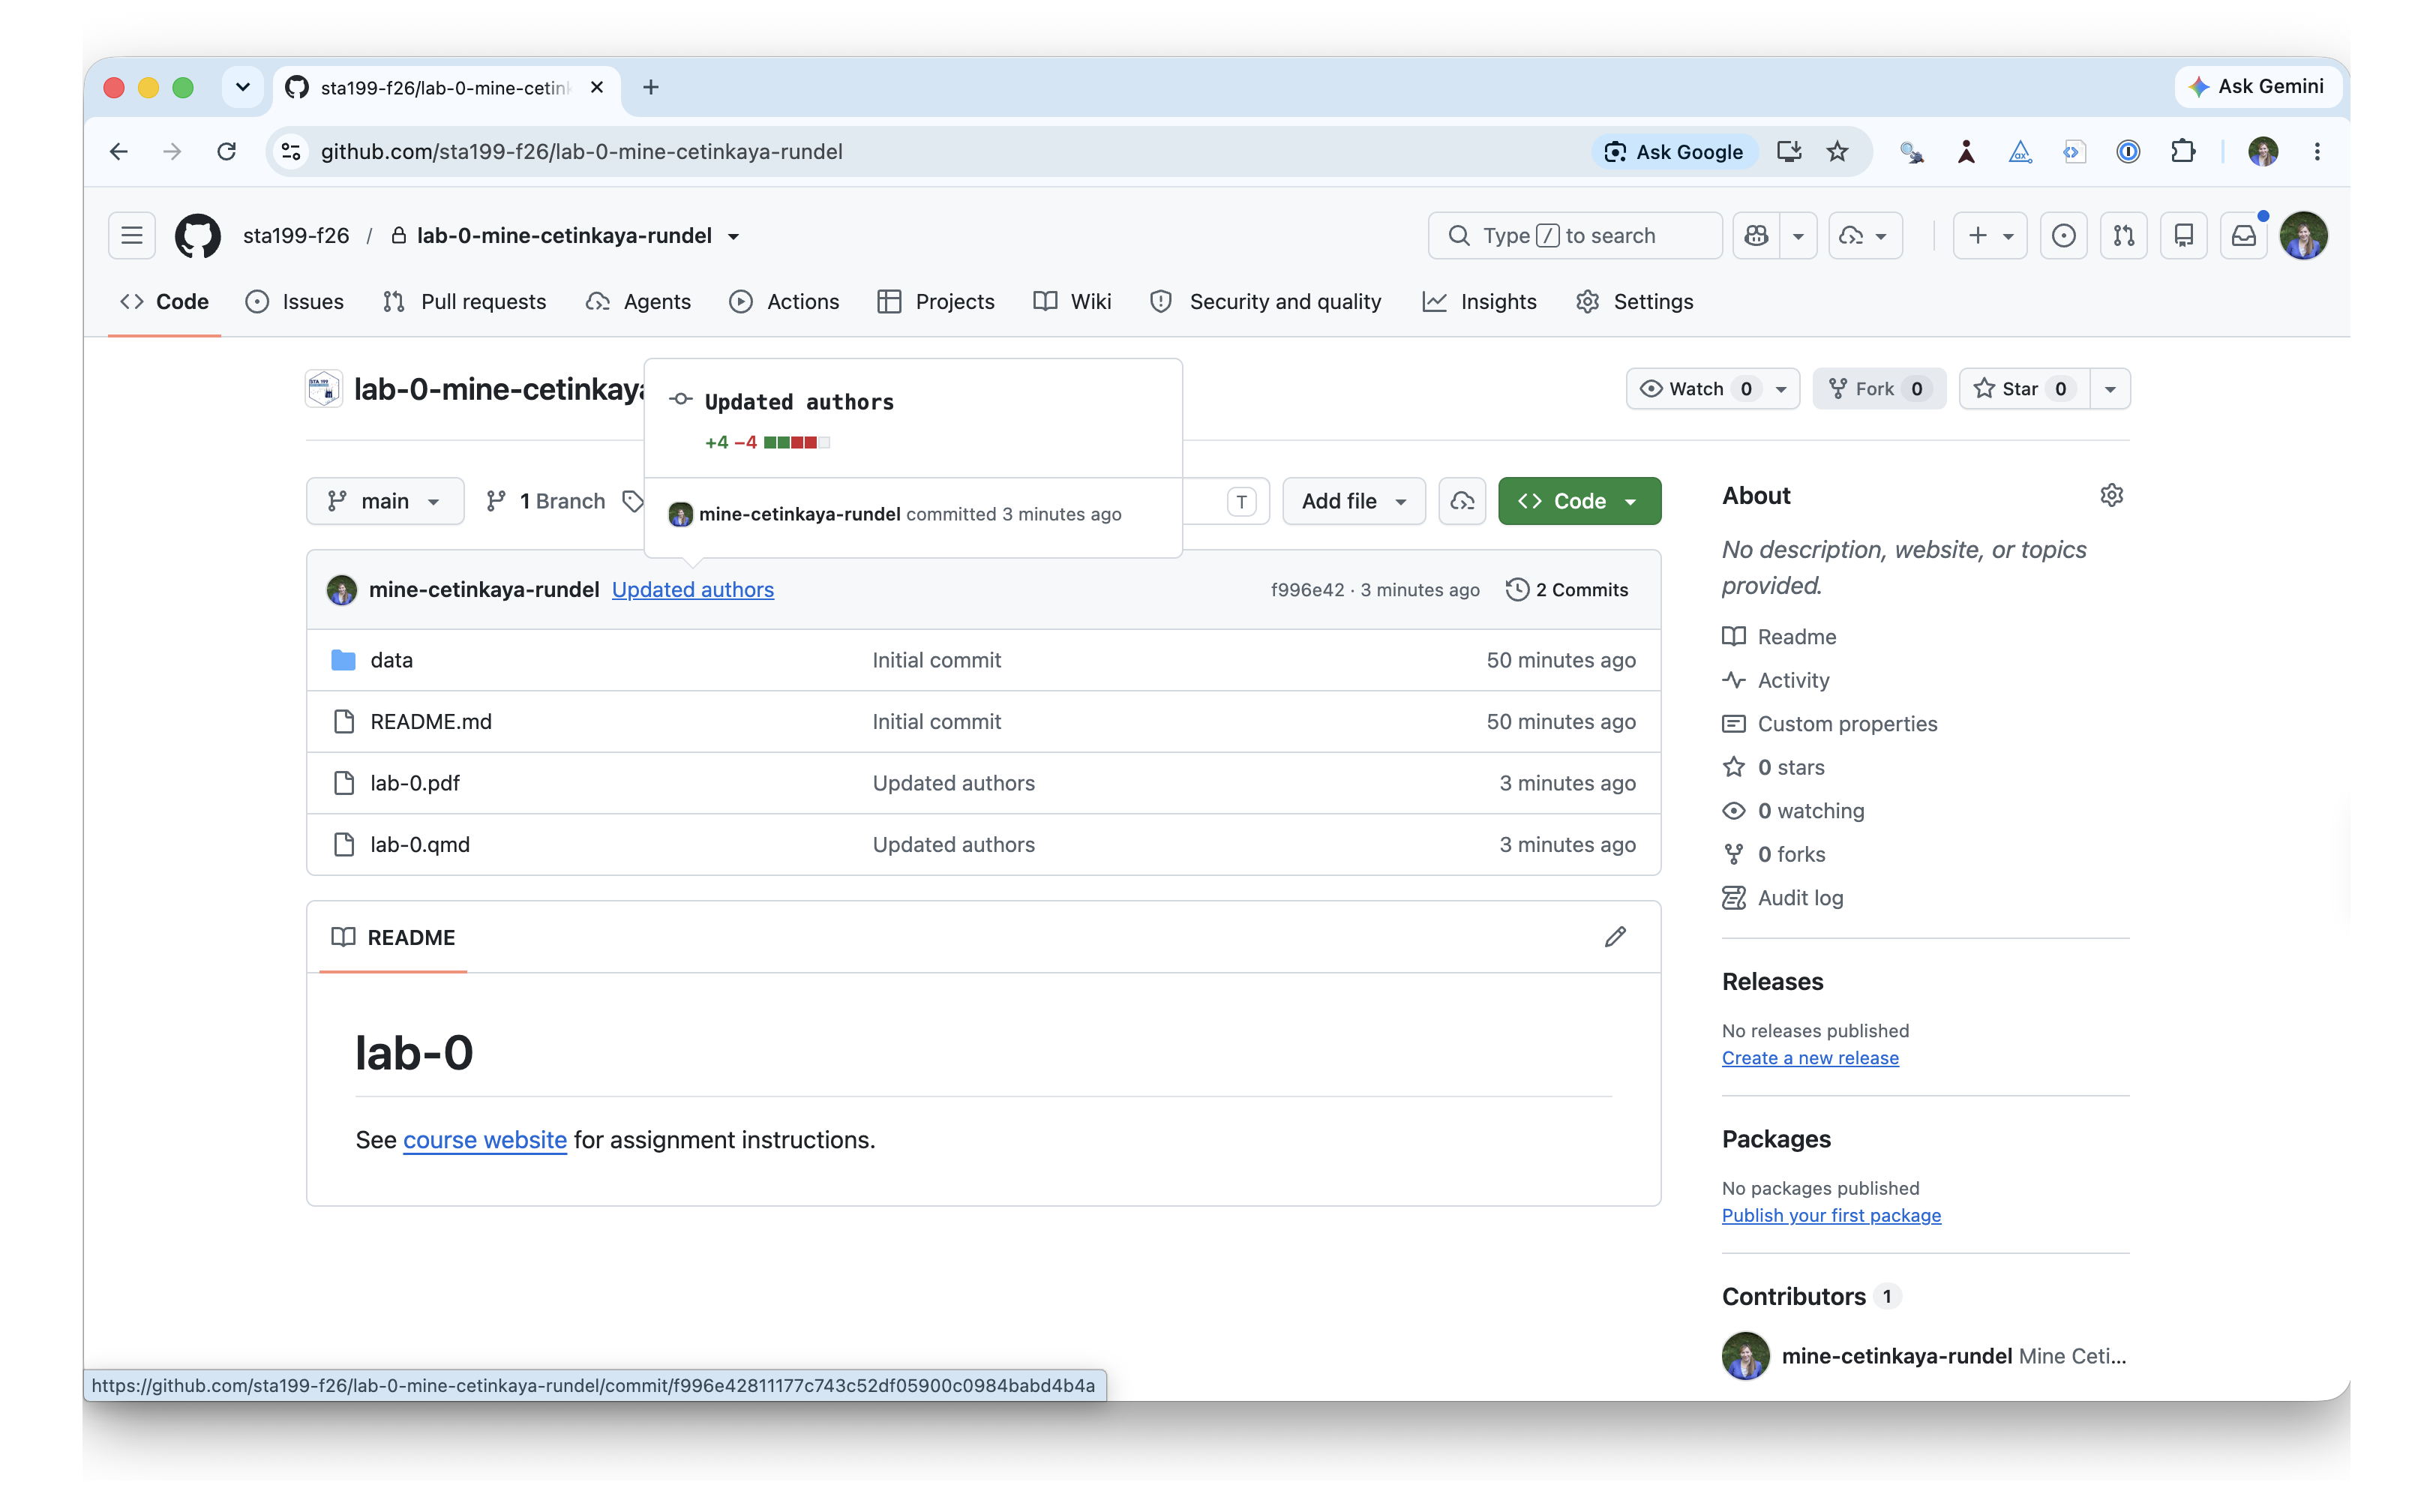
At this point, you’ve taken a snapshot of your changes, but they are still only in your local Positron container. To get them to GitHub, you need to push them. To do so, click Sync Changes.
Now if you go back to your repository, you’ll be able to see your changes there. Voila!
Work with data
To finish up the lab, you’ll work with data from the course Getting to know you survey and answer two quick questions.
Question 1
The data is in the data folder of your repository, in a file called getting-to-know-you.csv. You’ve already learned in lecture how to view a CSV file in Positron and how to read it in R. The code for doing so is already in the lab-0.qmd file, so you just need to run it.
- What does each row in the dataset represent?
- How many rows and how many columns does the dataset have?
Question 2
Take a look at the data in the data viewer to get to know the variables in the dataset. As a team, come up with a question you might want to answer with these data.
Once you’re done, commit and push your changes to GitHub.
Submit your work
As a last step, submit your PDF file to Gradescope. You can do so by going to the course Gradescope page, selecting the Lab 0 assignment, and uploading your lab-0.pdf file.
-
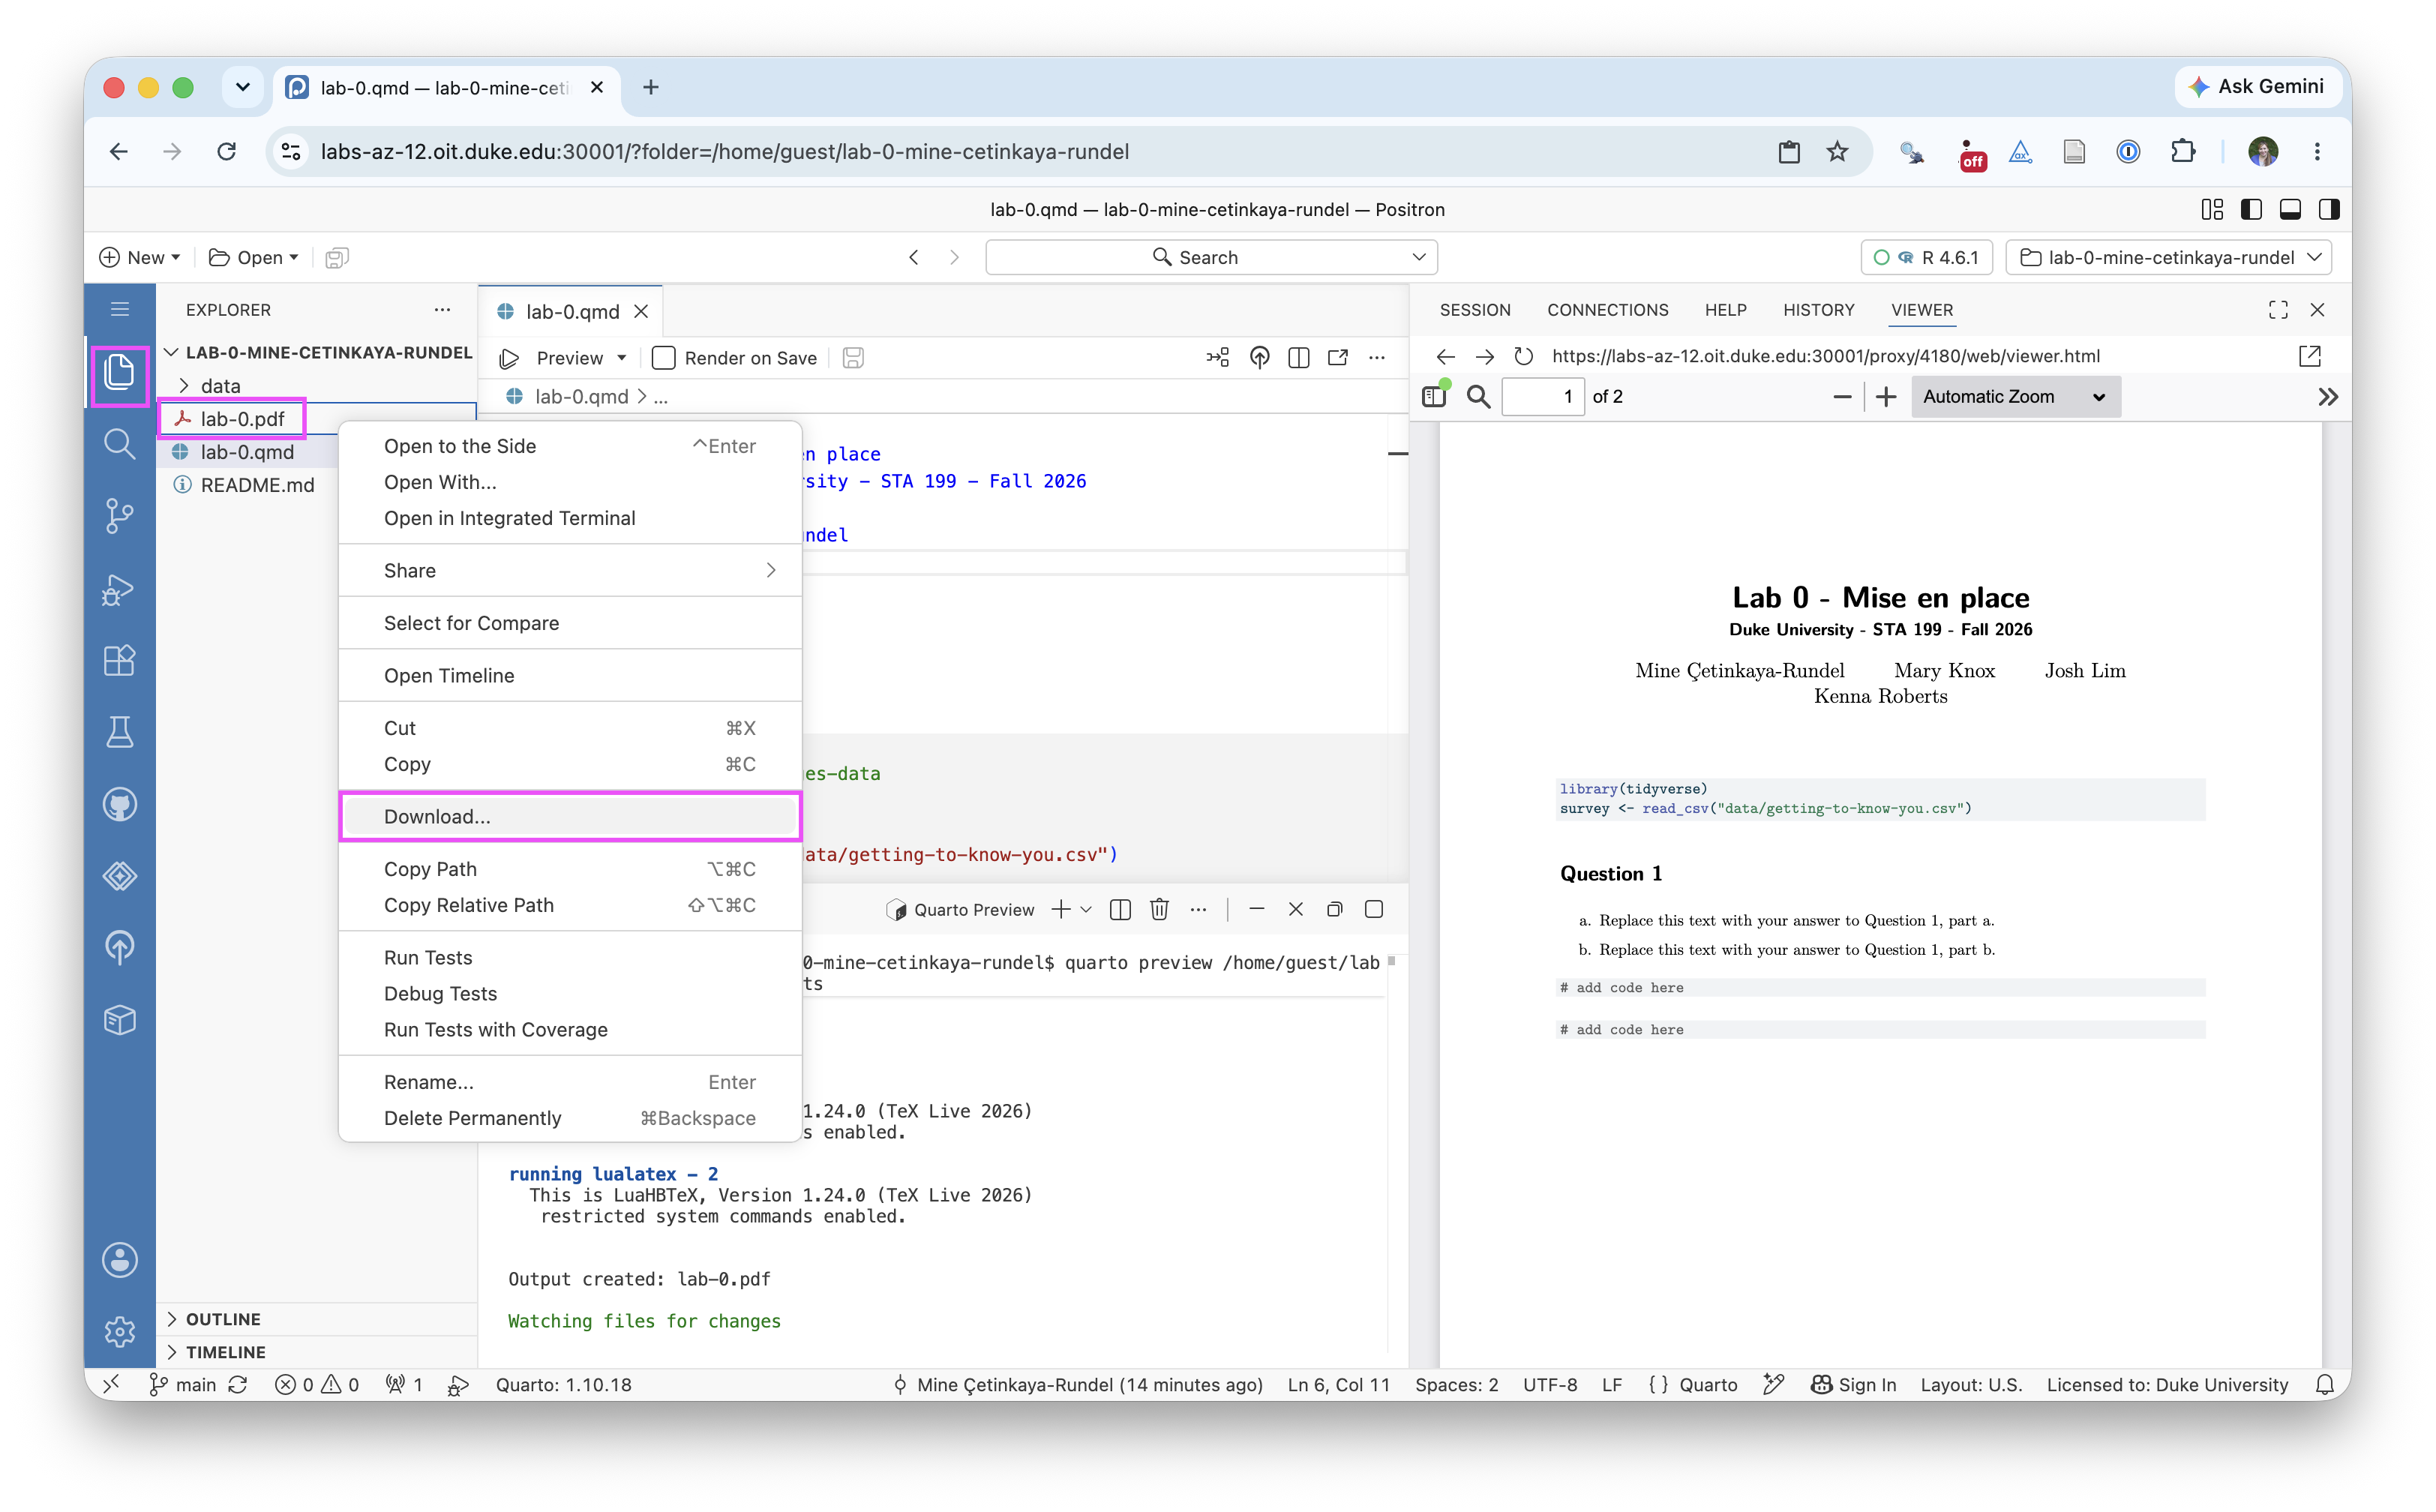
Step 1: Right-click on
lab-0.pdfin the Explorer pane and click Download.
- Step 2: Find the downloaded file on your computer (likely in the Downloads folder) and upload it to Gradescope!
Fantastic job, now go take a well deserved break!
This lab is not graded
But do your best to complete it, and if you can’t, submit what you have. This will allow us to give you feedback on your process and workflow before your first graded lab.
Footnotes
Yes, it’s too many steps. I don’t know why! But it works, and you’ll get used to it. Trust me, it beats downloading and installing everything you need on your computers!↩︎
Well, a more accurate statement would be that we will be reaching out to you to get things right during the first few weeks of classes. But, it’s best if you can get it right today!↩︎